M
madmax1970
Hi
Does any one have a diagram or can email me one, any help please
Does any one have a diagram or can email me one, any help please

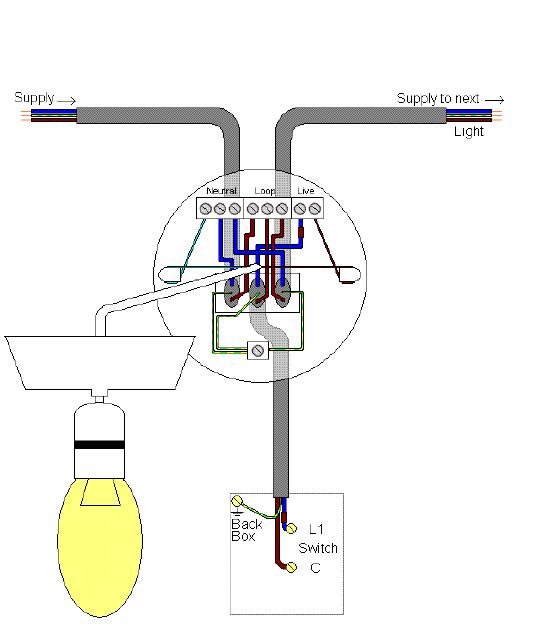
What a load of rubbish - the most common method to to loop into and out of the ceiling rose that is what it is designed for - standard wall plate switches are not.These days it's more common to loop in at the switch box, so there is only one cable at the ceiling rose. It makes connecting and fault finding easier because it reduces the need for a pair of steps.
So you create extra work, deeper box, rather than use the equipment available to do the job correctly.And make sure you use a deep box, 25 mm min.
What a load of rubbish - the most common method to to loop into and out of the ceiling rose that is what it is designed for - standard wall plate switches are not.These days it's more common to loop in at the switch box, so there is only one cable at the ceiling rose. It makes connecting and fault finding easier because it reduces the need for a pair of steps.
You will still need step ladders to reach the ceiling to install the cable there and the ceiling rose.So you create extra work, deeper box, rather than use the equipment available to do the job correctly.And make sure you use a deep box, 25 mm min.

Riveralt, You 'seem' to hate the idea, why?
Riveralt, You 'seem' to hate the idea, why?
Cos he thinks theres only one way to skin a cat, due to his lack of experience and imagination.
Riveralt, You 'seem' to hate the idea, why?
Cos he thinks theres only one way to skin a cat, due to his lack of experience and imagination.
Sorry, that makes no sense at all. Can you try again, but this time actually say what it is you're trying to do, and what your question is.
Not around here there not. I have no problem in mixing and matching as the design of the circuit requires - but I don't make rash assumptions about the type of circuit I am dealing with without further information.Riveralt in fairness, 95% of the new builds I've been near are all loop in / out at the switch.
I don't hate the idea, I never said that - though the idea of having to dig a deeper hole for a 25mm back box rather than a standard 16mm does tell you that there is more work involved than necessary taking that option.You 'seem' to hate the idea, why?
If you need to find a tradesperson to get your job done, please try our local search below, or if you are doing it yourself you can find suppliers local to you.
Select the supplier or trade you require, enter your location to begin your search.
Are you a trade or supplier? You can create your listing free at DIYnot Local