Damp patch in bottom corners of windows!

Joined
19 Feb 2015
Messages
46
Reaction score
0
Location
Lancashire
Country
United Kingdom
Hi guys, hope this is the right place for this post!

I bought a 1960's house this year that we've completely renovated, it has UPVC windows throughout but I don't know how old they are! (not ancient, but not brand new)

We've had some plaster work done and now today after the first heavy rain this year I have little patches of 'Damp' in a corner of almost every window in the house!

I can't see water leaking or running down anywhere on the inside. There's some pics attached to show what I mean!

Can anyone suggest some things to remedy this? I hope it's not serious as I can't afford anything major
 

Attachments

  • image.jpg
    image.jpg
    71.5 KB · Views: 6,632
  • image.jpg
    image.jpg
    56.8 KB · Views: 10,664
  • image.jpg
    image.jpg
    64.7 KB · Views: 4,918
  • image.jpg
    image.jpg
    68.9 KB · Views: 5,307
Sponsored Links
Lots of possible causes but a few main ones spring to mind.
Firstly the obvious check the sealing around the outside of the window.

Next before the plastering were there trims around the windows that were covering a gap in the plaster? If so its possible that you have bridged the internal/external walls allowing moisture to soak through.

The third most likely problem is that the ends of the window cills haven't been sealed, This could be more of a problem to rectify. Is the outside of the house brick or rendered?
 
I will check the seals properly at the weekend. The only trim that was there, is still there. He's just skimmed up to it. What do you mean about sealing the cills?

There is an upstairs bay that's rendered, the rest brickwork. Happening in them all though.

Thanks!
 
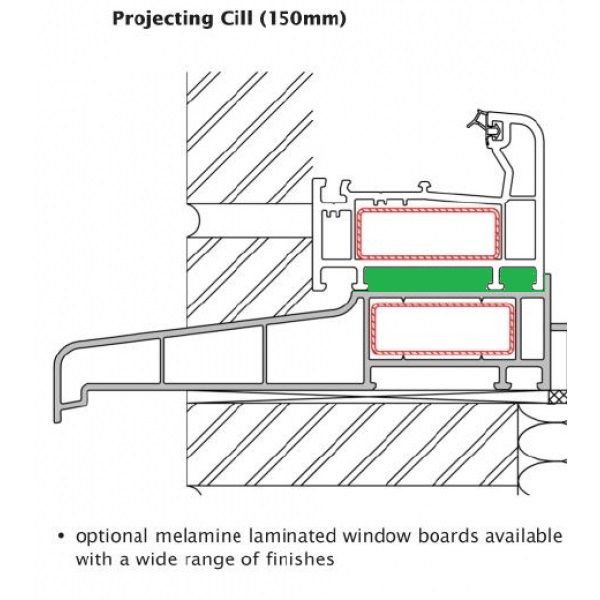
150-cill-600x600_zps21d75a5d.jpg


This can be a common problem when windows and doors are fitted by someone who didnt really know what they were doing. When fixing a window down to the cill (assuming of course you have external PVC cills) you need to seal along the back edge of the cill and the 2 ends of the window, This prevents driven rain from getting up between the window/cill and running out of the ends into your cavitys and internal walls.

See the area shaded green in the picture.
Assuming this is the problem brickwork makes rectifying it more difficult. If it was rendered you could just break off some external corners to be able to get a sealant gun to the 2 ends.

Post some pics of the outside and check the outside sealant first.
 
Sponsored Links
Hi Gaz, thanks again for your reply it's helping me out a lot!

The green shaded area is where the unit meets the sill? These should only be sealed at each end I take it? Can this be done with the unit in place?

I also have these plastic trims on the inside, do they need to be removed to make sealing easier?

I'm not a complete pleb but don't know anything about UPVC or window fitting at all!

here's some pics from outside (Abit dark I know)
 

Attachments

  • image.jpg
    image.jpg
    70.8 KB · Views: 4,507
  • image.jpg
    image.jpg
    55.1 KB · Views: 4,373
  • image.jpg
    image.jpg
    70.1 KB · Views: 5,017
Hi Gaz, thanks again for your reply it's helping me out a lot!

The green shaded area is where the unit meets the sill? These should only be sealed at each end I take it? Can this be done with the unit in place?

I also have these plastic trims on the inside, do they need to be removed to make sealing easier?

I'm not a complete pleb but don't know anything about UPVC or window fitting at all!

here's some pics from outside (Abit dark I know)

First off were there any obvious gaps in the sealant outside?

The problem I described above is the worst case scenario. The window and the PVC cill are separate items and when fitted the back of the cill and the 2 ends should be sealed before placing the window on top and screwing it down.

Usually if the cills haven't been sealed at the ends the oly way to fix it is to remove the window but if all your windows are trimmed outside like those photos you may be lucky. Your going going to have to take off the side trims and take some more pics (assuming as above you haven't noticed any obvious gaps in the sealant that could be causing the leaks)
 
Hi again, thought the problem was fixed after I sealed some small gaps on the outside, but it's comeback with the recent rain. I've took a side trim off upstairs where it seems to be worse, and here are the pics..... I can feel cold air coming through so that's obviously not right. Also there is plaster all the way upto the window frame. Is that right?

It looks too like there's abit of a gap where there's no silicone at the bottom of the frame, is it as easy as putting silicone down there?

Thanks again!
 
Did some more digging and got some loose silicone out and now I can see daylight!! Where would you suggest I seal? All the gaps?
 

Attachments

  • image.jpg
    image.jpg
    83.7 KB · Views: 6,007
  • image.jpg
    image.jpg
    60.2 KB · Views: 5,415
  • image.jpg
    image.jpg
    67.3 KB · Views: 5,603
Damp patches in the corners are caused by lazy fitters who don't run a bead of silicone along the sill. Here's one we had to sort a few weeks back. A builder friend who claimed he knew what he was doing, installed the returns of the bay on the wrong side as well
As Gaz said you need to get some silicone on the ends of the sill, rain will continue to drive in between the window and sill and make its way to the end, if the sealant isn't there it will soak into the wall.
If you can't get it in from outside then the plaster will have off, unless you can unglaze the window remove the bottom screws and prize the window out slightly
image.jpg
 
Great pic and explanation from DH there. As I said you may be lucky if all the outsides are trimmed the same as the one you posted a while back. You will be able to take the trims off, Seal the ends of the windows/cills then put the trims back and reseal.
 

DIYnot Local

Staff member

If you need to find a tradesperson to get your job done, please try our local search below, or if you are doing it yourself you can find suppliers local to you.

Select the supplier or trade you require, enter your location to begin your search.


Are you a trade or supplier? You can create your listing free at DIYnot Local

 
Sponsored Links
Back
Top