Hearth reconstruction

Joined
2 Feb 2024
Messages
39
Reaction score
0
Country
United Kingdom
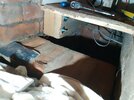
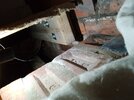
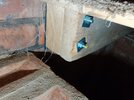
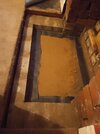
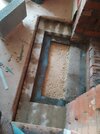
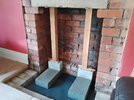
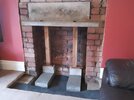
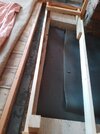
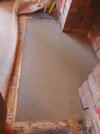
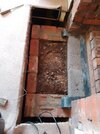
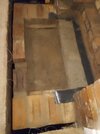
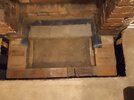
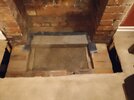
Hi. I'm rebuilding my hearth and trying to install some sort of dpc/DPM. There is a bitumen dpc running in the main wall and I have managed to rake out a little of the joint above this to allow me to insert some dpc sheet. I've attached some pics which show where I'm at. Basically my next step will be to infill the central area with sand so it's flush upto the brick work then apply a membrane across the whole area. I will then shutter the edges and cast concrete upto floor level. I know it's not 100% correct as I've obviously not got the specified dpc overlaps (will have a about 60mm min). But I think it's the best I can do in the situation. I'm basically I novice and am open to constructive criticism so just posting on here to see if anyone can a assure me I'm roughly in the right track or b tell me I'm doing it all wrong. Thanks in advance
 

Attachments

  • IMG_20240220_101323_797.jpg
    IMG_20240220_101323_797.jpg
    399.3 KB · Views: 28
  • IMG_20240220_173150_694.jpg
    IMG_20240220_173150_694.jpg
    242.4 KB · Views: 30
  • IMG_20240220_174358_899.jpg
    IMG_20240220_174358_899.jpg
    333 KB · Views: 29
  • IMG_20240220_174407_502.jpg
    IMG_20240220_174407_502.jpg
    359.8 KB · Views: 31
Sponsored Links
Morning,
I’m assuming your floor is concrete that your building the hearth on, if so has it already got dpm under it? You only really lay sand on dpm when installing insulation in there.

If it’s a concrete hearth and you want dpm there’s no issue just fill it with concrete ontop of the dpm… id of maybe used liquid dpc in this scenario.

Will look nice when you’ve done, don’t forget to add finished pics :)
Best wishes Jake
Hi Jake thanks very much for the reply.so The bricks that you see in the picture extend down (into the void under the floor) for about 1m and are basically just built on top of earth so there is no actual DPM/dpc.
 
Ah ok that makes more sense, then way I’d of done is type 1 , layer of sand , dpm, concrete or self Leveln g.

Ideally your dpm should lap
Your dpc
Regards
Jake
 
Sponsored Links
Ah ok that makes more sense, then way I’d of done is type 1 , layer of sand , dpm, concrete or self Leveln g.

Ideally your dpm should lap
Your dpc
Regards
Jake
Thanks again. Yes I'll do sand before dpm then concrete in top. I'll get lapping on all dpc to dpm joints (might not actually get what regs say but I'll take my chance lol) glad to hear that I'm roughly on the right track as had a bit of a slating on another forum basically saying I was making a right **** up
 
people are too decent in this group to speak to others like that, if you’re doing it wrong then they usually suggest a different way and explain why your way wouldn’t work… the idea of asking questions is to find out the right way to do something!

I’m fairly confident if you get stuck on other projects or even later on with this one just keep posting your questions.

There’s some
Really knowledgeable
People On here
Like woody, noseal and
Many more who have helped me
Out numerous times and would
Take their comments as
Gospel.

Just crack on with it and take pride in what your’e doing.
Best wishes
Jake
Your reply is very much appreciated thanks again
 
Just an update on my work as may help someone else. Not really sure if I'm doing things exactly by the book and always happy to receive advice or pointers. The 2 joists which originally sat embedded into the hearth are now cut back and chemical stud fixing into brickwork. The lower fixing in one of the joists pulled into the wood a little as it was still a little soft even after cutting back but the joists are now rock solid
 

Attachments

  • IMG_20240302_195433_597.jpg
    IMG_20240302_195433_597.jpg
    318.8 KB · Views: 21
  • IMG_20240302_195509_609.jpg
    IMG_20240302_195509_609.jpg
    308.9 KB · Views: 22
  • IMG_20240302_195549_402.jpg
    IMG_20240302_195549_402.jpg
    368.5 KB · Views: 19
Last course of brick now in and damp proof. Just need some membrane for the central area. Then going to pour concrete to bring to floor level. As before I'm a complete novice just doing what seems the best way so any advice is always welcome
 

Attachments

  • IMG_20240306_194151_114.jpg
    IMG_20240306_194151_114.jpg
    325.5 KB · Views: 15
  • IMG_20240306_145754_236.jpg
    IMG_20240306_145754_236.jpg
    400 KB · Views: 14
Little update.got the dpm in place and now all ready to pour concrete up to floorboard level.
original lintel was poorly fitted. think they must have realised last min that the lintel was too short for the opening so stuck a couple of overhanging bricks in(suppose regs were very different in 1930s) suppose it's lasted like this for nearly 100 year but I've fitted another lintel while it's open
 

Attachments

  • IMG_20240312_132720_191.jpg
    IMG_20240312_132720_191.jpg
    372.6 KB · Views: 17
  • IMG_20240312_132737_320.jpg
    IMG_20240312_132737_320.jpg
    344.2 KB · Views: 17
  • IMG_20240318_170137_026.jpg
    IMG_20240318_170137_026.jpg
    234.7 KB · Views: 15
Finally got round to gettin the concrete in.floor is a little uneven and wanted to get the hearh nice and level so built a little frame to give myself a guide to work to
 

Attachments

  • IMG_20240408_105824_337.jpg
    IMG_20240408_105824_337.jpg
    322.9 KB · Views: 7
  • IMG_20240408_170927_555.jpg
    IMG_20240408_170927_555.jpg
    391.8 KB · Views: 8

DIYnot Local

Staff member

If you need to find a tradesperson to get your job done, please try our local search below, or if you are doing it yourself you can find suppliers local to you.

Select the supplier or trade you require, enter your location to begin your search.


Are you a trade or supplier? You can create your listing free at DIYnot Local

 
Sponsored Links
Back
Top