Herringbone hearth

Joined
31 Aug 2005
Messages
4,064
Reaction score
369
Country
United Kingdom
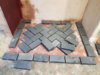
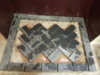
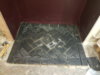
Morning all this is my Sunday project. Not done one before :)
Any tips appreciated here. Going to use 4:1 mix sim consistency to brick laying. Putting in a string line front to rear on center line to square up pattern and place by eye all blocks from middle out. Finish with cuts. Which look fun on them solid looking bricks going to clamp timber to block for my mitre cuts on them as I'm us8ng angle grinder with diamond wheel. Anyway thoughts appreciated!
 

Attachments

  • 20181021_085334.jpg
    20181021_085334.jpg
    288.4 KB · Views: 134
Sponsored Links
I doubt mortar is going to bond well to the nice shiny tiles already in place.
 
thanks was one of my worries dare say I need to dig them all up first and lay a flat bed? Any other options? I have log burner man due here next Sunday to install.
 
It depends on how accurate you want it to look.
Best way is to lay out the bond on a flat surface or board. You can either mark the border on the board or lay out the bricks and then mark the lines on the bricks.
Make sure the pattern is kept both vertical and horizontol and the angles at 45 degrees.
When you are happy with the dry layout, take the bricks and lay to the lines and check the angles.
 
Sponsored Links
leave the red tiles in place.
use a straight edge/level to draw square-off lines onto the red tiles.
use spacers to keep the square-off lines a spacer distance fro the walls of the opening.
dry set the outside perimeter tiles to the square-off lines.
then draw diagonal lines from the inside corners to inside corners inside the perimeter tiles.

start working out from the centre of the diagonals to dry lay all your herringbone bricks including cuts - use spacers.
then useing powdered tile adhesive start lifting and gluing from the front edge row of perimeter tiles.
work back into the opening gluing all the perimeter tiles only an following your set-out lines.
only butter the backs of the bricks not the red tiles - it will keep the bricks clean.

now begin buttering and setting the bricks from the centre working out to the perimeter rows of previously set bricks.
12/24 hrs later grout the bricks with whatever you want to use - sand an cement would be good.

why are the skim beads left bare?
 
Dont use spacers. These are variable bricks not precision tiles and the difference is taken up in the joints.

Do what Stuart says. Lay the bricks dry, mark the edges and do the cuts. The pattern needs to be centred and symmetrical, and all the cuts [of the same shape] should be of similar size and angles.

Lay the bricks on the cement mortar bed (which will stick to those tiles) with no mortar joints. This allows you to allign things. Point up after its all set.

Use a weak acid to clean the bricks afterwards as no doubt they will be stained.
 
Chaps thanks so much for your advice here v much appreciate gonna take on board and start later will post some pics back after cheers.
 
Ok here we go some progress. Lessons learnt don't let mix get too wet. First few blocks I laid sagged few mm. Keep working in diagonal and front back checking level overall. Rubber mallet and small and long level essential. Obvious to you veterans I know. This is my first floor laid with blocks on mortar.
Doing all cuts tomorrow night had enough this takes alot of skill to be perfected I have a way to go..
 

Attachments

  • 15403301593897557149125465807498.jpg
    15403301593897557149125465807498.jpg
    422 KB · Views: 98
The thing with blue bricks is that you want as little water in th emix as possible, and dont want to mess with them once laid. No tapping or banging or even staring at them. Lay them, gently adjust and then as my old instructor would eloquently put it "Leave the ****ing things alone".
 
Looking good festive. You can see how difficult herring bone can be with bricks of slightly different sizes. Keeping the bricks lining up at 45 degrees in line with each other is a challenge. On larger areas once you start losing the angles it gets worse as you go along.
 
The thing with blue bricks is that you want as little water in th emix as possible, and dont want to mess with them once laid. No tapping or banging or even staring at them. Lay them, gently adjust and then as my old instructor would eloquently put it "Leave the ****ing things alone".

Absofkin right I had to tinker with a few mind you good old advice from your master. Wouldn't be allowed to say that now.
 
Looking good festive. You can see how difficult herring bone can be with bricks of slightly different sizes. Keeping the bricks lining up at 45 degrees in line with each other is a challenge. On larger areas once you start losing the angles it gets worse as you go along.
Cheers Stuart done the cuts tonight..pic attached. Clean blocks n grout Tom night.

I could of done the bottom right a bit tidier but hey it's the kids room so not gonna lose sleep. Yep had to actually cut the side off one block or it would of gone way off. Laying a hole floor unless They were engineered blocks I would of been screwed

Tell you what fck working with cement dust too much. Hideous stuff. I'm an IT worker by trade although an engineers son I prefer cars welding wiring plumbing etc are much easier for me.
 

Attachments

  • 20181024_200945.jpg
    20181024_200945.jpg
    364.9 KB · Views: 86
festive,
thats why you work to lines an use powdered adhesive. why give yourself problems workin with sand and cement as an adhesive?
thats why you dry fit an cut the material on the work surface itself
the spacers are just to give roughly equal gaps for the grout joints - you remove them with the adhesive still wet an use a short straight edge to boss the grout lines straight.

the above works with porcelain tile or rough edge brick or even curly-whirly edged tiles.
 

DIYnot Local

Staff member

If you need to find a tradesperson to get your job done, please try our local search below, or if you are doing it yourself you can find suppliers local to you.

Select the supplier or trade you require, enter your location to begin your search.


Are you a trade or supplier? You can create your listing free at DIYnot Local

 
Sponsored Links
Back
Top