Loop wiring driving me ..... well, loopy

Joined
12 Sep 2010
Messages
8
Reaction score
0
Location
Manchester
Country
United Kingdom
Hello All,

Right, im trying to replace the ceiling roses for the upstairs lights.

Set up as follows

3 Bedrooms
Bathroom
Landing area

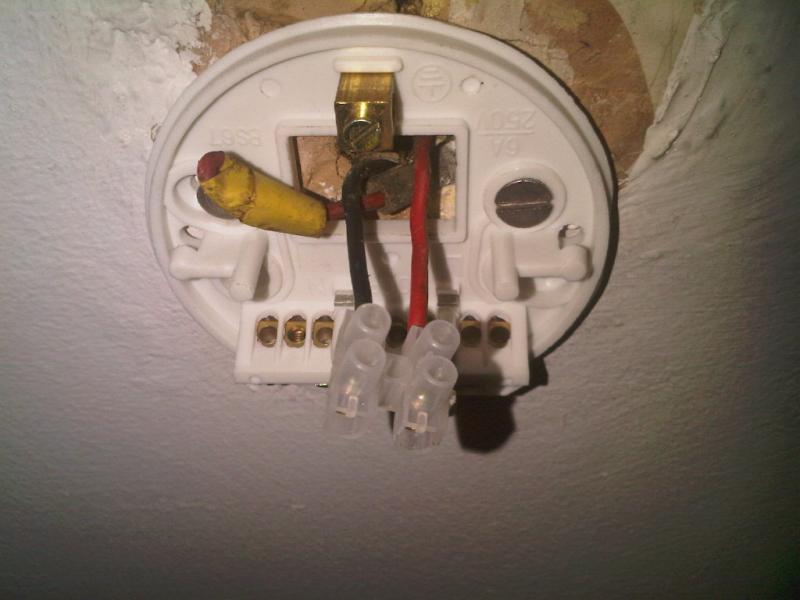
Master bedroom, Bathroom and landing all have just one live wire and one live neutral wire (all old colours: black and red)
2 other bedrooms have loop wiring (all old colours; black and red)

Replaced ceiling rose on landing fine.
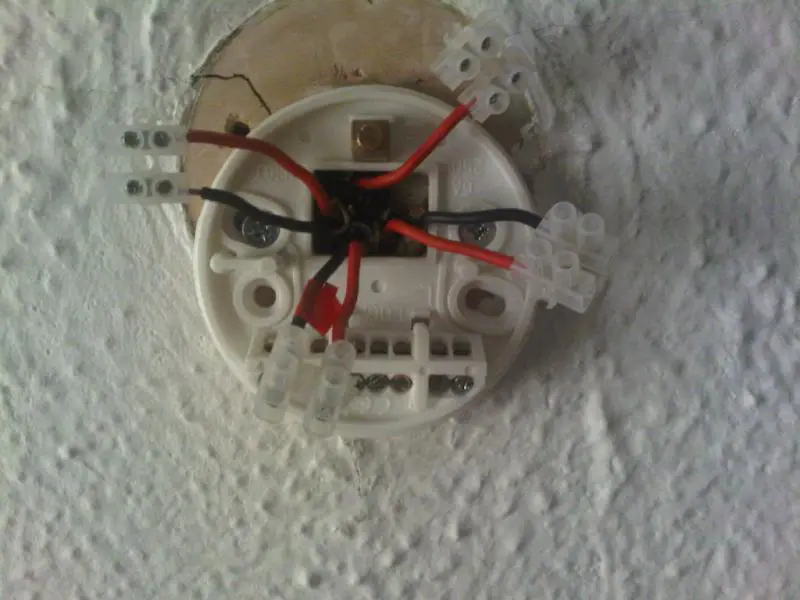
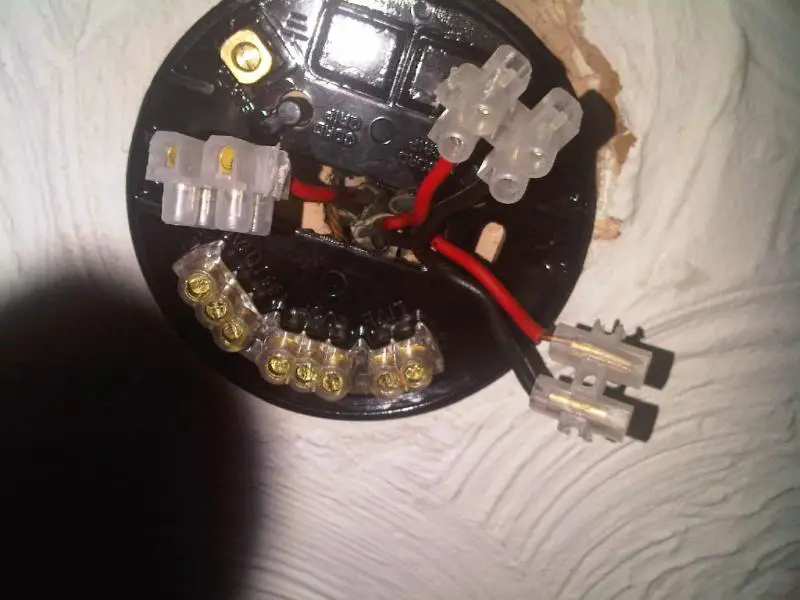
Replaced ceiling rose in spare bedroom and noted 3 black wires and 4 red wires. Paired red and black and noted which was the switch cable (used a multimeter to confirm the switch)

Wired rose as advised and now none of the other lights are working upstairs apart from the one in the one spare bedroom.

Checked fuse box and all fuses are ok.

Checked other wiring and they dont appear to be in a circuit and multimeter not picking up a circuit.

What is the best way to find out where the circuit is broken? The wiring is in the lift (attic) however being a total newbie to loop wiring how does one go about checking the loop wiring and or replacing cabling?

Thanks
 
Sponsored Links
I take it there's no cpc (earth wire)?

Are any of the fittings or switches Class I (needing an earth connection)?

I assume M Bed and landing and bathroom have all been successfully replaced, as they each only have a two-wire connection?

If this is the case, you need to focus on the two rooms with more than two wires at the fitting.

Using safe isolation, disconnect them all from the fittings and from each other.

Put terminal blocks on the ends of all the wires.

Use a multimeter on continuity to check which cables feed the switches. Mark these clearly as switchwires.

Now re-energise and test with multimeter on appropriate voltage setting to discover which of the cables is live.

That should tell you what is left, which ought to be the loop out connections to other parts of the circuit.

With this information, you should be able to successfully reconnect all fittings & complete the circuit.
 
Correct, there are no earth wires ... (i know the house could do with rewiring but thats for another day)

Yes, Mbed, landing and bathroom all replaced ok. (however lights now not working)

S/Bed 1 which is working i did note have a spare live wire on its own (does not appear to be a neutral (black) wire with it. Have noted on this light which is the switch cable.

S/Bed 2 which is not working does not appear to have a switch cable on it as the multimeter is not picking up a circuit.
 
Correct, there are no earth wires ... (i know the house could do with rewiring but thats for another day)

Wow!

You know the installation needs rewiring yet you have gone ahead with what I expect is an entirely cosmetic exercise of replacing accessories - nobody replaces ceiling roses with ceiling roses.

You have identified that the circuits in question do not have circuit protective conductors. There is a clue in the name of those conductors as to their purpose. (And, by the way, it's been a requirement for those circuits to have them since 1966.)

Then you've come on here and more or less told us you don't know what you're doing?

Brave fella!

By the way, you need to understand why Securespark asked this:
Are any of the fittings or switches Class I (needing an earth connection)?

And another thing I noticed. From:
S/Bed 2 which is not working does not appear to have a switch cable on it as the multimeter is not picking up a circuit.
it would appear you are working live.

But that's okay - nobody ever died from electricity, did they?

http://www.amazon.co.uk/Edison-Elec...=sr_1_1?s=books&ie=UTF8&qid=1284314760&sr=1-1

(It's a cracking read... he gets killed in the end)
 
Sponsored Links
If one light is working and the others aren't, it suggests that the working light is the first on the circuit, and the power is not reaching beyond that one - hence the problem is at or soon after that fitting. This is the basic operation of a radial circuit. If you haven't got a good grasp of that then I suggest you're better off leaving well alone and getting in someone does.

PJ
 
Dingbat, thanks for the constructive reply (and thanks for spoiling the ending of the book you recommended.)

If no one replaces ceiling roses with ceiling roses anymore what do people use? As for the cosmetic approach this is a cheap and cheerful fix until i can get someone in to rewire the property.

PJ, yes i do have basic grasp of radial circuits and realise that for whatever reason it is not reaching outwards to the other lights on the circuit. If you have any suggestions as how to best find out where it is breaking down would be much appreciated.

Thanks
 
PJ, yes i do have basic grasp of radial circuits and realise that for whatever reason it is not reaching outwards to the other lights on the circuit. If you have any suggestions as how to best find out where it is breaking down would be much appreciated.

Suggest you start with the spare bedroom rose, as that's the one that you changed just before everything else stopped working. Although you say you used a meter, I can only assume that you've made a mistake with the wiring, or a screw isn't tightened properly/conductor snapped.
 
Thanks for that.

The only difference between that s/bed rose (working) and the other s/bed rose is that there appears to be one more live cable than the non working rose. There is no neutral cable (black) with this.

The working rose has 3 pair of cables and one spare (4 x red, 3 x black)

The non working rose has 3 pair of cables (3 x red, 3 x black)

Looking at the diagrams on this site would it be better to change from a ceiling rose to a housed chockbloc? (as they seem a lot easier to ascertain which cable goes where)
 
Looking at the diagrams on this site would it be better to change from a ceiling rose to a housed chockbloc? (as they seem a lot easier to ascertain which cable goes where)

No, you still wouldn't know where to put each individual wire regardless of the type of terminals used. You say there's a spare wire, is this disconnected? Was it disconnected before you changed the rose?

As stated, pictures would be helpful.
 
Just as an aside the landing light is on a two way switch. One switch downstairs and one on landing.

This just has the two wires from one cable (1 x red, 1 x black) however there does to be another red cable which appears to be folded over on itself and taped off (looks like its never been connected)
 
Dingbat, thanks for the constructive reply (and thanks for spoiling the ending of the book you recommended.)
Oh, it's not spoiled. It's a damned good read - as long as you don't get the copy I have with about 100 pages missing in the middle! ;)

If no one replaces ceiling roses with ceiling roses anymore what do people use? As for the cosmetic approach this is a cheap and cheerful fix until i can get someone in to rewire the property.
I am amazed and applaud that you are not replacing your ceiling roses with Class I fittings from Korea/China/India like the majority of punters on this site. But if it's economy you're after, why not leave the old ones in place and leave the wiring undisturbed and working until that rewire takes place? (Remember, that rewire is probably twenty years overdue)

But the earthing is still an issue. Are there metallic parts on any light fittings that need earthing? Are your light switches screwed into metallic back-boxes? Having undertaken alterations to a circuit you now assume a certain amount of responsibility for re-energising a circuit which may not be safe.

A little knowledge can be a dangerous thing.
 
Ding - I might give the book a whirl then (hope its not got the missing pages in the middle) .. The light fittings are cheap and cheerful plastic with the only metal being the screws :)

As for starting the job in hand ive got the mrs to thank for that who decided to spruce the place up. (hindsight is a wonderful thing)

The wiring has been paired off for illustration purposes

s/bed1 - 4 lots of cabling. Switch cable marked with red tape. One cable only has one red wire and no black wire.


s/bed1 - 3 lots of cabling paired off.


Landing - 1 set of cabling. The wiring here was straight into a block as shown. Note the red wire bent over and taped off. This was already like this and not touched by myself.

 
Well it all looks relatively basic. In your first photo I would expect all reds to go together in the loop terminals (you'll have to double up on one of the terminals). The black marked with red tape will need to go to one of the two terminals on the right, and the neutrals into the left set of terminals.

In the second picture you'll need to identify the cable that goes to the switch and then wire as per above, minus the extra red.

In the third picture the red and black need to go to the far left and far right terminals. The taped up red should probably stay that way.

It might be a good idea to check that the taped up red doesn't actually end up in the rose in your first picture, as if it does, it would be better not to be connected rather than remaining live but isolated with tape.

P.S. I'm pretty sure I can see some earths twisted together in the ceiling above the rose.
 

DIYnot Local

Staff member

If you need to find a tradesperson to get your job done, please try our local search below, or if you are doing it yourself you can find suppliers local to you.

Select the supplier or trade you require, enter your location to begin your search.


Are you a trade or supplier? You can create your listing free at DIYnot Local

 
Sponsored Links
Back
Top