C
Craig Inskip
Hi All,
I know there are plenty of threads about this but I still can’t seem to hit this one on the head. I had an LP522 in place in my new house and am trying to hook up a new Nest to it
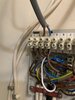
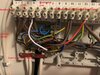
I have a swapped out the cables as per all instructions
LP522 L - Heatlink L
LP522 N - Heatlink N
LP522 1 - Heatlink 4 (hot water off)
LP522 2 no cable
LP522 3 - Heatlink 6 (hot water on)
LP522 4 - Heatlink 3 (Heating on)
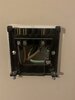
The thermostat downstairs I have disconnected, added the nest (no neutral) and connected the T1 and T2 to the wiring nest on 3 and 4 (3 contains the link to the thermostat and what looks like a link back to the heatlink - possibly CH On - 4 contains both the links to the thermostat link and to the 3 way motorised valve)
I’ve also tried the stat not wired in and just wireless with the old one wired up and set to full.
what I can’t get to work is the hot water. No matter what I try the relay doesn’t seem to click over. It has in the past.
move even had a replacement from nest as previously I had it working but if you called for hot water whilst heat was on it caused the heatlink to flip out and keep disconnected and ticking the relay.
has anyone got any ideas as I am pulling my hair out with this one
cheers
I know there are plenty of threads about this but I still can’t seem to hit this one on the head. I had an LP522 in place in my new house and am trying to hook up a new Nest to it
I have a swapped out the cables as per all instructions
LP522 L - Heatlink L
LP522 N - Heatlink N
LP522 1 - Heatlink 4 (hot water off)
LP522 2 no cable
LP522 3 - Heatlink 6 (hot water on)
LP522 4 - Heatlink 3 (Heating on)
The thermostat downstairs I have disconnected, added the nest (no neutral) and connected the T1 and T2 to the wiring nest on 3 and 4 (3 contains the link to the thermostat and what looks like a link back to the heatlink - possibly CH On - 4 contains both the links to the thermostat link and to the 3 way motorised valve)
I’ve also tried the stat not wired in and just wireless with the old one wired up and set to full.
what I can’t get to work is the hot water. No matter what I try the relay doesn’t seem to click over. It has in the past.
move even had a replacement from nest as previously I had it working but if you called for hot water whilst heat was on it caused the heatlink to flip out and keep disconnected and ticking the relay.
has anyone got any ideas as I am pulling my hair out with this one
cheers