New floor for conservatory.

JBR

Joined
9 Jan 2007
Messages
9,329
Reaction score
1,772
Location
Cheshire
Country
United Kingdom
New floor for conservatory.

My wife is demanding that we have a new floor in our conservatory. There is already a wooden floor (solid wooden boards) which is in good condition. I have suggested sanding this down and staining it a darker colour (which is one of her requirements), but she's not happy with that - the boards 'aren't wide enough'!

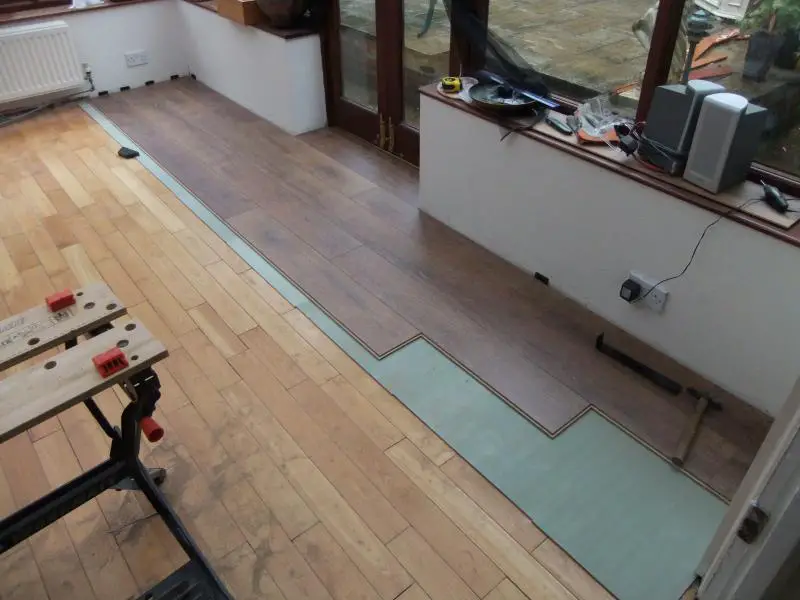
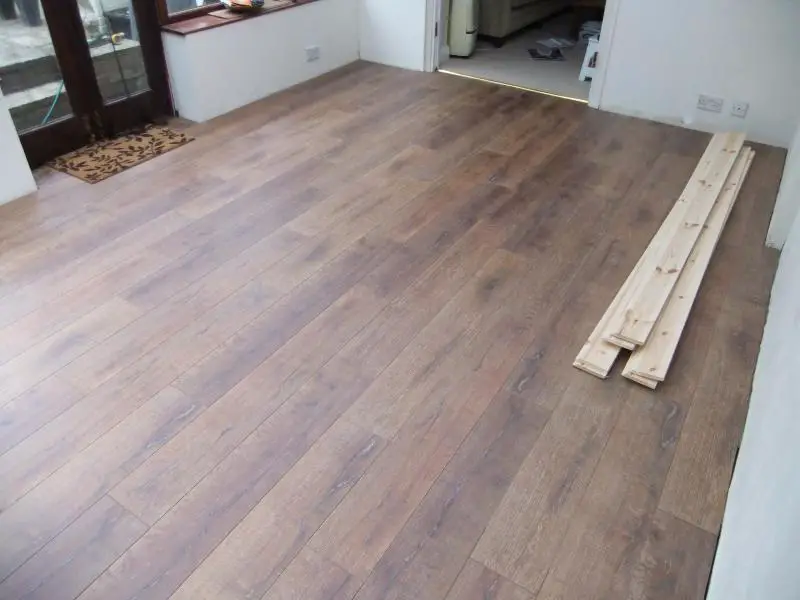
Now, being a dutiful husband, I have agree to do the work, but I'd like to retain the existing floor and lay the new one on top.

Should we get solid wood, engineered wood or laminate? Of course, I have already 'googled' all the pros and cons of each for general use, but not sure which to choose for our specific situation.

Also, if we are laying on sound wooden floorboards, should be first put down some sort of underlay?

I'd be grateful for any advice.
 
Sponsored Links
I'd avoid solid as it will be a nightmare in such extremes of humidity and temperature.

Engineered will look great but highly susceptible to damage from sunlight.

Good quality laminate like Pergo (if it's wide long board reports look at the 74911 range http://www.pergo.com/en-gb/Consumer/Products/Laminate-floors/?type=Wood ) will be very stable, very easy to live with and highly resistant to fading as well as being hardwearing and easy to clean etc.
 
Thanks Crazydaze.

This confirms what a couple of other people have told us, so we'll go for a good quality laminate. We had a look at some today and the good textured ones are really almost indistinguishable from real wood. Also, laminates are generally cheaper than wood or engineered wood, so if and when the time comes to replace, it won't break the bank.

I presume it will be best to use some sort of underlay.
 
It will have to be fitted on an underlay, most laminate will have a premium underlay recommended in the range, so go for the 4-6mm fibreboard underlay option. Or, if your looking at Pergo, they do a product called Quick Heat which replaces the underlay option with an electric underfloor hearing system that plugs into a regular wall plug socket and has a wireless thermostat and heat control just for the one room.
 
Sponsored Links
Thanks again. We've been looking around and the only place we could find some laminate whose colour suits my wife was at Topps Tiles.

It's Vintage Embossed Auburn, 12mm thick, glueless interlocking, and with 6mm underlay. Not the cheapest, but it does look the part. It's guaranteed for 15 years which might well see me out!

I'll have to take the internal doors off and either shorten them or replace them, but the 18mm will bring the floor level up to that of the living room. Also, we'll get some of those soft pads to go under furniture and a decent doormat for the outside entrance.

I've been trying to work out how to stagger the boards and have come up with a layout with almost no waste (offcuts being used at the opposite ends of different rows), but then I thought that if it's going to look like real floorboards laid on joists, the ends of the planks in alternate rows should be in line with each other as if they were placed over the joists. I know that structurally it doesn't matter, but would you bother for appearances sake?
 
When laying a floating floor, you can't plan out wasteage!!!!!

Firstly, when you set the first row out, you'll need to cut the leading edge off the floor so that the install runs true to the room, not the skirting. The skirting will not be perfectly true. When you see the instructions you will see that you need to 'third' the boards. First board will be 1/3 of a board to start, then as you finish that row and start the next, you'll use a 2/3 board approx, the third row will start with a full board.

If you brickwork the boards it will look awful and far too uniformed in appearance, the pattern won't be mixed enough etc.

To work out how much you need, work out the exact m2 of the floor area, then add 5-8%, then divide this by the pack size and round up the number of packs required.

15 years is a very average guarantee for laminate flooring.
 
No, I hadn't expected to eliminate all wastage, just to keep it to the minimum.

I'm afraid I don't understand what you mean by "cutting the leading edge off the floor so that the install runs true to the room", though. I have removed all the skirting boards, and will be laying out the boards with a 10mm gap at each wall for expansion. I assume that if I need to leave that sort of gap for expansion, there is the possibility of a similar amount of contraction so I could end up with a gap of up to 20mm, or doesn't it work like that?

Your method of staggering the boards is almost exactly what I had initially planned, except I was going to start with a full board, then 2/3, then 1/3 (120cm, 80cm, 40cm). I suppose that's just as acceptable. I think you're right about appearance; no-one is going to look at it and say they're not in line with the joists, anyway!

Yes, I did pretty much as you suggest: measured the exact area and added 10% then rounded up.

We'll have to live with the 15 year guarantee as that was the only colour my wife would accept!

I thank you again for your invaluable advice.
 
When you take the skirting off, you'll be left with your wall, which will almost certainly be out of true with the house, so, when you lay your uncut planks along the first row, you will see that in areas the gap will be more than 10mm and in other areas less than 10mm. The trick is to scribe the first row, in connect it, cut the scribed area off, and you'll have a more even 10mm edge.

When you unpack the flooring, you'll notice that the design of each board will repeat, so stack the different designs together and with a three row stagger you will be able to ensure that you don't get two boards the same next to each other.your guests won't notice, but you probably will! :)

If you have allowed 10% you should have plenty.

The number of customers that plan out how much flooring they need by scaling up the room on graph paper and drawing each plank on individually, usually in brick work pattern is unbelievable, apologies for assuming that this is how you'd planned the install!!!
 
Ah, now I see what you mean. Yes, of course it is very unlikely that the walls will be perfectly true.

I have to confess that I did plan it out on paper, but just as an initial guide and to give me a rough idea of what it might look like. I didn't use the plan to work out the required material, though, I measured the area and added 10%.

I don't know how accurate the manufacturer's published width measurements of the boards are. I'm thinking it might be best if I lay (single) boards across the floor temporarily from one wall to the other to make sure I don't end up with a final space that is too narrow to cut a board.

Your advice about stacking the boards of the same design together is very helpful. I'm not sure how many there will be of each, but I assume each pack will contain several different ones. If they were all the same it would look a bit naff.

Thanks once again.
 
The board design repeat will vary by pack, there's normally not that many different designs, if you are fitting without skirting a especially, you won't need to worry too much about the last row, it's the slipping under the door frame ( if there is a door frame on your last wall which there usually is although being a conservatory that may not be the case, you need to cut the bottom of the architrave out) to get a neat job that will be the fiddly bit.
 
The only door frame is in one of the 'short' sides where there will only be board ends. I had thought of cutting the ends of the couple of boards that will meet the jambs with a jigsaw to match the profile rather than cutting off the bottoms of the jambs. I'm not sure which would be easiest. There is also the matter of having to join the (click fit) boards by lifting, inserting and lowering. Trying to do that under the jambs would be difficult.

Edit: I'm just thinking that, as these board ends will be visible (all the others will be hidden by the skirting boards) I might be best using a junior hacksaw - very carefully!
 
The floor should be fitted under the door frame If at all possible, a 10mm gap at the bottom filled etc always looks messy and isn't best practice really, things like that are always a dead giveaway as to wether a floor has been pro fitted or not.
 
Yes, I see your point. If I don't leave a gap next to the jamb there will be no provision for expansion.

I suppose I could 'click fit' that board and then tap it until the edge disappears under the (cut out) jamb, assuming that is possible. Is this easy to do, or should I apply some sort of lubricant beforehand?

I'm sure this is the sort of thing you meant when you advised that trying to draw accurate plans is inadvisable.
 
New floor completed, in case anyone is interested. Just a couple of fiddly bits under door jambs. Wife happy.


Thanks for your advice.
 

DIYnot Local

Staff member

If you need to find a tradesperson to get your job done, please try our local search below, or if you are doing it yourself you can find suppliers local to you.

Select the supplier or trade you require, enter your location to begin your search.


Are you a trade or supplier? You can create your listing free at DIYnot Local

 
Sponsored Links
Back
Top