Oak Banister Filler showing through varnish

Joined
29 Dec 2020
Messages
10
Reaction score
0
Country
United Kingdom
Hi All,

Had an oak banister installed by carpenter. He filled main bits with this Ronseal light oak filler. Said i had to do the rest as they dont fill every hole.

Anyways i brought the same filler and started filling any holes etc. Sanded it back and applied Ronseal Light Oak Satin Varnish. As its dried i can see the bits that were filled. What have i dont wrong?

Any help would be appreciated...
 

Attachments

  • 20211113_154506.jpg
    20211113_154506.jpg
    230.7 KB · Views: 164
  • 20211113_154501.jpg
    20211113_154501.jpg
    290.7 KB · Views: 158
  • 20211113_154449.jpg
    20211113_154449.jpg
    206.3 KB · Views: 161
Sponsored Links
Personally I would have salvaged some sawdust at the time of making the banister and mixed it with PVA
Maybe used some tinned filler underneath?
Then fine sanded the top layer.
 
Well i have a piece left over i can try and make saw dust out of it. How do i make good of what i have? Go over it with another filler or sand it out? Ive just seen a Ronseal oak coloured filler.
 
I've had some success in the past by painting white powder filler with artist's watercolour paint mixed to match the wood colour, then clear varnish on top. Needs a test run on scrap wood first, as the painted filler tends to darken a bit when varnished.
 
Sponsored Links
My experience says that is not a good way to cure the problem. When applying any filler you use a very flexible stopping knife (one where you've rounded off the outside corners on a stone, or even the back step - plastic spatulas, whilst somewhat less flexible, are less likelyvm to mar the work) and you always apply the very minimum so that it doesn't spread all over the work 
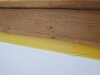
and into the grain as has happened here. If needs be an area to be filled can be stopped, sanded, stopped again and sanded again and so on to build-up filler. The OP has seemingly put great big gobs of filler onto the surface and spread it, then not sanded it back sufficiently. The filler is also the wrong colour - just because it says it is medium oak on the tin doesn't mean that the wood from the tree will comply. As a natural material wood tends to vary a lot in shade, so it may be necessary to mix 2 or 3 colours to get something approaching a reasonable match, but even that doesn't work completely because all finishes get absorbed into bare wood and change its' colour ,(mostly darken it) - whilst they don't get absorbed into filler (or for that matter sawdust and PVA, which is why that is a inadvisable, too) and they will generally stand out like a sore thumb unless you either tint it in afterwards (e.g. with something like Konig tinting pens) or mix the filler to be slightly darker and the correct tone (and sometimes more yellow or more red) in the first case. Without extra work filling is always a bit of a hit and miss approach

Whilst it goes without saying that as far as possible joints in clear finish work should always be as tight as possible (to reduce the amount of filling required), some filling is inevitable. A better approach, therefore, is NOT TO FILL before finishing the material, but to apply the lacquer first then go over small areas to be filled with a coloured repair wax such as Liberon or Konig. In my experience a light to medium oak may require wax sticks in light oak, medium oak, Jacobean oak (dark, to mix for knots), walnut (also for knots), mahogany (if any pinkish tinging is required) due to colour and tone variations and it may be necessary to have axdditional colours such as light pine or maybe antique pine (if a more yellowish hue is required). You don't just rub the wax against the area where the filler is required - instead you warm up the waxes gently (I generally use a mug of hot water), scrape off some flakes of wax and roll them into a small ball (a few millimetres across) between your fingers. Add extra colours as required to get nearer to the colour needed, but always aim for a colour which is slightly darker (because oak will go more golden and darken with age AND a stopping which is a little too dark will be less obvious than one which is too light). The warmed wax is pressed into the crack or gap with the stopping knife, taking care to reduce the amount of spread to the bare minimum, and left to harden for a few minutes. Then the excess is removed by the stopping knife (for re-use) and the area burnished with a coarse cloth.

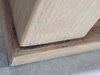
Where dowels or plugs (over screws) are used there are often a different colour to the surrounding wood (lower dowel):

Dowel in Oak.jpg


The only way to deal with this is to tint in either with a water-based stain (weakened, built-up with several coats) or by judicious use of the tinted touch-up paints. In the photo above the use of an inappropriate colour of filler (and over filling) is very obvious - the filler is lighter than the oak and possibly a bit too red. Doingbthis the dowel will still be visible, but should be less obvious

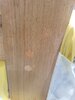
With open pore hardwoods such as ash and oak it is essential to understand that any filler will sink into the grain and be hugely visible when the finish is applied, hence the need for caution. Sawdust and PVA are a terrible solution on visible at eye level work, in part because they tend to get everywhere but also for the reasons stated above. They get used on floors (although even there there are many better solutions), but a floor is almost always 5ft or more away from the viewing point (your eyes) and in any case people tend not to look at floors, whereas finished woodwork is a lot nearer to eye level and defects are a lot more noticeable. That is why a better technique is needed

How do i make good of what i have? Go over it with another filler or sand it out? Ive just seen a Ronseal oak coloured filler.
Gently sand-out the over filled areas with a relarively coarse sandpaper (P100 or P80) then refill or tint in depending on the defect (see above). Did the oak come pre-lacquered? If so a repair lacquer may be required to match the same sheen as the original (see Konig, again)

I've had some success in the past by painting white powder filler with artist's watercolour paint mixed to match the wood colour, then clear varnish on top. Needs a test run on scrap wood first, as the painted filler tends to darken a bit when varnished.
That's akin to the traditional technique in which ground whiting or plaster of Paris is mixed with water-based wood dyes and used to fill grain before finishing the timber. The only problem about using any water-based colouring agent is that they tend not to be light fast unless protected by a UV resisting lacquer
 
Last edited by a moderator:
@JobAndKnock

Thanks for the very detailed reply. The oak came unfinished. The over filling was maybe myself more than the tradesman. He didnt really guide me and just said fill as you normally would. So from what you have said shall i sand it with corse sand paper and refill using the wax you mentioned??
 
Last edited:
Sand back very, very gently with P80 only where the filler is (so not long strokes, the idea is just to remove the over-filled filler, nothing more). That should lift the worst of it out. The finish goes on before any wax repairs are done - otherwise the finish won't take to the wood. Has the stair been lacquered yet?
 
Lacquered? Im varnishing useing Ronseal Satin Varnishes. Im trying to match what we done on our oak doors. Because we wasnt getting the colour we wanted with just light oak we had to try medium and dark oak. So 2 coats of light oak, one of medium and then 1 of dark. To keep it the same as the doors thats what i intend on doing.

Ive only done the one coat of light oak yet.
 
Technically what is sold as a "varnish" these days isn't - it's a lacquer. So your "varnish" is more likely to be a polyurethane'based or acrylic-based lacquer. The wax (where you have gaps) is uses after the lacquer has been applied

As you've already put one coat on the following won't help, however, if you ever want to stain timber to match something else and you are starting with sanded wood it is easier to actually stain the raw timber with a water-based wood stain. This can be diluted and applied as several weak coats, instead of one heavy coat, to build to the depth of colour you require. Once the wood is dry it is denibbed (as water stain raises the grain) wiped off with a cloth dampened in white spirits (to remove any dust) and when dry it can be finifhed with clear lacquer
 
Ok so i sand all the bits where it stands out (Filler). Finish my lacquer coats and then use the wax stuff?
 
Also as you know what your talking about abit of the base rail it looks like has mould. How do i sort this? I tried a mould spray. Tiny bit on some tissue. Ive sanded as much as i could. Not sure how its developed tbh.
 

Attachments

  • 20211114_233138.jpg
    20211114_233138.jpg
    184.8 KB · Views: 83
  • 20211114_233145.jpg
    20211114_233145.jpg
    170.7 KB · Views: 83
If it is mould then the culprit has to be condensation, but you say you have tried a mould and mildew remover (which are fundamenmtally forms of bleach). The other possibility is that, as the timber is oak, there has been some form of iron/steel contamination and that what we are looking at is the result of a ferric metal, water and the natural tannin in the timber. Is this area finished? Is the black stuff trapped beneath the finish? Was steel wool used the clean the oak at any point? Is your finish water-based? Has the floor been mopped at any point?

I'm trying to ascertain contributory factors, hence all the questions. Either way one way to get the stains out is the treat the area with a solution of oxallic acid crystals in water, Decorators centres sell these, as do some chemists , eBay and Amazon. Wear a mask when using these and ventilate the house. The crystals are mixed in the ratio 1 part acid: 6 parts water, applied with a brush (a scrubbing brush, fingernail brush or old tooth brush can be used for tough/hard to reach bits), abd the timber is allowed to dry. For stubborn applications several applications may be necessary. When you have it clean sponge the area with water to remove any excessnacid and allow to dry again. Then denib

You may need to tint the timber after using oxallic acid, though, as it is a form of bleach. It is impossible to know if you will need tyo until you use the stuff
 
Id like to thank you for all your help.

This area is unfinished. It is the banister going into the loft. To make it easier i have a banister on the landing and then one going upto the loft. This is still unfinished as i tried the varnish on the lower balustrade to see how the filler would come out.

Never been mopped and neither have i used steel wool.

The banister has been installed for a year and been covered. Just getting around to finishing it now. Long story home renovation has been slow.

Ive tried sanding it with 120 grit sand paper. Thats the lowest i went but i can try 80/100.
 
A year is s long time to leave timber unfinished. Has your refurbishment included new plasterwork? If so that can release a lot of water vapour into the air which can condense on cold surfaces at night even if they are covered (as well as plastic covers retaining moisture and preventing it from evaporating)

Good luck with your job
 

DIYnot Local

Staff member

If you need to find a tradesperson to get your job done, please try our local search below, or if you are doing it yourself you can find suppliers local to you.

Select the supplier or trade you require, enter your location to begin your search.


Are you a trade or supplier? You can create your listing free at DIYnot Local

 
Sponsored Links
Back
Top