I'm currently fitting new windowboards around the house (slowly but surely).
After a fair bit of help and research I chose a method and set to task.
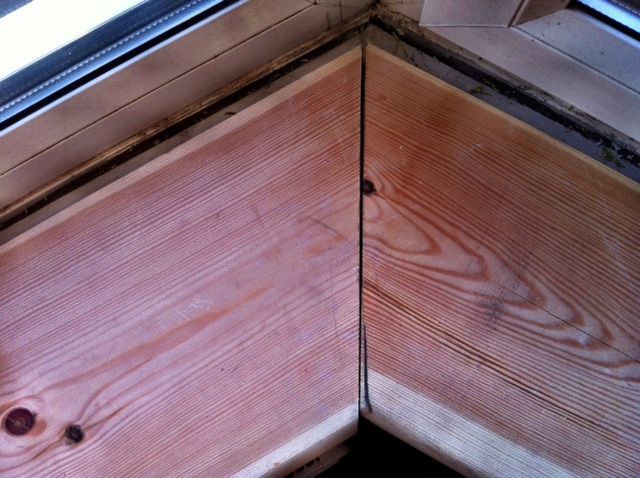
The old boards had been covered in UPVC, which in itself looked a bit of a rushed job. Unfortunately, the wood boards underneath were damaged by both the glue, nails (they were hammered into wedges in the masonry) and the bull noses had been hacked off.
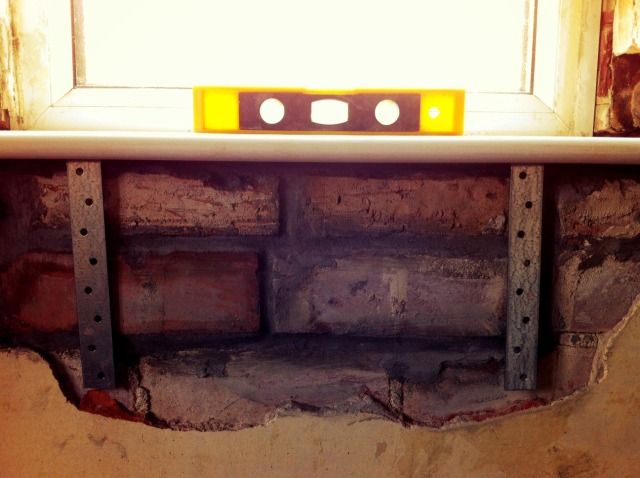
The brickwork underneath had partially collapsed, but I've now made this 'good'.
Issues where the inner leaf of bricks were higher than the outer (which the windows sat on) and there was only a small 'lip' of brick to secure anything on (the original boards were held in at the front via the wedges - must've been 'floating' at the back) - that 'lip' of brick is around an inch (sometime more sometimes less) and it's not at all level 10-15mm out in places.
So, the method/madness I used was:
* prime/undercoat board first
* attach batten/s (you'll see on the pic below there are two - I had some spare rough sawn battens but one wasn't enough to level with the front.
* screw in battens leaving a little bit of the screw head out so it grips better to the chosen glue/filler
* gripfill the rear board to the small lip of masonry
* window brackets for the front, using spacers to level up

Having never used gripfill before, I was starting to curse how c*ap it was...I held the back down a bit expecting it to hold firm after a few minutes...no such luck.
I'm really struggling to get the bloody thing level - I managed to get three sides level, but one was out...and those brackets are pain to secure...I guess the whole thing has to be level first, but once secured on (glue set) you can't take if off and mark and drill the holes - I'm sure those in the game can do this easily but I was having a fight with it.
So I googled setting times for gripfill and came up with this burst of joy post:
//www.diynot.com/forums/viewtopic.php?t=131223
First of all, I now realise gripfill has to cure (which overnight it has done very well) - the rear is now secure, I just need to gripfill the front right (and weigh it down whilst it sets again) and screw in the brackets.
But this plasterboard idea makes complete sense...I have a bay window to do next and PB'ing first would make it much, much easier (and level).
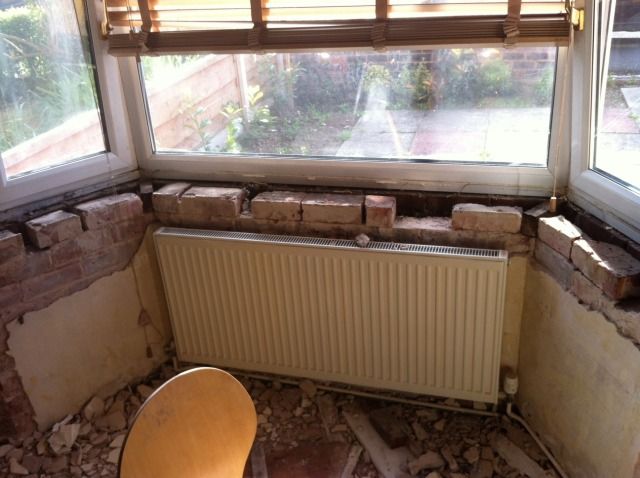
Bay window (pre made good!)
So - couple of quick questions:
1: Would you recommend I ditch the current brackets method (worth still adding them even with PB on)?
2: Use 12.5mm Plasterboard, using drywall adhesive (used this to PB a cavity above a new door frame last week and it's solid - love it)?
3: As I'll still have to use battens on the lower outer brick leaf, is it necessary to prime and undercoat these (they are rough sawn treated).
Honestly...it's been a revelation to read about this new method.
After a fair bit of help and research I chose a method and set to task.
The old boards had been covered in UPVC, which in itself looked a bit of a rushed job. Unfortunately, the wood boards underneath were damaged by both the glue, nails (they were hammered into wedges in the masonry) and the bull noses had been hacked off.
The brickwork underneath had partially collapsed, but I've now made this 'good'.
Issues where the inner leaf of bricks were higher than the outer (which the windows sat on) and there was only a small 'lip' of brick to secure anything on (the original boards were held in at the front via the wedges - must've been 'floating' at the back) - that 'lip' of brick is around an inch (sometime more sometimes less) and it's not at all level 10-15mm out in places.
So, the method/madness I used was:
* prime/undercoat board first
* attach batten/s (you'll see on the pic below there are two - I had some spare rough sawn battens but one wasn't enough to level with the front.
* screw in battens leaving a little bit of the screw head out so it grips better to the chosen glue/filler
* gripfill the rear board to the small lip of masonry
* window brackets for the front, using spacers to level up

Having never used gripfill before, I was starting to curse how c*ap it was...I held the back down a bit expecting it to hold firm after a few minutes...no such luck.
I'm really struggling to get the bloody thing level - I managed to get three sides level, but one was out...and those brackets are pain to secure...I guess the whole thing has to be level first, but once secured on (glue set) you can't take if off and mark and drill the holes - I'm sure those in the game can do this easily but I was having a fight with it.

So I googled setting times for gripfill and came up with this burst of joy post:
//www.diynot.com/forums/viewtopic.php?t=131223
First of all, I now realise gripfill has to cure (which overnight it has done very well) - the rear is now secure, I just need to gripfill the front right (and weigh it down whilst it sets again) and screw in the brackets.
But this plasterboard idea makes complete sense...I have a bay window to do next and PB'ing first would make it much, much easier (and level).
Bay window (pre made good!)

So - couple of quick questions:
1: Would you recommend I ditch the current brackets method (worth still adding them even with PB on)?
2: Use 12.5mm Plasterboard, using drywall adhesive (used this to PB a cavity above a new door frame last week and it's solid - love it)?
3: As I'll still have to use battens on the lower outer brick leaf, is it necessary to prime and undercoat these (they are rough sawn treated).
Honestly...it's been a revelation to read about this new method.