Remove defunct boiler timer / switch?

Joined
28 Mar 2022
Messages
5
Reaction score
0
Country
United Kingdom
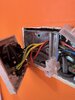
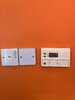
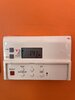
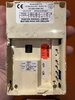
I've an old Danfoss wall timer which at one point in time controlled the on/off of the central heating to my combi boiler. Photos attached.

For about 5 years I've had no use to touch it as I've since had a wireless thermostat installed. (There's a receiver for that hooked into the boiler, and a standalone unit where I can control the temperature).

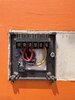
This old wall timer is therefore defunct. It's just always 'on'. As it's ugly I'd like to remove it completely, and cover the block terminal with a blanking plate or even bury the cables into the wall and decorate over it.

Is it possible for me to 'bridge' any of the cables in order to force an 'always on' state?

Bit of extra info:
With the timer removed from the wall, the hot water still works, but the central heating does not.
 

Attachments

  • IMG_3526.jpeg
    IMG_3526.jpeg
    148.7 KB · Views: 160
  • IMG_3527.jpeg
    IMG_3527.jpeg
    140.1 KB · Views: 211
  • IMG_3789.jpeg
    IMG_3789.jpeg
    283.2 KB · Views: 129
  • IMG_3791.jpeg
    IMG_3791.jpeg
    279.1 KB · Views: 116
Last edited:
Sponsored Links
I would remove the blanking plate and see if the wires from the programmer are fed from there.

Yes you can bridge, but there must be some thing to show where live wires are likely to be found, be it a blanking plate, or the programmer, so better to bridge at origin not at the programmer.
 
I would remove the blanking plate and see if the wires from the programmer are fed from there.

Yes you can bridge, but there must be some thing to show where live wires are likely to be found, be it a blanking plate, or the programmer, so better to bridge at origin not at the programmer.
I agree.

Brilliant if the joint's behind that blanking plate (which is also my guess).
If my assumption that the fused switch is for the boiler is correct and there are minimal cables behind the blank, it may also be possible with some careful chisel work to re-route that/them into the switch and do away with the blank and the programmer.

Can you remove the blank and send a pic please.
 
Thanks both of you, appreciate you taking a look - here's the view behind the blanking plate.

I must admit my first thought is "crikey where do I start" - but then I'm no sparky so maybe this is easier than it looks to me...
 

Attachments

  • IMG_3792.jpeg
    IMG_3792.jpeg
    224.1 KB · Views: 107
  • IMG_3794.jpeg
    IMG_3794.jpeg
    235.7 KB · Views: 110
Sponsored Links
Cool. Let’s see the wiring to the back plate of the programmer. There’s probably a screw on the underside to release the front panel.
 
In the first instance disconnect wires numbers 1, 2 & 3 and place wire 4 where 2 was.
upload_2022-3-28_17-39-11.png

That will isolate the cable heading to the programmer, it will then be safe to remove the programmer the ends of 1,2 & 3 need to be tucked safely and the easiest way to do that is place all 3 in the connecter block which has been made spare.

It does look feasible to reduce the double back box down to a single if you wish.
 
Is wire number 5 the same a number 6, is it connected to anything and is it in the same cable as number 4 ?
upload_2022-3-28_18-2-45.png
 
In the first instance disconnect wires numbers 1, 2 & 3 and place wire 4 where 2 was.
View attachment 265510
That will isolate the cable heading to the programmer, it will then be safe to remove the programmer the ends of 1,2 & 3 need to be tucked safely and the easiest way to do that is place all 3 in the connecter block which has been made spare.

It does look feasible to reduce the double back box down to a single if you wish.

Sunray you absolute legend. I carried out your instructions and it's worked perfectly; the ugly old timer is now off the wall and the boiler responds to the wireless thermostat just fine without it. Bless you!

Is wire number 5 the same a number 6, is it connected to anything and is it in the same cable as number 4 ?
View attachment 265517

Out of interest, wire number 5 is indeed the same as wire number 6, but it goes nowhere! It's just been sat there in the back box all these years, not even safely wired into a terminal block. It does have enough insulation around it to prevent the wire itself touching anything, but to be on the safe side I'll terminate it properly into a separate block.

Thanks again for your help, much appreciated.
 
Sunray you absolute legend. I carried out your instructions and it's worked perfectly; the ugly old timer is now off the wall and the boiler responds to the wireless thermostat just fine without it. Bless you!


Out of interest, wire number 5 is indeed the same as wire number 6, but it goes nowhere! It's just been sat there in the back box all these years, not even safely wired into a terminal block. It does have enough insulation around it to prevent the wire itself touching anything, but to be on the safe side I'll terminate it properly into a separate block.

Thanks again for your help, much appreciated.
You are welcome. Well done.
As I said it is quite feasible to reduce the double size box to a single size if you would like to tidy it further.
 
Depending on the source of the power to the double back box you could possibly change the back box to fit a double socket instead (less filling!)
 
Depending on the source of the power to the double back box you could possibly change the back box to fit a double socket instead (less filling!)
The FCU is still in use but yes a single socket instead of the blank will work providing this circuit is not spur off a ring.
Excuse the crudity but fitting a 13A socket in the right position really is as easy as this:
upload_2022-3-28_23-28-43.png

I will not recommend doing this unless the supply is 16A and not a spur from a ring, which will dictate a 2.5mm² supply cable.

Earth wires not shown for clarity.
 

DIYnot Local

Staff member

If you need to find a tradesperson to get your job done, please try our local search below, or if you are doing it yourself you can find suppliers local to you.

Select the supplier or trade you require, enter your location to begin your search.


Are you a trade or supplier? You can create your listing free at DIYnot Local

 
Sponsored Links
Back
Top