

Good morning,
I hope this is the right forum to ask about it.
My old kitchen hood (recirculating) has died, and as I could not find the exact replacement of the same dimensions (I foresaw the ensuing issues), I decided to replace it with an extractor fan. As there were some logistical issues with installing the duct etc. I have hired a "professional".
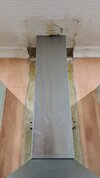
Long story short - I was left with a bit of a mess - bare wall, gap in the cornice and dirty, damaged ceiling. See the attached photo for details.
For the wall we are thinking to put colourful tiles along the hood, so that hopefully will not be an issue.
I wanted to ask for your advice on the cornice and the ceiling. What would be the best way to deal with the damage?
For the cornice - I was told I would have to buy a whole length and cut out matching pieces. That seems daunting and of course there will be still cracks etc to deal with.
Would working with gypsum/grout (can't remember what is it called), and adding layers once dry, possibly work?
Also - what would be the best way to deal with the ceiling (of course it, and the surrounding area will need a lick of paint) ?
Thank you for any/all ideas.
I hope this is the right forum to ask about it.
My old kitchen hood (recirculating) has died, and as I could not find the exact replacement of the same dimensions (I foresaw the ensuing issues), I decided to replace it with an extractor fan. As there were some logistical issues with installing the duct etc. I have hired a "professional".
Long story short - I was left with a bit of a mess - bare wall, gap in the cornice and dirty, damaged ceiling. See the attached photo for details.
For the wall we are thinking to put colourful tiles along the hood, so that hopefully will not be an issue.
I wanted to ask for your advice on the cornice and the ceiling. What would be the best way to deal with the damage?
For the cornice - I was told I would have to buy a whole length and cut out matching pieces. That seems daunting and of course there will be still cracks etc to deal with.
Would working with gypsum/grout (can't remember what is it called), and adding layers once dry, possibly work?
Also - what would be the best way to deal with the ceiling (of course it, and the surrounding area will need a lick of paint) ?
Thank you for any/all ideas.


") )
)