- Joined
- 25 Sep 2023
- Messages
- 5
- Reaction score
- 0
- Country

Hello all,
First off, apologies if this question is the very basics and has been answered several times. As a novice to DIY, I just wanted to double check that my planned approach to dismantling a light fixture is the safest/correct approach -- I just can't seem to find anything clear on Youtube specific to the UK unfortunately.
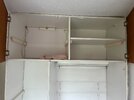
We're wanting to take down the wardrobe in the image attached, which would involve dismantling the light fixture. The light is powered by a wall switch. Rather than have this fixture dangling from the wall, I plan to dismantle the casing and cap off the wiring. This would be intended as a temporary solution before bringing in an electrician in a month or two for a batch of various jobs.
What I had in mind:
1.) Test Voltage pen works on known live wire and a known wire that is off
2.) Turn off mains power to property (in our case we have an older consumer unit which doesn't specify per-room supply)
2.b.) Tape down wall switch off, just in case.
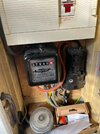
3.) Remove bulb/tube and dismantle outer light casing (I'm sure I don't need the mains power off for this but just in case)
4.) Test Voltage pen again on exposed wire in question to triple check it is off.
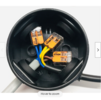
5.) Feed wires through a junction box
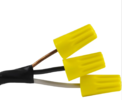
6.) Use electrical tape to cap off the ends of each wire. For a fixture like this I imagine there would be 3 wires, with the start of the loop instead occurring at the switch. However ... here's where I'm confused ... if there are 6 wires (2 x live, neutral, earth), am I supposed to cap off each wire individually; or connect each corresponding wire via a two-way connector e.g. wago? I probably wouldn't trust myself just yet with the latter.
7.) Make sure the junction box is secured
8.) Turn mains back on
Please do call me out on anything stupid or any major omissions in that list. I'm open to halting my plans and waiting on the electrician if needs be.
Thanks,
Danny
First off, apologies if this question is the very basics and has been answered several times. As a novice to DIY, I just wanted to double check that my planned approach to dismantling a light fixture is the safest/correct approach -- I just can't seem to find anything clear on Youtube specific to the UK unfortunately.
We're wanting to take down the wardrobe in the image attached, which would involve dismantling the light fixture. The light is powered by a wall switch. Rather than have this fixture dangling from the wall, I plan to dismantle the casing and cap off the wiring. This would be intended as a temporary solution before bringing in an electrician in a month or two for a batch of various jobs.
What I had in mind:
1.) Test Voltage pen works on known live wire and a known wire that is off
2.) Turn off mains power to property (in our case we have an older consumer unit which doesn't specify per-room supply)
2.b.) Tape down wall switch off, just in case.
3.) Remove bulb/tube and dismantle outer light casing (I'm sure I don't need the mains power off for this but just in case)
4.) Test Voltage pen again on exposed wire in question to triple check it is off.
5.) Feed wires through a junction box
6.) Use electrical tape to cap off the ends of each wire. For a fixture like this I imagine there would be 3 wires, with the start of the loop instead occurring at the switch. However ... here's where I'm confused ... if there are 6 wires (2 x live, neutral, earth), am I supposed to cap off each wire individually; or connect each corresponding wire via a two-way connector e.g. wago? I probably wouldn't trust myself just yet with the latter.
7.) Make sure the junction box is secured
8.) Turn mains back on
Please do call me out on anything stupid or any major omissions in that list. I'm open to halting my plans and waiting on the electrician if needs be.
Thanks,
Danny