Shoddy insulation in loft conversion

Joined
19 Oct 2016
Messages
17
Reaction score
0
Country
United Kingdom
We recently contracted a company to convert our loft into one single room. Long start short, many corners were cut, they didn't involve building control like they promised and lots of other lies. Things got so bad that I had enough and fired them mid job. I can't even pursue them for damages as they are now in liquidation. I guess the company was seriously struggling when I hired them and they probably cut every corner possible to maximise profit. The room looked OK at face value but what's behind the plasterboard isn't. I cannot afford to pay another company to continue with the project so I'll have to DIY the rest.

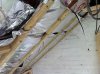
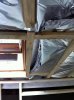
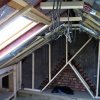
For the main room, they used 50mm Celotex with TLX Silver at the bottom before battening and plasterboard hung and skimmed, whilst in the eaves cupboard, they just lined it with 25mm Celotex screwed into rafters with gaps everywhere! There is nothing behind the stud walls.

I have already fixed the eaves cupboard by ripping our the 25mm Celotex and replaced it with 75mm Xtratherm insulation and lied it with TLX Silver but my main concern lies with the actual room. TLX multi foil is supposed to be overlapped by 50mm and taped to eliminate thermal bridging and provide a vapour barrier however the guys did not do either. They just slapped on the TLX with gaps everywhere as shown in the pictures I took. Even though I knew this was wrong, I was stupid enough to let them continue plasterboarding before I fired them for other reasons.

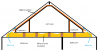
I had been reading a lot to understand about condensation problems and the need for a vapour barrier in lofts. Our roof has a breathable membrane but I want to know if the risk of condensation and heat loss is enough to justify ripping out all the beautifully skimmed plasterboard, redo the insulation correctly and replaster. The plastering team was wonderful and I would hate to have to rip out all their work not the mention the costs involved to replaster the entire room.

I have attached a few pictures of the state of the insulation just before the plastering team arrived.
 

Attachments

  • IMG_0078.JPG
    IMG_0078.JPG
    184.8 KB · Views: 484
  • IMG_0079.JPG
    IMG_0079.JPG
    114.1 KB · Views: 469
  • IMG_0083.JPG
    IMG_0083.JPG
    170.4 KB · Views: 514
Sponsored Links
Update:

After much debate, I finally bit the bullet and ripped down all the plasterboard and low and behold, there is plenty of condensation underneath the felt. I anticipated there might be a slight dampness, but I wasn't prepared to be rained upon.

I am at a loss on how to proceed from this point forward. The original company who did the work went into liquidation and restarted afresh, trading under an almost exact name. I had messaged them previously to get them to redo some of the work, but I have so far been ignored.

The videos explains it all.


The most important thing I need to know is how to tackle the condensation issue. I wonder how much the shoddy insulation is to blame for the condensation. The felt under the tiles is the breathable type but we have no eaves or ridge vents.

Any advice will be appreciated. Thank you.
 
How has the breathable membrane been installed? Is the membrane taught or does it drape between the rafters? There should be a 50mm air gap between the top of the rafters and the insulation?
 
Assuming that's a foil insulation underneath the rigid insulation there should be an air gap above and below it?
 
Sponsored Links
Sorry for the problems you've been left with, but I think it would be best to start from scratch, but don't worry, it's easily done. you really need to create the airgap between the celotex, and the tiles, and allow it to go up one side, across the top, and down the other side. You want a 50mm airgap between the celotex and the tiles, so you need to add 50mm battens to the underside of the rafters, then use 100mm of celotex, bringing it level with the top of the battens, and fill any gaps with expanding foam. Then you'll put 35mm +12mm insulated plasterboard across the rafters, and cover any joins with alli tape. You've put 75mm of celotex on the uprights, but you need to increase this to 100mm as well, but obviously, you'll only need the 100 between the rafters to get a warmish void between the dwarf walls if you've got the insulated plasterboard in front of them.

The multi foil that they've used is good in theory, but you have to have it as loose as possible, otherwise it's less effective where it gets near the rafters, as there's a smaller and smaller gap between the layers.
 
The breathable membrane was installed when we retiled the roof in 2008 and is taught. The Celotex that the builders put in was 50mm and a 50mm gap was left between the tiles and this does run over the top and across the other side, although the gap at the top is quite small. The layers are arranged like this

tile/breathable membrane
<50mm gap>
50mm celotex
<0mm gap>
multi foil
<25mm gap>
plasterboard

As you can see, they didn't leave an air gap between the rigid insulation and the multi-foil insulation and only a small one provided by the plasterboard batten, a bit less than the manufacturer recommended at 38mm.

As we have the modern breathable membrane, is a 50mm gap still necessary as I thought this is only for older roofs with sarking felt? I have read that with breathable membrane, the gap can be 25mm. In fact, the fitting instructions that comes with the TLX multi-foil suggest that no air gap is needed if breathable membrane is used. I refer to the below rafter 0.18 solution...

http://www.tlxinsulation.co.uk/asse...Guides/TLX-Silver-Install-Leaflet-2016.06.pdf

We have very limited head height so I'm not keen on adding more timber which will, in turn, bring the ceiling down more. I would ideally keep the existing layer arrangement but add another 25mm rigid insulation to bring it up to 75mm. I know that this won't achieve U=0.18 but I'm not too concerned. My calculation suggests it will be around U=0.25 which I am happy with.

My main concern is the condensation under the breathable membrane. Since my last post, I've exposed the south facing pitch and is only slightly damp whereas the north facing pitch as shown in the video is dripping wet. I guess the sun warms the south side enough the dry out all the condensation, but ideally, I need to find a way to prevent condensation.
 
It looks as thought the condensation is from the gaps in the multifoil insulation, hence why it's supposed to be overlapped and sealed. the daft thing about any of the insulation systems, is that they seem to be airtight, so you need good ventilation to make sure you don't get these sort of problems. If you've got the necessary airgap under the celotex, then you just need to get it going up and over the ceiling, otherwise any moisture that get into the airgap will just stay there. It's not that the sun warms up the south side (although it will in the summer), so much as north is always colder, so causes condensation. You could get away with a 25mm airgap, as long as it goes up and over both sides, and this would take you to 75mm, but as 135mm is the current standard, you want to find a way of getting insulated plasterboard across the rafters to stop any cold bridging on the rafters themselves.

In the tix instructions, the salient point, is that they have a vapour barrier behind the plasterboard to stop any moisture getting through, so this suggest to me that it's not as good as the celotex.
 
Yes just to say the air gap or lack above the insulation below the tiles is a red herring for this issue. That one is to ventilate a"cold roof " which has non breathable membrane under the tiles, which doesn't apply to you. A small clearance of 10mm is needed between the insulation and the battens to allow water runoff down the membrane, but that would cause a different issue.

In your case the problem is purely an inadequate VCL. The permeability of the buildup should increase towards the outside so any trapped moisture will evaporate quicker than it builds up. In cold roofs that means a polythene sheet carefully lapped and sealed. Unfortunately that's almost impossible for standard builders to achieve. In new construction it's recommended to have a warm roof for that reason.

Anyway my recommendation would be rip the insulation out and let it all dry out. Then fit the insulation, preferably one layer rather then 2 layers. And finally put a thick vapour barrier ie 1000 guage polythene. And seal the edges well, and don't make any holes in it. Finally add some kind of ventilation/extraction to the loft to keep the humidity down in cold weather.
 
I can do a VCL for the main room, but I wonder if there is a risk of damp air rising from the bedrooms below through the ceiling just below the eaves and finding its way into the air gap between the files and the rigid insulation. The rigid insulation behind the cupboards doesn't start from the very bottom but about 2 feet up. I've sketched a rough diagram.

I'm afraid I cannot rip out the cupboards so if the risk of condensation from the rooms below if significant, I will need to find alternative solutions, like painting the bedroom ceilings.
 

Attachments

  • loft construction.png
    loft construction.png
    20.2 KB · Views: 693
Two principles that should guide all the work you do, one is the insulation should be an unbroken layer around the heated areas of the house, and secondly the vapour/air barrier should be on the hot side of the insulation. It may be the insulation itself if you are using celotex.
The vapour barrier is particularly important in the bathroom as that's going to have high levels of moisture.

Now you know that, you can decide what you want to demolish to repair.
It's worth sealing all the holes well in your bathroom ceiling.
 

DIYnot Local

Staff member

If you need to find a tradesperson to get your job done, please try our local search below, or if you are doing it yourself you can find suppliers local to you.

Select the supplier or trade you require, enter your location to begin your search.


Are you a trade or supplier? You can create your listing free at DIYnot Local

 
Sponsored Links
Back
Top