Thermostat Bridge for Hive Install

Joined
14 Dec 2022
Messages
7
Reaction score
4
Country
United Kingdom
Hi all,

Looking for some help installing a hive thermostat and trying to covert online guides into my own situation.
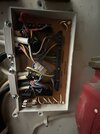
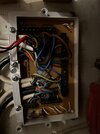
Wired the hub and receiver up fine. I know I now need to bridge the existing thermostat. I have a honeywell 42005748-001 so I have traced back disconnected the 2 wires going to the thermostat. I have the looped a wire in the slots the 2 thermostat wires were in. Then I have linked ‘heating valve brown’ to ‘programmer CH on’.

Is this correct?

I have attached before and after photos.
 

Attachments

  • 0FAD2332-8F8D-4F8B-B894-AE518BD0A1A2.jpeg
    0FAD2332-8F8D-4F8B-B894-AE518BD0A1A2.jpeg
    200 KB · Views: 103
  • 0B380B90-9160-4CB5-94AA-D281835ED099.jpeg
    0B380B90-9160-4CB5-94AA-D281835ED099.jpeg
    202 KB · Views: 80
  • 5E0954DB-93F1-47EE-A552-1E2B25225235.jpeg
    5E0954DB-93F1-47EE-A552-1E2B25225235.jpeg
    402.4 KB · Views: 86
Sponsored Links
It's difficult to see in the jumble of wires in the photos, and installers don't always use the terminals in the wiring centre for their marked purposes.

You don't state the model of thermostat, but as you say it only has two live wires, then as you have done, trace them back to the wiring centre, note where they are connected and remove them.

Then link together the two terminals that you have just remove the thermostat wires from.

That's all, no need to change anything else.
 
Thanks for the reply. It’s a Hive Mini wireless one. So the aim is to bridge the thermostat out.
By the sounds of it, I don’t need the link from the heating valve to the programmer?

I’ve draw what I’ve done on this, which is hopefully a bit clearer
 

Attachments

  • DB7FCED4-E248-4A0B-8217-B450935495C7.jpeg
    DB7FCED4-E248-4A0B-8217-B450935495C7.jpeg
    75.4 KB · Views: 131
As the system worked originally, the room thermostat was simply a switch. When heat was required, the two wires were joined together inside the thermostat and when it wasn't required they weren't joined together.

Now you should have removed your existing programmer and replaced it with the Hive hot water and heating receiver.

The Hive has both time and temperature control built in, so the old thermostat is now redundant, but simply removing it would leave the CH wiring in the permanently 'off' position so the heating would never work. so the wiring should be in the permanently 'on' position to allow Hive to take total control.

If the original 2 thermostat wires went to the room thermostat terminals 1 and 3, then the blue bridge you have drawn is all that is required. That's all, no need of anything else.

The other wire you have shown is actually duplicating the same thing. At the end of the day the CH 'on' from Hive should go to HTG MV live. Which can be done either way, with the link via the roomstat, or linking CH on the HTG MV live, you don't need to do both.

For DIY I usually recommend the first method because it's generally easier as the thermostat wires are removed anyway and it only involves touching two terminals, so less scope for error.
 
Sponsored Links
Very clear! Thank you very much - really appreciate your help!
 

DIYnot Local

Staff member

If you need to find a tradesperson to get your job done, please try our local search below, or if you are doing it yourself you can find suppliers local to you.

Select the supplier or trade you require, enter your location to begin your search.


Are you a trade or supplier? You can create your listing free at DIYnot Local

 
Back
Top