Which screws

Joined
23 Aug 2013
Messages
203
Reaction score
2
Location
South
Country
United Kingdom
Hello,

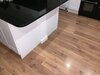
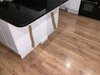
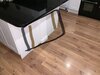
I’m doing something unconventional, at the side of my kitchen unit cupboards, i’ll be hanging a radiator from them.

I’ll be screwing from inside the unit to some 2x4 wood (unless you can suggest something else?) for a 19KG radiator (minus water).

I’ve not measured the thickness of my kitchen unit but a quick google search suggests it should be around 18mm thick

Which screws should I use for this? As you can tell I have no idea so a link to Screwfix would be amazing.

Thanks
 
Last edited:
Sponsored Links
As above - but I would buy the small set so you have different lengths:
https://www.screwfix.com/p/goldscre...untersunk-woodscrews-grab-pack-1000-pcs/6367f

Note that I find the goldscrew-plus-pz great (fast and very sharp so easy to get into wood)- but sometimes a little too sharp (damaging rawl plugs and chipboard if I put too much torque on driver) and quite expensive when you need a lot.

In which case I use goldscrew-pz-double:
https://www.screwfix.com/p/goldscre...oodscrews-trade-case-grab-pack-1000-pcs/99867

SFK
 
Spax every time for wood screws, SF do them

Blup
 
Sponsored Links
It has been an awfully long time since I did my maths A'level but I would be worried (perhaps unnecessarily) about the forces on the end panel where it meets the base and primarily where it meets the top panels. Most of the force is downwards but given that the centre of the mass of the radiator is 7(?)cm away from the panel itself, it means that you are placing quite a lot of faith in the joins between end panel and the other panels towards the top.

ASS_25389415_4_3.jpg

The above shows where the stress is greatest (and the rough direction of some of the load).

I honestly do not know if the glue and dowel joins are strong enough to take the loads at play. Hopefully others will be able to provide confirmation.

If I were faced with your task. I would use nuts and bolts (plus washers) to fix the rad brackets to the end panel (without the 2 by 4). I would then consider using a 1 by 1 timber baton at the top of the unit, screwed and glued to the side panel and the worktop to reinforce the top of the unit.

That said, it may be the case that your 2 by 4 will help to minimise any outwards bowing in the end panel but I think you would need to use glue or actually screw through the timber in to the end panel.

All of the above may well be over kill. I just don't want to see you find that things go pair shaped months down the line. For the record, I have seen loads of floor to ceiling cabinets that house two ovens that bow outwards towards the bottom (albeit only slightly). 18/19mm aren't quite as "rigid" as the people selling them would have you believe.
 
It has been an awfully long time since I did my maths A'level but I would be worried (perhaps unnecessarily) about the forces on the end panel where it meets the base and primarily where it meets the top panels. Most of the force is downwards but given that the centre of the mass of the radiator is 7(?)cm away from the panel itself, it means that you are placing quite a lot of faith in the joins between end panel and the other panels towards the top.

View attachment 218140

The above shows where the stress is greatest (and the rough direction of some of the load).

I honestly do not know if the glue and dowel joins are strong enough to take the loads at play. Hopefully others will be able to provide confirmation.

If I were faced with your task. I would use nuts and bolts (plus washers) to fix the rad brackets to the end panel (without the 2 by 4). I would then consider using a 1 by 1 timber baton at the top of the unit, screwed and glued to the side panel and the worktop to reinforce the top of the unit.

That said, it may be the case that your 2 by 4 will help to minimise any outwards bowing in the end panel but I think you would need to use glue or actually screw through the timber in to the end panel.

All of the above may well be over kill. I just don't want to see you find that things go pair shaped months down the line. For the record, I have seen loads of floor to ceiling cabinets that house two ovens that bow outwards towards the bottom (albeit only slightly). 18/19mm aren't quite as "rigid" as the people selling them would have you believe.
Yeah i’m not too sure how it’ll go either but worth a try. In a nutshell my kitchen is 11mx5 and all I have is a 300mmx1800 designer radiator and an plinth heater, i’ll be using the flexi’s from the plinth heater into copper pipe for the new radiator. I did want a mini stud wall built up and hang the radiator on that but due to Covid this is difficult atm so going the DIY route for now.

Below is a picture of where it’ll go, as it’ll be a 1200mm radiator it’ll be on both cabinets so the load will be spread (at least in my mind)
 

Attachments

  • D5B85C88-297F-4572-80C8-4079BA1214D6.jpeg
    D5B85C88-297F-4572-80C8-4079BA1214D6.jpeg
    241.1 KB · Views: 150
  • E92CF66C-1D92-4C9E-A624-AA3FBB912940.jpeg
    E92CF66C-1D92-4C9E-A624-AA3FBB912940.jpeg
    247.8 KB · Views: 137
  • D5180163-E5D1-48A7-BAFF-B280138E9B2A.jpeg
    D5180163-E5D1-48A7-BAFF-B280138E9B2A.jpeg
    251.9 KB · Views: 144
A second plinth heater would be neater. Have a similar size room and didn't need additional heating.
 
Yeah i’m not too sure how it’ll go either but worth a try. In a nutshell my kitchen is 11mx5 and all I have is a 300mmx1800 designer radiator and an plinth heater, i’ll be using the flexi’s from the plinth heater into copper pipe for the new radiator. I did want a mini stud wall built up and hang the radiator on that but due to Covid this is difficult atm so going the DIY route for now.

Below is a picture of where it’ll go, as it’ll be a 1200mm radiator it’ll be on both cabinets so the load will be spread (at least in my mind)

Ok, weight distribution wise you will probably be ok.

Are you planning to use braided flexi pipes?

The following says that is a no no.

https://www.plumbersforums.net/threads/braided-flexible-pipe-to-supply-a-radiator.105849/
 
Ok, weight distribution wise you will probably be ok.

Are you planning to use braided flexi pipes?

The following says that is a no no.

https://www.plumbersforums.net/threads/braided-flexible-pipe-to-supply-a-radiator.105849/
My plinth heater has flexi’s going to it as original part, they go onto 15mm copper pipes on the heater itself, i’ll then use copper pipes from the end of the flexi’s going to the radiator, so not wiring flexi’s directly to the radiator cables
 
Personally, I wouldn't want to fit a radiator onto the side of a kitchen cabinet which may or may not be replaced 5 years (or less) down the line. If nothing else I'd be concerned about how well the cabinet was fixed to the wall.

What I have seen done is a blockwork pygmy wall built at one end of a run of kitchen units, which was pretty solid. An alternative that I've built on jobs in the past a couple of times was a timber studwork pygmy wall which was built around a couple of flanged steel posts (which were resin-anchored to the concrete floor) and faced off with 12mm plywood skinned with plasterboard. Looks like a conventional wall, can be put in faster, will carry a heavy rad as well
I’ll certainly see how it goes without water, btw not sure where I got 19KG from even worse it’s 38KG.

If it starts to look horrible as in stress of the side i’ll whip it off and think again.

I did see a freestanding column radiator but man they’re so expensive, mind you it did look good
 
Just wondering... but would it be possible to use some end panels (with edging) and packing out, to span the width and height of the brackets and screw them to the ends of the units AND the wall? The down side is that you will push the radiator up to 36mm(18+18mm) away from the end of the units.

I hope that makes sense.

Out of interest, how far past the units does the wall jut out?
Yeah I understand but not sure how that would benefit me (may not be fully understanding you).

I’ll be using the 2x4 battens which will go from the floor to the top of the cabinets on both sides, well to be honest i’ll be doubling up, so one batten each side will be screwed from inside the cabinet to the batten, then another batten screwed on that so I can bring it out closer to the room rather than close to the unit.

Thinking of the weight now might be prudent not to have 2 battens screwed together as that might put more strain because of center of gravity.

The mini wall sticks out 4cm from the side of the unit
 
I see no issue with the weight or force, you might just want to strengthen the cabinet using some brackets between top rail and cabinet side.

I would also consider pulling the plinth off then putting some 4 x 2 on edge underneath the cabinet side and wedged up - so the weight is transferred directly to the floor not on the cabinet side to bottom screws or dowels.
 
Yeah I understand but not sure how that would benefit me (may not be fully understanding you).

I’ll be using the 2x4 battens which will go from the floor to the top of the cabinets on both sides, well to be honest i’ll be doubling up, so one batten each side will be screwed from inside the cabinet to the batten, then another batten screwed on that so I can bring it out closer to the room rather than close to the unit.

Thinking of the weight now might be prudent not to have 2 battens screwed together as that might put more strain because of center of gravity.

The mini wall sticks out 4cm from the side of the unit


Oh.. I thought the batons were going to be inside the cabinets.

With regards to your second image. I am recommending that you pick up a new end panel and cut it so that it spans the width of your two brown lines (rad brackets). Lets call that part A. That end panel would be then screwed to the ends of the two units, however, because the wall juts out by 4 cm, your newly cut panel will be 4 cm away from the cabinets and require you to pack them out using off cuts from the rest of your newly purchased end panel. Two strips of end panel either side of the wall (parts B) plus 6mm packing pieces behind the cut to size part.

D5B85C88-297F-4572-80C8-4079BA1214D6.jpg

The advantage of the above is that you will then be able to screw the A/B combo from the inside of the cabinets (no visible screws when looking at A) and you will be able to screw through part A into the end of the wall (unfortunately two visible screws). You will now be distributing the weight/load of the rad throughout the cabinets and the wall.

When looked at from the side, yes you will see the A/B panel but it will be the same colour as the end of the units.

I hope that makes more sense.
 

DIYnot Local

Staff member

If you need to find a tradesperson to get your job done, please try our local search below, or if you are doing it yourself you can find suppliers local to you.

Select the supplier or trade you require, enter your location to begin your search.


Are you a trade or supplier? You can create your listing free at DIYnot Local

 
Sponsored Links
Back
Top