Ideas for construction method on new summerhouse

Gary..
Timber frame Target 0.28 W/m2K.
R + Resistance
From outside to inside.
External air 0.06 R
22mm timber cladding .0,17 R
25x50mm Vertical batten to form 25mm cavity 0.18
Permeable felt.
12mm ply or OSB 0.09 R
47x125 Stud work
12.5 foil backed plaster board 0..25 R
Internal pressure 0,12 R
Inside studs 100mm Celotex 4.54 R
Leaves 25 mm low emisavity cavity between celotex and plasterboard for service void
According to our figures total R .is 5.41 m2K/W. Allow a generous percentage of 20% for cold bridging as there is lot of it, equals 4.32 m2K/W, which equals U Value of 0.23 W/m2K. Will give you more detail within next two days.
Regards oldun
 
Sponsored Links
Gary,
Been thinking about our last post and ways of trying to save you a few bob.
Change stud work to 47x100. Change celotex to 80mm. Will give you Total R of 4.50 less cold bridge equals 3.60 equals U value of 0.28W/m2K
Will come back again the next two days.
Regards oldun
 
Thanks - also I'd be interested in your view on my previous question about the floor construction - whether I'm okay to skip the screed and whether concrete/Cellotex/Chipboard would work?

I'm interested in the hollow cavity that you suggested on your original spec. Is it an option to fill this with 100mm cellotex then overboard the whole wall on the inside with 50mm cellotex to minimise cold bridging, so the only thing holding the plasterboard in place would be long drywall screws through to the 100mm x 47mm carcassing?

Thanks

Gary
 
Gary,
If you want to go option 2, then fine, but work away from your garage over the 4200 span and throw in a timber dead man on hard packers at mid span. Fill in deadman on completion as before.
You will have to be a lot more fussy with concrete if you are going insulation and T&G boards. Tamp, level and finish with plastic float.
To reduce the bounce use P5 22mm T&G Caber boards glued on all edges and 600mm edges staggered and with 12mm expansion joint round all perimeter. You will get a certain amount of bounce in the middle, but you have got to expect that. P5 Caber board is the densest and heaviest board that you can get.
Regard insulation, use celotex FF4000, Repeat FF4000. Product is designed for wet UFH. The K value passes slower through the insulation, It has a higher compression rate and better dimensional stability.That’s your questions answered for today , will come back on to your stud work and over boarding with in two days.
Regards oldun
 
Sponsored Links
Thanks - foundations are poured and corners are up. I'll keep putting the bricks down in the evenings this week and see how I get on.
 
Gary.
Couple bad days. Sorry.
We work out our own U values, and for piece of mind we run our figures for our last U value calculation through Celotex calculator, and for some reason they did not stand up. Can only assume Celotex allow a much larger percentage for repeated cold bridging.
Any way it is not all bad news. Have used celotex calculator this time and have checked L1B Technical note 10.
Go 22mm cladding, 25mm vertical battens, breathable membrane, 11mm OSB, 47x100 studs, 80mm GA4000 in studs, 20mm low emisavity service void and 37.5 PL4000 overboard to studs. PL4000 is 25mm celotex stuck to 12.5mm plasterboard. This will give you a U value of 0.23 W/m2K
With your PL4000 Gary, overboard with the long edge horizontal to the studs and not vertical to the studs like a lot of the pr*cks do these days.
Sorry about our c*ck up Gary.:oops: Felt rough at the time and did not check, how ever we always get round to checking what we write.
Will get back to you within next couple days with regard to studs and roof, but would advise now that design of roof is not very practical.
If you wish to lower or raise your U value, let me know
Regards oldun
 
No problem at all- I'm still laying bricks! The new design seems like it'll give me quite a bit more internal floor area so that's great. I'm presuming I can just thicken up the gt4000 if I want a better U value then.

Will keep brick laying. Regarding the roof I've been looking at some lightweight plastic tiles rather than the epdm, so the construction would be a more traditional membrane and batten affair with cellotex between and under rafters. Looking forward to your view on that.

Gary
 
Yep - plastic interlocking tiles - weighing around 8KG per M2, installed over battens and breather membrane.

I've abandoned the idea of the massive eaves overhangs because the plans say the resulting eaves will be way too low to be practical, so I'll go for standard eaves that are 200mm deep - I'll get a new diagram uploaded later so that you can see what I mean.

I like the idea of a vaulted ceiling in the summerhouse but not sure what I can get away with in terms of avoiding spread - i.e. whether I can fit some collar ties to make it all stable, or whether I should keep a couple of joists in place too made out of a decorative wood such as oak and leave them exposed? I could even put a feature king post in place to support the apex of the hips/ridge.
 
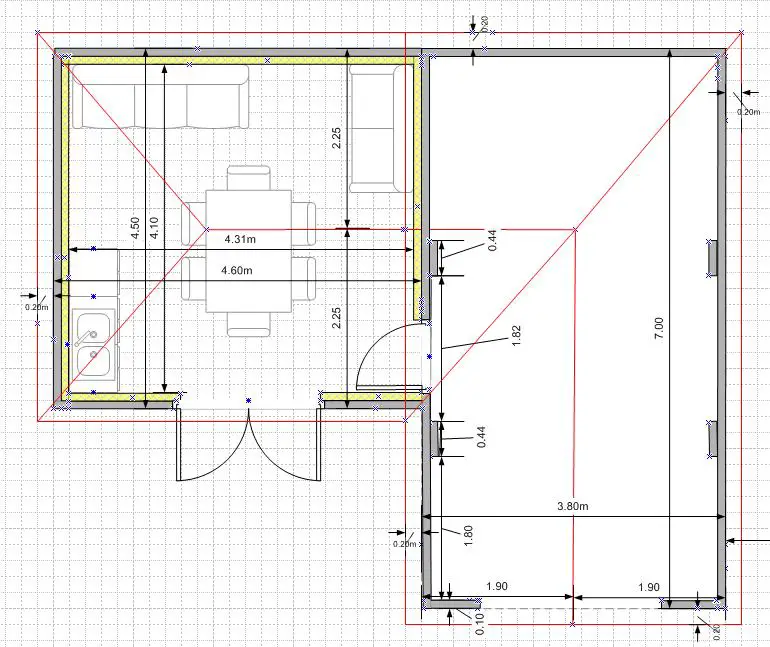
Updated plan and elevation below. I've tried to illustrate the idea of the two oversized 'feature' joists to stop the spread. I've added double thickness wall plates too (two layers of 100x50mm):


Gary
 
Gary
Sorry but going to give you a lot of problems.
You now appear to be showing 450mm single brick skin below studwork. How you going so insulate that to the U value that you require? Also how do you intend to secure bottom plate to dwarf wall?
Notice that you have not got the same storey height to the new build as to the garage. Why
On the new build part your hip rafters are not at 45 degrees. Why? This can be overcome but means a lot of additional work and the possibility of roof tiles now coursing round hip/
You have not stated your pitch. On the new part you have a half span of 2250 and a rise of say approx 1375 from top of plate to top of ridge board which will give you a pitch of 31.4` degrees and a length of rafter of 2637 plus overhang, however on the garage you have a half run of 1900 and rise of say 1375 which will give you a pitch of 39.5 degrees and length of rafter of 2345 plus overhang. So in a nutshell you will have unequal pitch to hip and valley over garage. Will make life very very difficult. The figures above are only approx to give idea of pitches. Check them out yourself.
Regards plastic roof tiles, never used them. Would never consider using them unless we found out a lot more information. In our opinion they are only fit for a shed or beach chalet. We do know that they greatly expand in hot weather and shrink in cold weather. We also do not know their reaction to breathable felt or the air circulation between the felt and dew point of plastic tiles. . In the normal run we would talk people out of vaulted ceiling, unless it was designed and built in the correct manner, how ever in your case , if you use plastic tiles with such a light loading then possibly 2 no 50x225 C16 with bulldog connectors or 75x200 C16 will be sufficient to span 4500 and stop any spread and creep, however that is only our opinion.
Which brings you to roof insulation L1B looks for a target value of 0.18Wm2K To comply with Technical Note 10, you will require Celotex GA4000
165 between rafters or
100 between rafters &35 under rafters or
50 between rafters & 70 under rafters, with plasterboard attached to 25mm deep counter battens to create air space.
In a nut shell that is your spec for roof insulation unless you want to improve it. One other item, if it was ours we would ventilate between insulation and felt even though you are using permeable felt.
Do not feel so good, so will post this for you to digest. Will give a lot more thought to the problems over weekend.
Regards oldun
 
I'd included the dwarf wall because I thought it'd be slightly more attractive, and because I have the bricks lying around. Having given it some more thought, it's a few days extra work that I don't need, so I'll forget that idea. That'll help with the U value too.

The walls are complete up to DPC level now. I'm going to screw the sole plate down through the DPC with concrete screws.

Re: unequal storey height, the elevations show the foundations cross sections. The finished floor levels are actually the same. I've finished the slab 100mm below the garages finished floor level so that I'll be able to lay 75mm PIR and 25mm chipboard on top. Slab is floated flat to minimise the bounce through the PIR/chipboard.

The new build hips aren't set at 45 degrees so that when viewed on the front elevation they match the pitch of the roof on the existing garage - so purely aesthetic. I'll take a closer look at the roofing tiles - I'm not sure whether I'm okay to have a variable head lap on them so that I can make sure there's no coursing around the hip.

Re: the variable pitches, I'm not sure what I can do about that given that I have one building that's 3.8M wide, and one that's 4.6M. Assuming the rise has to be equal for both, then the building dimensions dictate the pitch. After the two hips and valleys on the last roof I've got quite comfortable marking and cutting hip and valley jacks - is that the only difficulty?

I'll use 100mm of PIR between the rafters with 35 underneath and then I can have a 45mm vent gap between that and the breather membrane.

Thanks again,

Gary
 
Gary,
Sorry, only just noticed that you have answered our last post Can not post tomorrow. but will do so Saturday
Regards oldun.
 
No problem - I'm currently going through stud work, so it'll be a few weeks before I'm on the roof.

On that subject, I've had cold feet on the plastic tiles and am going to go for fibre cement instead - Marley Garsdale. Seems only slightly more heavy at 21KG/m2 and looks relatively simple to lay - any thoughts?
 
Gary, Had not forgot you but have kept putting your summerhouse out of our mind due to the fact that we can get our head round how to explain your roof to you due to the unequal pitches
Google and have read of this and you will understand the problem better.
.
A Tale of Two Pitches: Exploring Off-Angle Roof Framing .

We are not saying it can not be done, but we do not know how to explain it to you in simple terms.
We will sit down to-morrow and giver it a lot of thought and come back to you
Regards oldun
 

DIYnot Local

Staff member

If you need to find a tradesperson to get your job done, please try our local search below, or if you are doing it yourself you can find suppliers local to you.

Select the supplier or trade you require, enter your location to begin your search.


Are you a trade or supplier? You can create your listing free at DIYnot Local

 
Sponsored Links
Back
Top