
If you are terminating to a metal box then the supplied brass banjo will be fine, however if you are connecting to a plastic box a Piranhna locknut is recommended (see below).
If the box is to be mounted outdoors then extra care should be taken to ensure it remains water tight.

Some of the tools you may need. (The red item in the middle is a knife)

The end of the armoured cable needs to be cut straight.


Note: if you are using a plastic back box then the earthing banjo should not be installed the same way as in the picture. Use a pair of locknuts on the inside of the box sandwiching the banjo between the two or use a piranha locknut to securely connect the CPC to.

Feed the shroud onto the cable the wrong way around - the end of the SWA needs to be a neat cut. Force the shroud down a little so it stretches onto the cable.

Cut the shroud straight slightly beyond the end of the cable

You should now be able to make the shroud fit onto the cable. If not, trim another little bit from the shroud.

Change the orientation of the shroud so it is now the correct way around and feed it onto the cable.

Align the cable with the base of the gland and mark where the base of the knurl aligns with the cable.

Using a hacksaw or a junior hacksaw, score around the cable cutting through the outer plastic but only approximately half way into the steel armour strands. Do not cut through the steel armour.
A tip is to keep the armour in the correct orientation to the gland whilst you carry out this stage so the armour strands are of equal length when you come to fit it to the gland later.

Using a stanley knife, very carefully strip back the outer sheath from the score you have just made to the end of the cable.

Taking a few strands at a time, bend them forwards and backwards so they snap off where you made the score before.


Trim back the outer sheath to allow enough armour to mate up to the knurl on the gland base.

Slide the main part of the gland onto the cable.

Spread the armour strands out by holding the cable and twirling the inner cable around gently to make the armour strands cone out.
Offer the cable up to the gland and ensure none of the steel wire strands have gone inside of the gland.

Mark the cable beyond where the inner insulation exits the gland.

Remove from the gland and strip back the inner sheath taking care not to damage the wires, apply sleeve as required.

Install the cable into the gland so the armour reaches the base of the knurl, ensure no strands have gone inside the gland.

Tighten the upper part of the gland to the base. The cable should now be securely held into the gland.

If you are using a watertight gland, tighten down the seal.
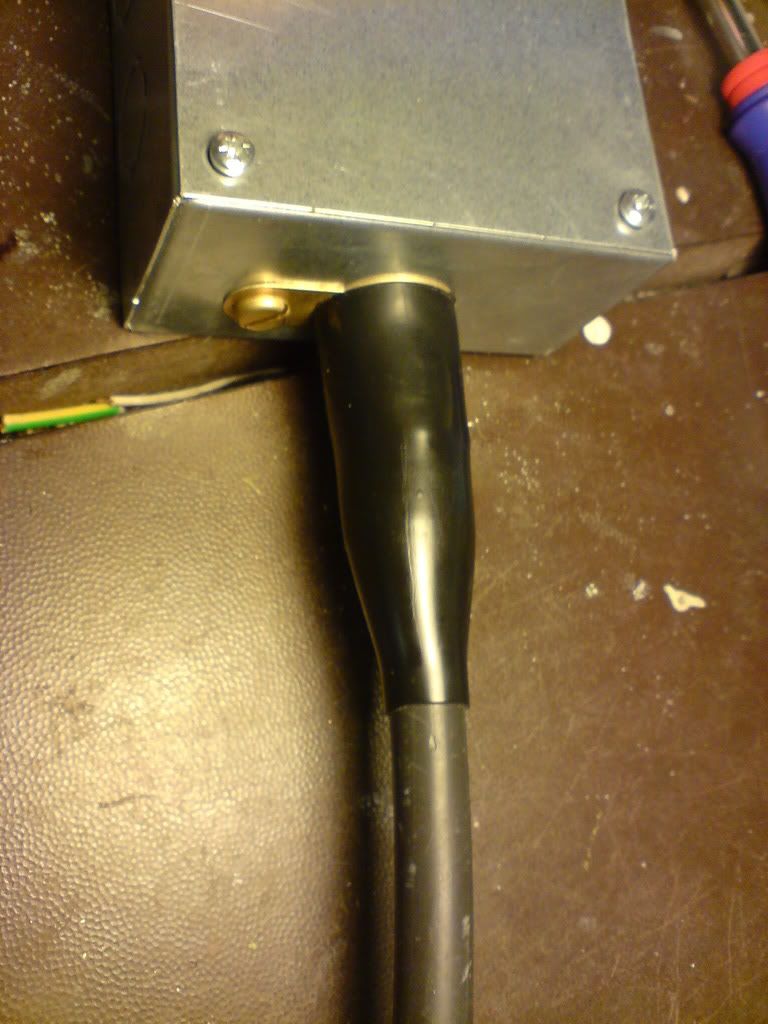
The traditional method for earthing the gland and enclosure is to use a tag, commonly called a ‘banjo’ bolted through the enclosure or mounting plate as shown above.
This takes more time, it occupies space inside the enclosure and for external use it creates a route for possible water ingress and it damages any protective coatings, creating a corrosion risk.
An alternative is to use earthing nuts, aka Piranha nuts.

Fitting instructions.