Arc welding tips for cleaner welding please.

Joined
9 May 2021
Messages
186
Reaction score
6
Country
United Kingdom
Hello

so, I brought a cheap arc welder, due to having a few bits around the house that has broken and needed repairs. As there was a lot of small repairs the quotes I was getting was at least 5 times the cost of a welder.

So, my first attpemt at welding, I managed to melt part of an iron bed frame, but the “fix” I did to it had made it stronger, and the slat near the support leg was completely cracked/split. I have managed to fix that, it’s ugly, and it’s not clean, but I have kind of bridged the crack.
so, my mums bed is now fixed, and stronger than before.

so, now I am attempting to fix my bed, but again, it’s ugly and wanted some advise on how to make the fix better.


here are some pictures of my bed support leg that completely snapped and now repaired. Any tips would be great, thank you.

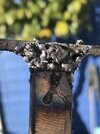
3677A417-CF27-41FC-805F-B5A0E17891F0.jpeg
DDB054BA-CCD1-4F3A-BC93-4D45FE3FEFB0.jpeg
 
Sponsored Links
The normal way to clean up a weld is with grinding or sanding discs in an angle grinder which it looks like someone has already done below the weld. Grind away the excess metal, weld properly over the top and then grind off the excess again.

I suspect if you grind away all the non fused melt on around the area that you've welded, you'll find that there very little properly fused weld.
 
Oh, so the idea is to wield, grind, then wield and grind, building up connected wields?
 
Sponsored Links
When you weld, the idea is to fuse the metal parts you want to join together, using the arc rod to add metal into the weld.

The weld you've done is dreadful, so you need to grind off all the rubbish. You then need to re-weld over the top, fusing the new weld into the old. As you've added metal into the weld, then grind off the excess.

You shouldn't be welding it lots of times. If you do it properly, you only need to weld it once. You're first attempt is poor, so you need to tidy it up by doing a proper weld over the top. But the idea is not to do it over and over again.
 
Get some scrap steel to practice on. Give it a good clean where the weld is going to be by using a grinder or wire brush. Clamp the parts together and then tack weld. On thin metal it is generally easier to use several tack welds and gradually join them up. Then tidy up if necessary by using a grinder.
 
You might be trying to weld cast iron which can give strange results if not done with the correct stuff. There is info on that on the web. Anyway, otherwise.

Best to clean up to bare metal first.
It looks like the end of the rod isn't close enough to the pool of metal to me. It needs to be in it. ;) Once you've created the pool.
Then the stick needs to be waved side to side and moved along but you may get away without the waving by feeding the stick in more rapidly.
Looks like you need to create 2 types of joint. A straight butt joint on one side and a fillet on the other. A bit cf a chamfer on one side of the butt joint might help. It ensures some useful penetration. Do that side first if you do this so there is some metal there when the other side is done and help prevent burning through.
 
EEk, that's not very good!.
Practice practice.
Read some stuff online about preparing the metal. Watch some youtube videos. You want a small "vee" groove to weld into, then you want a welder which is capable of giving you a controlled addition of metal with the right amount of "penetration", which is melting of the metal which you're trying to join.

Cheap machines don't regulate themselves very well. If you try to weld thin car body material with them all that happens is you get holes and what looks like bird droppings.
As it's a bed frame, thicker and not very cosmetic, you should be able to get there . I'd use a disc cutter to remove all the weld you've made and start again with clean metal. You need good electrical connection to both pieces too.

DOn't try to weld square-ended pieces, the weld will sit on top.

Start by finding out by practice, what is the smallest size of an even bead you can make.
Then grind the Vee to suit.
YOu may find you have to move the stick faster than you're comfortable with, so it doesn't spit and make holes. The end of the stick has to be just out of the weld pool. If you dip it in, you get a mini explosion.
Often you can use the flux coating to keep that distance as you move along, by resting it against the soon-to-be-welded metal.

YOu're aiming for something like this:
before and after:

1665506367794.png
 
It looks as if you are just waving the end of the stick about the general area you are trying to weld. It needs to be kept in one spot to built up a pool of molten metal and then moved much more gradually, through the pool.
 
If you have a box section joining a side plate you want something like this. If you have sharp corners at the top of the box section, they'll melt first, run off and make a mess.
1665508050404.png

The stick doesn't go INTO the pool or it'll splat , but the flux covering looks like it is, depending on the flux:
There is a gap where the droplets are.

1665508287066.png
 
Okay, thank you for the advise. I smoothed the old weld (not by me, factory done) on one side, I tried to melt the old welds that broke to make a new pool, with new weld added for strength

so, I have only tried the but joint, and I think I have done a lot better here. The bed frame is stated as steel, but now I see this, and what you said, I think cast iron. I have not tried to redo any of the T joints, if needed… so, it’s just one side, and a did create a small hole, but I did the weld between ajohn and justin of myself reading.… so I had read ajohn post but not Justin post.

EA351FAF-521E-48CB-AA6E-48B33E9A1174.jpeg


I have put a line where the two half’s join. The circle is a hole.

F0604157-3E0D-4805-B32A-6D325DA98C64.jpeg
 
You can tell if it's cast iron, when you grind it the sparks are a dull red and further disintegrate in the air, whereas steel is bright orange and they just shoor off in the distance.
That brings back memories!
Yes cast iron has bright red at the end of the short "shooting stars" with nothing much before. Steel are long thin and yellow, starting right off the grinder with mini sparkles depending on how much carbon it has.
Cast iron sparks less basically because it's softer so doesn't get as hot. It's easier to file too, being softer.

Cast iron expands a lot when it's melted, so it tends to crack - a real pain.
Did your welder come with graphite electrodes by any chance? If so, you could BRAZE instead of welding, using the spark between the electrodes more like a flame . Basically a brassy filler. Not AS strong , but pretty darned strong. It doesn't get as hot so far less chance of cracking.

From where you are now though, you have a join so well done, I'd settle for that. Who'd be looking at it if it's painted black?
 
I am sure, that the sparks are orange, but not really sure as I have the welder mask on most of the time, and I can hardly see anything, even when full arc

so, I brought a lot of sticks, I believe they are different due to the numbering on the sticks, so what stick should I use for cost iron?
 
Sponsored Links
Back
Top