Hi all. I have/am about to complete the install of my new kitchen. Looks amazing and can’t believe I’ve done it tbh…however I have an issue with a couple of my wall cabinets. The wall the 800mm is on looks like it isn’t and has a bulge about half way down the cabinet. As a result it isn’t quite pulled against the wall at the top (on those hanging brackets) although is against the wall at the bottom. Should it be the opposite? Should it be pulled in tight at the top and shimmed at the bottom? For clarity, I’m a paranoid diy’er and have it screwed through the back and onto studs as well as the brackets. Horror stories abound about these cabinets though and I don’t really want it falling off or being generally “not done properly” as I’ve been so careful elsewhere. I know about scribing etc but really rather not get it off the wall *again*.

You are using an out of date browser. It may not display this or other websites correctly.
You should upgrade or use an alternative browser.
You should upgrade or use an alternative browser.
BnQ wall cabinet on non plumb wall
- Thread starter DB76
- Start date
Sponsored Links
- Joined
- 11 Jan 2004
- Messages
- 42,745
- Reaction score
- 2,634
- Country

Pictures?
Sponsored Links
The wall used to be a doorway so is studded with skim on top. Standard crappy bnq hanging brackets with added screws (x3) through the back, about half way up, through some planed softwood and into another stud. I said I was paranoid lol
Which is more upright,large gap at top or bottom or better with splitting the difference. A scribbed in clad on end panels hide gaps if your not tiling up to them
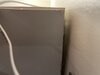
Ah well because it’s by a wall, it *looks* level now. It isn’t though. It would be nigh on perfect if pulled to the top brackets. There’s a small gap at the bottom, but minor. That gap would be at least 7mm. Sides not an issue as splashback will cover it. Just wondering if anyone has ever let the brackets be not pulled tight and lived to tell the tale lol.
Attachments
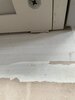
Cut channels into the plaster where it bulges so the cabinet can sit flush.
Do the same with the end panel.
It won't be noticeable once done.
Otherwise, break a chunk of plaster where it bulges and reskim.
Do the same with the end panel.
It won't be noticeable once done.
Otherwise, break a chunk of plaster where it bulges and reskim.
I thought this might be the way forward. Just didn’t want to get it off again Fiddled with it so much. I’m happy with his it looks. Looks fine as I don’t have many wall units. I was more concerned about the safety aspect. Hence the extra (long) screws through the back
Cupboard should be hung level regardless of background.
This is true. It’s pretty much there. Bnq build quality isn’t top notch as I’ve found out lol, hence the extra timber I’ve mounted on the rear, screwed through the side, assisted by metal joining plates and screwed into the next stud down. Should be bomb proof. Also, laminate splashback going flush with the cabinet and onto worktop so extra support there. Thanks all
The main aesthetic consideration is they all look flush across the front and all bottom edges are flush.
These are the areas your eye is drawn to when viewing something, (parents/siblings/great aint Maud etc), and as the back edges will be hidden no one but you will know it does not fit perfectly in hidden areas.
It sounds secure enough to the wall so I think you should stop worrying too much.
These are the areas your eye is drawn to when viewing something, (parents/siblings/great aint Maud etc), and as the back edges will be hidden no one but you will know it does not fit perfectly in hidden areas.
It sounds secure enough to the wall so I think you should stop worrying too much.
DIYnot Local
Staff member
If you need to find a tradesperson to get your job done, please try our local search below, or if you are doing it yourself you can find suppliers local to you.
Select the supplier or trade you require, enter your location to begin your search.
Please select a service and enter a location to continue...
Are you a trade or supplier? You can create your listing free at DIYnot Local
Sponsored Links
Similar threads
- Replies
- 2
- Views
- 989
- Replies
- 3
- Views
- 648
D
- Replies
- 4
- Views
- 983
- Replies
- 0
- Views
- 759
- Replies
- 8
- Views
- 11K