
You are using an out of date browser. It may not display this or other websites correctly.
You should upgrade or use an alternative browser.
You should upgrade or use an alternative browser.
Boilermate ii gledhill boiler buzzing
- Thread starter Jeet
- Start date

Sponsored Links
Hi,
Thanks for all the info in this thread.
We too had the dreaded buzzing and I discovered it was the PCB board and ordered one of ebay, and duly fitted it.
However, the heating pump stayed on, and kept pumping hot water round the system, even though the room stat was set to 19, it didnt click the boiler on till 27 and the heat was climbing.
I took out the new board and put the old one back, and the pump returned to going on an off immediately the stat clicked either way respecively. I did think that perhaps the old board was wrong to do this and the pump SHOULD continue for a time after the boiler goes out, but for an hour!
Any ideas before I try to return the new board?
Just resurrecting this thread!
I get the buzzing on the top board which is the Pump Drive board.
What are the capacitors I need to change and does anyone have a Maplins code for them?
Thanks
EDIT:
Radial Capacitor 22uf 63v
http://www.rapidonline.com/sku/Elec...radial-electrolytic-capacitors/180812/11-3730
I get the buzzing on the top board which is the Pump Drive board.
What are the capacitors I need to change and does anyone have a Maplins code for them?
Thanks
EDIT:
Radial Capacitor 22uf 63v
http://www.rapidonline.com/sku/Elec...radial-electrolytic-capacitors/180812/11-3730
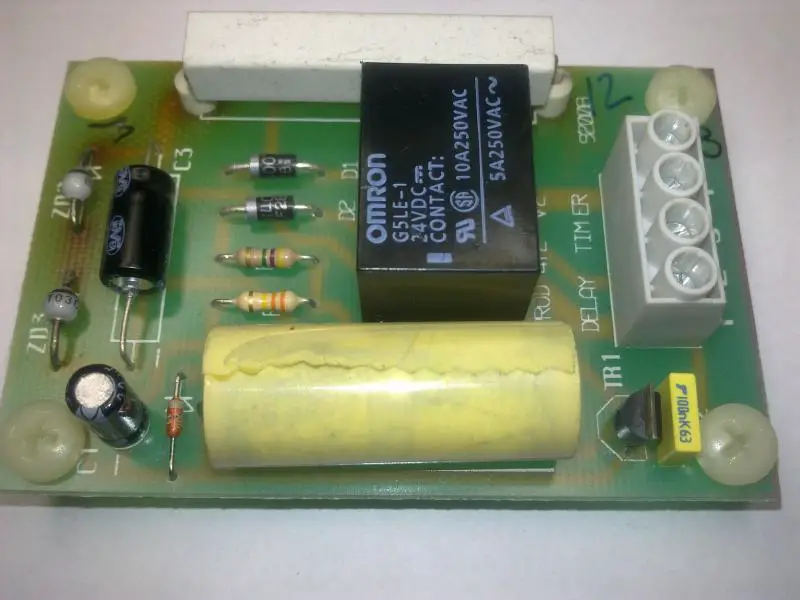
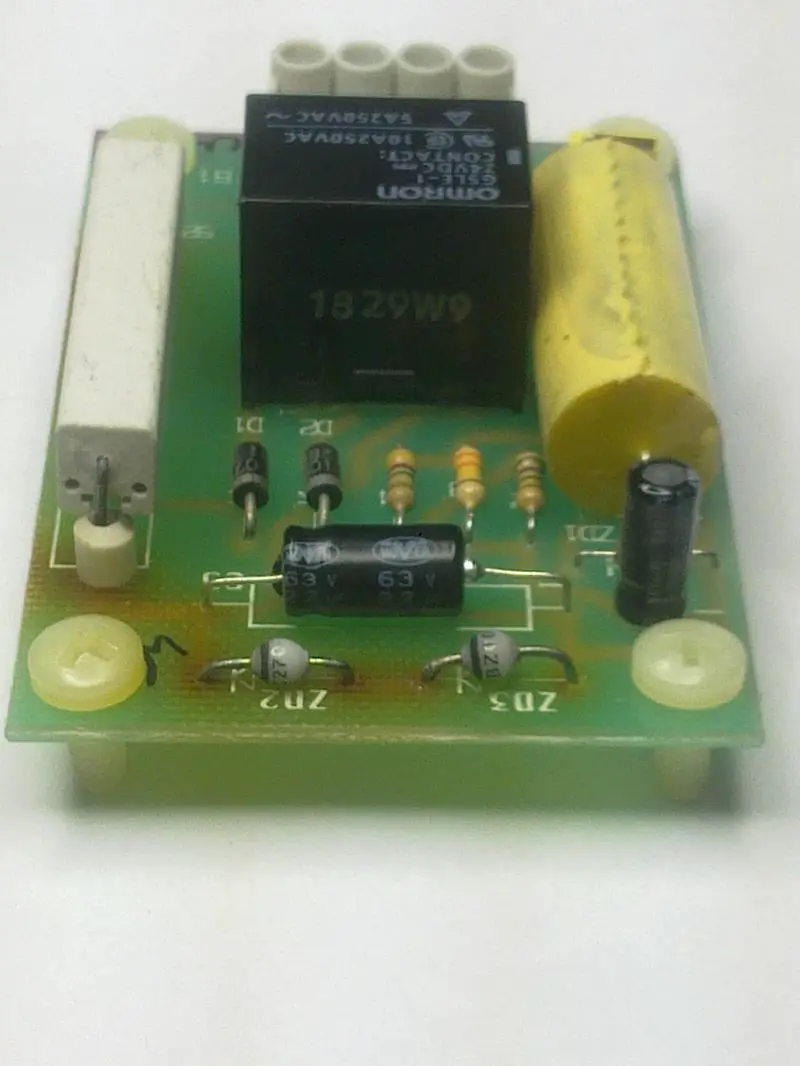
Thanks to all who contributed answers here. I had the same relay chatter (buzzing)with my Boilermate II. Replaced the smoothing cap (22mF 63V) on first the pump delay PCB, that changed the buzzing to more frequent and regular. Then changed the 22mF 63V electrolytic on the pump drive PCB, finally "Peace at Last" (as PAL TV was once known...)
Did this and its sorted!
Very easy, total cost 36p

Sponsored Links
The problem and solution is really quite simple, and incredibly cheap if you can wield a soldering iron. The issue is not the relay itself, but the rather crude power supply. There is a 22uF electrolytic capacitor which smooths out the 50Hz from the mains, which due to the high temperature it is constantly exposed to, has dried out, and consequently is no longer doing a very good job. The buzzing noise is the relay being switched on and off 50 times a second - which isn't very good for the pump. Maplin supply suitable electrolytics that are rated for high temperatures - so should last a few years longer. I suspect that replacement boards will develop the same symptoms over time. I've replaced all the electrolytics in both boards for around 50p[/img]
Can you use any 22uF electrolytic capacitor? do you know the part code from maplins
thanks
sorry my mistake! on the wrong page
Just over 2 years since my last post and the 63V capacitor needed replacing again. Since the Maplin capacitor is smaller than the original component, it's perhaps not surprising if it dries out even more quickly.
Just over 2 years since my last post and the 63V capacitor needed replacing again. Since the Maplin capacitor is smaller than the original component, it's perhaps not surprising if it dries out even more quickly.
And almost 3 years since doing my fix, some buzzing has now come back to haunt us once more. Not had a chance to catch the buzzing whilst it is happening yet, but I'll just replace all caps this time regardless...
just wanted to say I had all the same problems and would have spent big money if it were not for this forum and the advice in it. I replaced all the caps in both boards and no buzzing anymore. To identify I took high res picutres and magnified to allow the numbers to be read, especially on the pump drive board,
they were all 63v, 22uf, 2.2uf and 1 uf
the ones on the delay board have been listed earlier.
It was worth doing as I also noticed a cable that had been pinched slightly under the cover plate, so rectified that too.
they were all 63v, 22uf, 2.2uf and 1 uf
the ones on the delay board have been listed earlier.
It was worth doing as I also noticed a cable that had been pinched slightly under the cover plate, so rectified that too.
Hi all, to replace the capacitors on the pcb's does one need a soldering iron?
The big axial capacitor is rated 63V 22uF, and the small radial capacitor is rated 16V 22uF. Maplin part numbers AT04 (43p) and VH09 (12p) respectively.
Hi everyone.
Sorry to resurrect this thread but I'm now at a brick wall.
I've got a boilermate ii and the lower PCB was doing the 2-3 second buzzing as described in previous posts. I swapped the two suspect capacitors as quoted above yet the problem persists.
Are there any other components on this board which would cause this problem?
Thank you.
I wrote this after incorrectly thinking the post at the bottom of page 1 was the last word.. how apt that is wasn't!!
I Totally disagree.. I have used this site for years, without posting, as a heating engineer it is a very useful resource. I totally dont care what dates the posts were, the end result is a very useful thread.
I know what I am going to do today, rip out and throw away those pcbs, wire boiler pump to the pump live on the boiler, and also put a timer on the boiler, its astounding that these units were left effectively on all the time!!!!
The big axial capacitor is rated 63V 22uF, and the small radial capacitor is rated 16V 22uF. Maplin part numbers AT04 (43p) and VH09 (12p) respectively.
Hi everyone.
Sorry to resurrect this thread but I'm now at a brick wall.
I've got a boilermate ii and the lower PCB was doing the 2-3 second buzzing as described in previous posts. I swapped the two suspect capacitors as quoted above yet the problem persists.
Are there any other components on this board which would cause this problem?
Thank you.
Probably just reiterating what’s already been written – After ten good years in a Skimpy (Wimpy) house my BoilermateII also started buzzing (when the heating was switched on). A search engine brought me here and this is what I did:
(I’m taking for granted you can use a screwdriver, a soldering iron or, at least, you know someone who can do this for you).
With the mains power feed switch off/disconnected:
Remove the four self-tapping screws from the four corners of the long white cover and pulled off the store temperature controller dial and its pointer. You can now prise out the cover and place it to one side – my cover was earthed with a long length of wire.
With great care, power/switch the heating back on. You will now have a better idea where the buzzing is coming from (both my lower pump drive PCB and my upper PCB sounded like they were buzzing. I found that lower Pump drive PCB was resonating on the main metal body so it sounded like both PCB’s were at fault).
Once you have an rough idea which PCB is buzzing, switch the mains/power feed back off then, undo the four white plastic screws which attach the buzzing PCB to the main boiler body (hold the plastic backs if they start to spin).
With the four white plastic screw fixings removed lean the PCB away so it’s not likely to contact with anything else around it (obviously still wired up). Now connect and power the heating back up. Now you should be very confident which PCB is the affected buzzer – Hopefully it’ll just be one of the PCBs. Switch everything back off and power down.
Now, carefully tape/label the four wires connecting to the buzzing PCB (The PCB will have numbers printed next to each of the four screw terminal connections for reference. Remove the PCB.
As already stated in this forum, (on my faulty lower pump drive PCB) I swapped out the C3 electrolytic capacitor (the original was valued a 22uf 65v axial ‘lay down’ version – which you can replace like for like however, I upgraded to a 22uf 100v. Mine was sourced from Maplin in the UK, Part number ‘VH29G’ (Priced £0.39 UKP 2012) I was only able to source the radial ‘stand up’ version.
Replacing the faulty C3 electrolytic capacitor is quite straightforward. It is polarity sensitive so before removing the faulty component, make sure you know which end is which on both old and new (they are generally marked with a black negative symbol next to the negative leg/wire or one of the two legs/wires is shorter – both indicate the negative side of the component) my PCB was also marked.
Once you are satisfied with the soldered new electrolytic capacitor in place, double check its polarity (double check all the other solder connections on the rear of the PCB, a couple of mine looked dry) and re-connect, re-attach all of the above in reverse order). I check the old buzzing PCB was now functioning correctly after reattaching the four PCB connections and before reattaching it to the main boiler body.

Thanks for a detailed post. Our Boilermate (not Boilermate II, we have the original) started buzzing this morning (delay timer) after we'd both had a shower. After reading this thread, a visit to Maplin and some quick soldering at Oxford Hackspace, we had a functioning Boilermate again by lunchtime, and the boiler pump is now reheating the water.
A couple of notes - as well as new capacitors, on your trip to Maplin you should probably get a packet of N17CH 1/4" PCB standoffs, as the ones holding our delay timer board on were all yellowed and brittle and fell apart when trying to remove / reinstall the PCB. You might also consider soldering in a new 4way screw terminal block if you can lay your hands on one; ours is getting very brittle, though it seems to being holding together enough for safety.
Also, double and triple check the polarity of the electrolytic capacitors: this is what happens when you get it wrong...
Anyone who prefers not to solder their own might like to look at this clone part on eBay which someone has enterprisingly started to produce. As the (Dec 2014) price of the Gledhill part is over £75 for some fairly basic electronics, £26 seems a great deal more reasonable. I have no connection with this supplier or knowledge of his kit, and this is not a recommendation, but trying this would have been my next step if for any reason I couldn't have soldered in new caps.
Links in this post may contain affiliate links for which DIYnot may be compensated.
DIYnot Local
Staff member
If you need to find a tradesperson to get your job done, please try our local search below, or if you are doing it yourself you can find suppliers local to you.
Select the supplier or trade you require, enter your location to begin your search.
Please select a service and enter a location to continue...
Are you a trade or supplier? You can create your listing free at DIYnot Local
Sponsored Links
Similar threads
- Replies
- 1
- Views
- 1K
- Replies
- 9
- Views
- 4K