Hi all
Very basic DIYer here. As in I'm happy to have a go at everything, and have most tools I'd need, but I'm not well practised. Please bear with me.
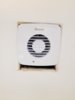
Recently decided to replace the old knackered extractor fan in the en suite as it sounds like an earthquake.
Somehow, when they built these houses 16yrs back, they managed to find what seems like the only rectangular fan enclosure in the known universe. Honestly, I couldn't find anything that would suit (so far). Thanks Vent Axia; who needs industry-standards anyway.
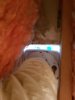
Having taken the old one out, I'm now left with a rectangular gap, and apparently only square options. The old cover smashed to a million pieces upon removal, so I can't even just put it over this one (which would be a bodge anyway of course).
See pics - that's where I am so far. The thing itself is very lightly wedged into place; coincidentally the housing just happens to wedge nicely in the gap width-wise.
To fix the length issue, I've pinched a cut-off of plasterboard from a mate. It's not as thick but won't matter if I get it right. I'm thinking:
- Cut a piece of plasterboard to shape, to fill the gap. It'll need to be a bit of a crescent-moon shape on the inside edge, to compliment the curve of the fan housing
- Wedge it in the gap from above (assuming I cut the width just right, it should sit in snugly)
- Use filler in all the visible gaps from underneath
- Paint
Fine, seems ok. But then the fan is still just sitting there, not actually attached - just held in by being slightly wedged. Unlikely to ever be an issue, but feels lazy.
Any thoughts/recommendations on anything blindingly obvious I'm missing here please? What would you do in my situation?
many thanks
Matt
Very basic DIYer here. As in I'm happy to have a go at everything, and have most tools I'd need, but I'm not well practised. Please bear with me.
Recently decided to replace the old knackered extractor fan in the en suite as it sounds like an earthquake.
Somehow, when they built these houses 16yrs back, they managed to find what seems like the only rectangular fan enclosure in the known universe. Honestly, I couldn't find anything that would suit (so far). Thanks Vent Axia; who needs industry-standards anyway.
Having taken the old one out, I'm now left with a rectangular gap, and apparently only square options. The old cover smashed to a million pieces upon removal, so I can't even just put it over this one (which would be a bodge anyway of course).
See pics - that's where I am so far. The thing itself is very lightly wedged into place; coincidentally the housing just happens to wedge nicely in the gap width-wise.
To fix the length issue, I've pinched a cut-off of plasterboard from a mate. It's not as thick but won't matter if I get it right. I'm thinking:
- Cut a piece of plasterboard to shape, to fill the gap. It'll need to be a bit of a crescent-moon shape on the inside edge, to compliment the curve of the fan housing
- Wedge it in the gap from above (assuming I cut the width just right, it should sit in snugly)
- Use filler in all the visible gaps from underneath
- Paint
Fine, seems ok. But then the fan is still just sitting there, not actually attached - just held in by being slightly wedged. Unlikely to ever be an issue, but feels lazy.
Any thoughts/recommendations on anything blindingly obvious I'm missing here please? What would you do in my situation?
many thanks
Matt