First fix help

bsr

Joined
5 Aug 2008
Messages
961
Reaction score
111
Location
Gloucestershire
Country
United Kingdom
Hi guys, a couple of first fix questions if I may?

What do you do with accessory and socket wires? Tape in a circle and leave in roughly the right place? I have a mix of plasterboard and rendered walls so do you cut and fix back boxes in render as part of first fix (like chases) or as second fix?

I'm guessing the key thing is to keep your measurements somewhere so you aren't digging around in freshly plastered walls looking for the cable?

Also for a house where 90% is traditional loop in at ceiling rose would you continue that and take a 3c+e to socket for a neutral? Or loop into switch? I've not done loop at switch before and it seems a lot of cables to pack into a back box with a dimmer.

Cheers
 
Sponsored Links
Some degree of choice in all of it but generally you fix back boxes before plastering and perhaps cover them over with eg a carrier bag because it's near guaranteed your plasterer will go straight over it with the trowel and fill the box with plaster if you don't. Cable tie or tape your wire tails together and tuck them completely inside the box so they don't catch on the trowel. For finding them again I mark on the floor with a sharpie directly underneath the box, with the height it's at if it isn't standard. For ceiling downlighters etc I use eg roofing felt strip stapled between the joists with the wire attached to it, place my laser measure on the floor so it shines on the wire then mark the floor. When it's time to drill the ceiling, put the measure back in the marked box, use it to indicate the ceiling position and drill the hole

If you're looping at switch with dimmers use deepest back boxes you can get. If using Internet controlled dimmers eg fibaro you could make a hole in the back box to drop the module down through - easier if you use plastic back boxes for plasterboard walls
 
  • Thanks
Reactions: bsr
Thanks, a plumb line and marking the floor sounds like a good shout.

Assuming plastic plasterboard boxes go in with 2nd fix?
 
I fitted mine before plastering because they clamp the plasterboard hole, hence there is a 1 to 2mm plastic lip all the way around. If your plasterer plasters off it it ends up flush, but you do have to make sure it doesn't end up wobbling around. I put a small bead of stickslike on the back of mine when pushing them into place as well as pulling the lock tabs out, and they help hold it. If it's really bad (hole too big) you can look at firing a screw into an adjacent stud if you have one
 
Sponsored Links
I try not to use plastic plasterboard boxes, I tend to fit a noggin and use metal boxes as they are better from a maintenance aspect and often I have found the lugs on the plastic boxes to be temperamental.

I normally tuck all cables inside the back box in a loop then and place a piece of cardboard over the top flush. Sometimes I've cut a bit of clear plastic and drilled two holes where the back box screws are and screwed that in place to protect the enclosure from getting filled with plaster.
 
I use wide plastic capping just long enough to fit behind the lugs. I think it's better than cardboard.

It bends easily to get it in or out and springs back into shape.
 
I used to work for a bad tempered former pro rugby player, if any boxes were plastered in he would smash random holes until he found the boxes, plasterers soon got the message
 
one quick tip: take a picture on your phone once its ready for plastering

that way you have something to refer back to, just in case.

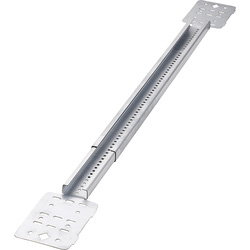
and telescopic joist brackets are great for mounting back boxes on rather than using plastic boxes


DIYnot Local

Staff member

If you need to find a tradesperson to get your job done, please try our local search below, or if you are doing it yourself you can find suppliers local to you.

Select the supplier or trade you require, enter your location to begin your search.


Are you a trade or supplier? You can create your listing free at DIYnot Local

 
Sponsored Links
Back
Top