Horizontal Toilet Waste - Changing Height of toilet

Joined
29 Aug 2007
Messages
435
Reaction score
38
Location
Buckinghamshire
Country
United Kingdom
I am about to redo my bathroom. Currently the toilet has a horizontal watepipe that goes through a plasterboard wall into a bulkhead and down the soil pipe. The idiot who tiled the floor previously didn't overboard it (tiles have cracked, hence the refit).

Once I have overboarded it and tiled the height of the toilet is going to be about an inch higher than previous. Am I going to have to pull the plasterboard down and move the pipe up or replace it with a flexible waste? If so is it hard to to?
 
Sponsored Links
You can get an offset straight pan connector from a good plumbers' merchant.
 
Pan connectors aside, have you thought about replacing the floor with 18-25mm WBP ply instead of over boarding :idea: . Actual thickness will depend on your joist size/pitch/span but will avoid excessive floor height & threshold problems so often associated with over boarding. Replacing the floor is usually my preferred option as you then know exactly what you’ve got.

Please read the Tiling Sticky & Forum Archive posts before doing any more work or buying tiling materials, it could prevent you making disastrous & potentially expensive mistakes. It’s important to use only quality trade tilling materials of the correct type for your tiles & tile base; cheapo own brand & DIY stuff is mostly crap. What size/type of tile are you going to be laying? Are you tiling the walls also?
 
Sponsored Links
Thanks Richard.

I plan on using BAL Single Part Flexible. Possibly rapidset although that last time I used that I wasted a bit as I wasn't quick enough.

I've used the BAL stuff before, it's not cheap for non trade but everyone recommends it.

I had thought about ripping up and replacing but the floorboards run under the shower and under a stud wall out into the landing. I don't really want to rip all that up and am not confident about cutting them. Was going to overboard with 18mm WPB ply. Perhaps I should think again?

I am only tiling the shower cubicle walls, the rest of the bathroom is going to be paint (apart from a couple of tiles above the sink). I was going to go to Topps Tiles and get them to recommend an adhesive for the walls as I am using Kerdi membrane over hardibacker. I know that is not essential but for the sake of an extra couple of hundred quid I want it to be 'Mike Holmes' perfect :) . The existing instal was done by a muppet and there are stains on the ceiling downstairs and mold on the PB.

The floor tiles will be 300m x 300mm ceramic (possibly travertine). Haven't picked the wall tiles yet but they will probably be 485mm x 340mm cermaic.
 
Are they proper floorboards in reasonable (flat) condition or is it crappy chipboard? If its timber boards in good condition a decent tile backer board should see you OK & usually 12mm WBP is ample for over boarding all except chipboard (the BS is only 15mm). What size/pitch/span are your floor joists?

IMO, Kerdi membrane over the Hardibacker is a bit of an over reaction to your bad plasterboard experience but it certainly won’t fail you. Them’s big wall tiles; what thickness are they & do you know the weight sq/m? Are you aware of tile weight restrictions of various tiles substrates? You’ll need a flexible powder adhesive for those tiles, tub ready mix is a definitely out.

Travertine it’s porous & will stain easily so you need to be careful with your adhesive & grout choice; some tiles come sealed & some need sealing before laying & again before grouting. I use BAL exclusively, you wont go wrong with it but Topps charge the earth for it; either go in your tiling scruffs & negotiate a hefty discount or look on-line for your materials. The trick with Rapidset is to only mix up what you can use in around 30 minutes & wash your tools & bucket down thoroughly between each mix.
 
They are proper floor boards. Condition looks to be fine and flat. I haven't looked at the joists yet, will check tonight.

What sort of tile backer would you recommend? Hardiebacker 250? Is a 6mm board thick enough?

I am aware of the weight restrictions. The tiles have been selected by the wife but I haven't been down to the store and inspected the size and weight yet. As I understand using the 12.5 cement board gives me a maximum kg/m2 of around 40, is that correct? Does the kerdi effect that (other than the additional adhesive to apply the membrane)?

Definitely wont be using tub mix for anything. I'll take a look online for BAL stuff else I'll go to Topps covered in grout and see what I can get off.

One quick question, the shower tray has 3 upstands, should the kerdi go over the upstands or butt against it and sillicone between the edge of the tray and board?
 
They are proper floor boards. Condition looks to be fine and flat. I haven't looked at the joists yet, will check tonight. What sort of tile backer would you recommend? Hardiebacker 250? Is a 6mm board thick enough?
Floor boards is good, will advise further when you tell me about the joists.


I am aware of the weight restrictions. The tiles have been selected by the wife but I haven't been down to the store and inspected the size and weight yet. As I understand using the 12.5 cement board gives me a maximum kg/m2 of around 40, is that correct? Does the kerdi effect that (other than the additional adhesive to apply the membrane)?
Lightweight backer boards will take up to 40 kg/sqm but they can go to 50kg/sqm or even more, depending on make. I know BAL WP1 liquid membrane has a weight limit of 30 kg/sqm & Tile safe membrane has a maximum weight of just 20kg/sqm. I can’t find any info for the Kerdi membrane, I suggest you check with Schluter.

Definitely wont be using tub mix for anything. I'll take a look online for BAL stuff else I'll go to Topps covered in grout and see what I can get off.
I’ve found some branches are happy to accommodate but others not; see what you can get.

One quick question, the shower tray has 3 upstands, should the kerdi go over the upstands or butt against it and sillicone between the edge of the tray and board?
Personally I don’t like/use trays with up stands as they can kick the bottom row of tiles out. To avoid making this worse, I’d go down behind the tray & seal between the tray & membrane; be careful how you use silicone before tiling, not much will stick to it including tile adhesive.
 
Thanks again Richard.

I can't actually see the joist spacings. The floor boards are tight together and I cant see any nails / screws. I can only see the space under the shower currently as I haven't ripped the floor tiles up yet. I peeled the corner though and this will make you laugh. The previous num nuts has overboarded with, wait for it, 3mm hardboard. Shiny side up. It's barely fixed to the floorboards and the addy hasn't bonded to it either.

Needless to say it will take me about 1 minute to pull it up. I am going to pull the floor at the weekend so will update then on the joists.

I had chosen the tray with upstands but haven't ordered it yet. Maybe I'll get one without upstands.
 
Post back with more info when you have & we'll take it from there. In the meantime, take some time to read the Tiling Sticky & Archive posts; do it right & your next bathroom will last at least 10 years. ;)
 
Post back with more info when you have & we'll take it from there. In the meantime, take some time to read the Tiling Sticky & Archive posts; do it right & your next bathroom will last at least 10 years. ;)

Well as expected the floor came up very easily. Took me 3min 38 secs to clear the floor of tiles. The 3mm hardboard was nailed down with panel pins. The floor is 6'x 4'and I counted 12 nails, nice one. The shower cubile is being a bid harder as the plasterboard is crumbling. I have to sort the waste as the PB can't go in the Hippo bag so that's being a pain.

Anyway the joists are 2" x 4". They run the length of the room and they are 16" on centres.

The floor boards are very flat, I've checked with a straight edge and there are no gaps. They are nailed down though. I was expecting them to be screwed. I gave a good jump around and there was no movement (I weigh 18 stone). The floar boards seem to be 22mm thick.

When I over board should I use longer screws and go through the boards into the joists?

I've re-read the sticky again. Tried for a discount at Topps and got told to poke it. So will be ordering some BAL off the T'Interweb.
 
Anyway the joists are 2" x 4". They run the length of the room and they are 16" on centres.
The pitch is OK but can you confirm they are only 4” x 2”? That’s pretty small; they are usually 6” or even 8” deep. You say they run the length of the room, what is that but, more importantly, what is the length of unsupported span?

The floor boards are very flat, I've checked with a straight edge and there are no gaps. They are nailed down though. I was expecting them to be screwed. I gave a good jump around and there was no movement (I weigh 18 stone). The floar boards seem to be 22mm thick.
22mm is good but nails tend to come loose over time so I would definitely advise you add some additional screw fixings, through into the joists (check for pipes & cables). That’s also known as “the fat man test” (no offense). :LOL:

When I over board should I use longer screws and go through the boards into the joists?
With over boarding you should fix through into the joists (again check for pipes & cables), many just screw into the floorboards but this can lead to the over board curling.

I've re-read the sticky again. Tried for a discount at Topps and got told to poke it. So will be ordering some BAL off the T'Interweb.
Doesn’t always work, although I’m surprised they offered you nothing at all; some branches are more co-operative than others.

I would also advise you spend a little time reading through some of the relevant Tiling Forum archive threads
 
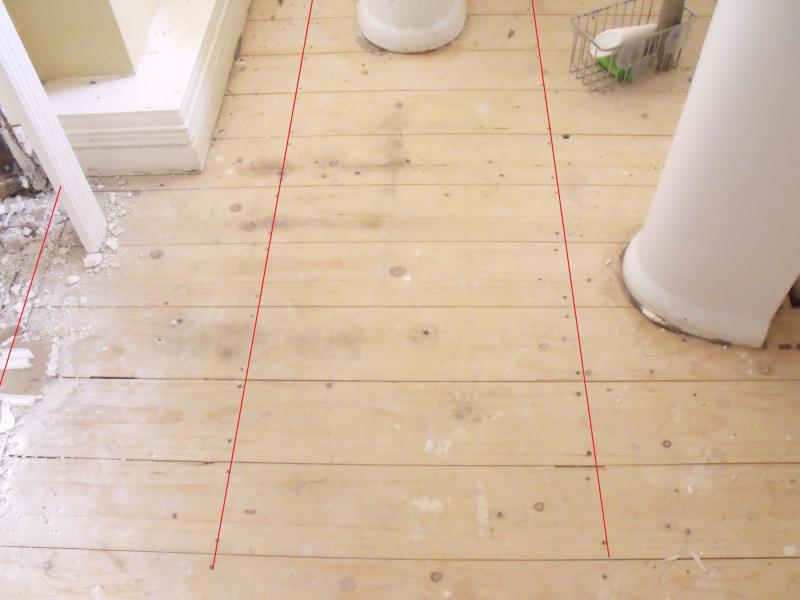
Richard, I have marked the poisition of the joists in the photo below.

The joists are 1.5" wide. I assumed 2 x 4 but as you see from the pic the boards are so close together that I can't see whats beneath them nor get a tape measure down them. I didn't want to start lifting them as they were in such good nick.


I think I picked the wrong day in Topps, the guy serving was a right misserable oik. I have been in there before and they have been quite friendly. Got the wrong person I guess.

Cheers[/img]
 
So you haven’t actually had sight of the joists? You will need to lift a few boards, say every 5th one, to check where pipes & cables run but you may establish this by lifting jut 2 or 3 boards; this will also allow you to measure the actual size & span of the joists. It’s fairly important in both cases.
 
So you haven’t actually had sight of the joists? You will need to lift a few boards, say every 5th one, to check where pipes & cables run but you may establish this by lifting jut 2 or 3 boards; this will also allow you to measure the actual size & span of the joists. It’s fairly important in both cases.

Richard - Thanks for your continued help. I can't get the frigin boards up. They are toungue and grove and the buggers won't budge individually. There was one board where the toungue wasn't in the grove one one side but as soon as I tried lifting this board it started to break the addjacent board.

Can I not find where the pipes / cables run using a metal/electricity detector and overboard with the Hardiebacker 500 or aquapanel? Surely I wont need anything more substantial than that will I? I don't want to cut corners but I can't see anyway of getting the boards up in one piece and because they run into the main bedroom and under the stud walls I am not confident in pull them up completley.
 

DIYnot Local

Staff member

If you need to find a tradesperson to get your job done, please try our local search below, or if you are doing it yourself you can find suppliers local to you.

Select the supplier or trade you require, enter your location to begin your search.


Are you a trade or supplier? You can create your listing free at DIYnot Local

 
Sponsored Links
Back
Top