House refurbishment project. Plenty of pictures.

Joined
15 Apr 2005
Messages
16,510
Reaction score
265
Location
Yorkshire
Country
United Kingdom
Ok so we got the keys to our new house yesterday. The house is a 1950s 3 bedroom ex council house in a lovely quiet area of Swinton, Rotherham. The house was lived in by a 95 year old lady, who died last year. Sadly she lived here alone for 20 years since her husband died. Her grandchildren sold the house, we bought it for £104950. We are embarking on a full programme of refurbishment, hoping to do a lot of the work before we have to vacate our old house. Here followeth the before photos. Bear in mind everything you see has likely been here since the husband passed away 20 years ago.
20160823_121653.jpg lovely note they left us. Shame given they hardly ever visited her - they live in ossett, 20 miles away.
20160823_123503.jpg consumer unit, probably late 80s.
20160823_134004.jpgpatio door, also serving as the only back door.
20160823_134031.jpg
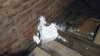
so here it gets interesting. Stop cock. Embedded in a wall. On lead pipe. Brilliant.
20160823_134022.jpg
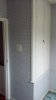
further along said wall, this wall divides the kitchen from the dining area. More on the interesting door in a little while...
20160823_134040.jpg wall again, showing hideous radiator pipework
20160823_134116.jpgthe other side of that wall, mostly taken up by an enormous sink unit.
20160823_134121.jpgopposite. In the fixtures and fittings pack they ticked the cooker nd washer were included. I rather think these actually qualify as scrap metal. Ie rubbish that should have been removed . . .
20160823_134111.jpgkitchen down the middle. The wall will be removed at some point. It sounds like a stud wall but low down i can see some brickwork behind the cabinets. We are also having a full width extension built too, after we move in.
20160823_134101.jpgthe door. If open, you have to squeeze through the gap.

More to follow. . .
 
Sponsored Links
20160823_134128.jpg kitchen larder, containing an assortment of cleaning products, a full tub of Hillards salt and the gas and electric supplies.
20160823_134144.jpg moving on to the living room. The carpet in here is really quite nice quality and we may leave this in place if we have to move in. That fire is back to back with one in the dining room, with a back boiler in between.
20160823_134151.jpg hideous pipework everywhere. Two radiators in here.
20160823_134200.jpg some of the windows are newer than others. The newest were fitted in 2009 by safestyle. No doubt that dented the inheritence. . .
20160823_134225.jpg this porch was also renewed by safestyle.
20160823_134212.jpgstairs. The hideous boxed in stair rail i believe is original as all the houses round here have this. I will investigate replacing it with a more traditional post and rail system.
20160823_134234.jpg funky carpet in the hallway appears to have been laid in 3ft strips and sewn together.
20160823_134245.jpg toilet with retrofit plastic cistern. Originally had a high cistern. Can see the marks on the wall. The wall to the left of the pot will be removed to form one bigger bathroom. It appears to just be a thermalite block wall and runs parallel with joists above and below.
20160823_134502.jpg quite why they needed this ugly gas heater and a radiator on the landing is beyond me.
20160823_134342.jpg front box room. Actually quite a nice size, but we will be knocking that cupboard out down to the bulkhed and building a bed frame over it. Much better use of the space.
 
20160823_134425.jpg front master bedroom. Ugly t12 fluorescent lamp over the bed, wired in bellwire to a plug. The plug has a second bellwire poking out of it thats been cut off. My daughter (2yo) attempted to plug this in yesterday. Ye gods. Also worth mentioning all the bedrooms only have one souble socket. A rewire is coming.
20160823_134536.jpg airing cupboard. Lead. Pipe. Everywhere.
20160823_134609.jpg interesting pipework.

So far we have stripped the back bedroom, not pictured here, of flaming woodchip (much easier once a steamer had been donated!) Removed the curtains and demolished the wardrobes and drawers in the front bedroom. Tomorrow, more stripping.
 

Attachments

  • 20160823_134342.jpg
    20160823_134342.jpg
    102.6 KB · Views: 481
These house look fantastic taking into account history! Really, 20 years without renovation and all things is not too awfull as I can imagine!!
Good luck with your project!
 
Sponsored Links
some of that looks older than 20 years, as a kid I remember having that same lino put into our brand new house 1980
 
some of that looks older than 20 years, as a kid I remember having that same lino put into our brand new house 1980
indeed some of it is much older. I imagine the toilet pan is the same age as the house which is 1950s.
These house look fantastic taking into account history! Really, 20 years without renovation and all things is not too awfull as I can imagine!!
Good luck with your project!
indeed there are some remarkably well preserved museum pieces! More pictures to follow tonight if i get chance.
 
I'm sure that 3' carpet is 1960's. Quite common to have the narrow strips in those days. £105K :eek: that's half what you'd have to pay down here. If it wasn't so cold up there we'd have moved years ago, or maybe Australia.
 
Under the 3ft strip hall carpet is 1980s newspaper. So i assume that is its age.

Anyway, no photos today, but we have almost finished stripping the bedrooms with some help from my mum, and removed the skirting boards. Apart from where the radiators are in the way. Feels like a productive day.

Back again tomorrow afternoon on my own, when i will finish stripping paper and possibly start pulling tiles in the bathroom. Ill also ring a couple of electricians to give quotes. I phoned two today, one doesnt do rewires and the other never phoned back.
 
Yesterday made a bit of progress. My mum and dad came to help.

20160826_151719.jpg cavity wall insulation under the bath. Put my foot through the tiled panel. It was the only way.
20160826_173314.jpgrandom wall light in the box room.
20160826_173256.jpgbanana door
20160826_173447.jpg how we drained the heating system. I know its meant to go on bare copper but it only had to seal for 20 minutes!
20160826_173522.jpg the garden.
20160826_173501.jpgrubbish pile.
20160826_173731.jpgbathroom. All the plaster will need to come off, it is crumbling away like sand.
20160826_173742.jpgbath. The wall between the bath and toilet is being knocked down this week probably. Provided we can get the bath out. I'm hoping we can save the sink and toilet, loose the bath to maintain facilities for all on site.
20160826_173758.jpg accident with a radiator. My dads contribution. The rad was empty but he decided to take it off the wall and start swinging it around like tiger woods. He learnt his lesson, for the others we tighened the bleed valve and inverted the rad as we lifted it off. Some of the rad tails were just too tight so we just lifted the valve off the copper pipe instead.
20160826_173814.jpg socket fed with suspiciously thin cable.
 
20160826_173834.jpgpicture rail just finishes above the window. Only picture rail in the master bedroom. Strange.
20160826_174132.jpgtanks in the loft, featuring my bodge at tying up the f&e ballcock. I added a few tiles under the batten to tighten the rope. The tank was full which i wasnt expecting. The pipe across the front is the overflor from the big tank which drains into the f&e tank. The overflow from that then goes down through the airing cpd and apparently out into the bathroom drain hopper. Strange. Oh and both pumpover pipes go into the hot water tank.
20160826_174141.jpgpipes to the tanks, with insulation that the mortgage surveyor implied may contain asbestos. . . Thoughts?
20160826_174158.jpgmore cwi, a good few cuft of it pushed up some old rolls of carpet in the loft.
20160826_174243.jpgexcellent insulation on the loft hatch. Width of my finger.
 

Attachments

  • 20160826_174202.jpg
    20160826_174202.jpg
    102.7 KB · Views: 450
Last edited:
20160829_163915.jpghallway stripping commenced today.
20160829_163925.jpg i knocked down wall no1. This was a cupboard formed by a thermalite block wall and a double door. It is above the bulkhead aboe the stairs, but we decided to open this up to make the box room feel bigger. Not that its a small room for a box room, but the bigger the better! I am a little concerned by the state of the plaster on the adjacent wall. It just seems that if i pull on it it will just fall off. It is cracked and sounds hollow. It may have to be stripped to the brick.
20160829_163929.jpg
20160829_163936.jpgseriously lazy electricians decided to butcher the adjacent fixed board rather than take it up.
20160829_163954.jpgwednesdays victim. The dividing wall in the bathroom. Its days are numbered.
20160829_163959.jpg
20160829_164008.jpg progress in the bathroom. When the wall is gone the bath will be down the middle! But we cant remove the bath as it is piped in lead to the taps.
20160829_164112.jpgquestion. Did taps used to be this way round? Both the sink and the bath are this way around. Or has someone messed up here?
20160829_164116.jpg

Ive just found some more pictures of the demolition that i took on my partners phone. Back soon with them.
 
20160829_151144.jpg they boarded the ceiling prior to building this wall.
20160829_151149.jpgbuilt onto the bulkhead, which is timber framed.
20160829_152208.jpgdone!
 
Today i spent the day doing some fiddly jobs. Took out all the horrible surface mount aerial and phone wiring. Took up the carpet on the landing. Investigated the pipework to the loft. Discovered a tap between the f&e tank and the cylinder coil. Closed it in case my ballcock comes loose! Ooh err.
20160831_162416.jpg also took off all the architraves upstairs. I was considering taking off the door linings and renewing. But decided not to because, well, look at the bloody size of them! 2 inch thick! Lucky to get half an inch these days. Also the door linings appear to be integral to the structure of the walls. So they stay.
20160831_162509.jpg this was why i wanted to renew them. Only one out of 5 is level, and that one is being boarded up!!
 
Wow, good job :)
I'm to scared to even lift up my hallway carpet lol :ROFLMAO:
 
I'm doing my place up ATM with more to do, so really interested in this. Keep the updates coming.
 

DIYnot Local

Staff member

If you need to find a tradesperson to get your job done, please try our local search below, or if you are doing it yourself you can find suppliers local to you.

Select the supplier or trade you require, enter your location to begin your search.


Are you a trade or supplier? You can create your listing free at DIYnot Local

 
Sponsored Links
Back
Top