Kitchen

Joined
20 Nov 2021
Messages
28
Reaction score
5
Country
United Kingdom
Hi,

here's a thread about a kitchen renovation for a house I bought in March. It's my first house but I have helped my Dad with DIY so not a total newbie. I haven't made great progress (mostly due to other jobs in the house to be fair). I'm hoping that posting here will motivate me to finish it as during winter I've really missed having a fully functional kitchen.

I don't have a good starting photo but it was classic 90s.

My teenage (but quite tall!) nephew helped me rip out most of the units (I kept the sink and a couple of side units so the kitchen retained some functionality). On the right side the wall units obscured the window. I like light and immediately decided the new kitchen wouldn't have wall units that side.
upload_2021-12-23_19-53-21.png


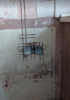
Some of the electrics were.. ahem.. interesting. When I got an RCD CU fitted the kitchen light tripped it. At least the problem was easy to find..
upload_2021-12-23_19-55-2.png
upload_2021-12-23_19-55-51.png


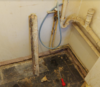
Removed partition to old utility room/pantry. It was a waste of a window and the plasterboard was rotten anyway. Not decided exactly how to use the space- simply that the washing machine will live down there. The soil stack is in the middle of the wall (why they didn't put it in the corner is a mystery). Seems a lot of effort to move the whole stack so I'll either just box it in better or move the top section of pipe and have a bend below worktop where it'll be well hidden.
upload_2021-12-23_19-57-50.png


Removed all the floor tiles. It's not clear in the photo but the screed is unevenly laid, especially in the utility room. I chiselled out some high spots by hand and will do more now I have borrowed an SDS drill. Then self levelling compound. Chasing all cable in wall rather than loose wires strung across the wall units! Oh... they'll all be level too!
upload_2021-12-23_20-1-18.png


Recent photo:
upload_2021-12-23_20-9-40.png


First design concept (fridge is wrong colour but the orange walls might stay!)
upload_2021-12-23_20-17-36.png


I already bought Samsung appliances incl. smart things auto dose washing machine (which I'm super happy with :)), induction hob (fitted temporarily in old work top- happy with it although the funny noises took some getting used to), 90cm curved glass hood (too big with hindsight).

Following a tip on another forum I plan to run 10mm insulated speed fit pipe to the sink for quicker hot water from new combi boiler (the current pipe has a run of 22mm and it takes a while for hot water to come through).

I hope to finish that, remaining chasing, wiring, plastering and floor levelling during this holiday.

I am still deciding on where to buy units (probably DIY-kitchens based on reviews here). The old doors were actually solid wood (which I like) and I seriously considered stripping them down, painting and reusing them. I like the idea of reusing stuff for the sake of the environment too. However, it feels just bit too much work when I prefer a more modern design. So I'll buy new doors too.

Any tips or encouragement appreciated!!
 
Sponsored Links
Great thread.

Make the window as big as possible.
Light is everything.
 
I'll add some morr comments. You put a lot of effort into this.

Think about putting a window on the right wall.

Think about not having two sets of cupboards on both sides. That's going to make the space very cramped.

Where is the dishwasher going?

Think about the space behind.

Kitchens are tools but they are also communal spaces. You spend a lot of time in it so see if you can make it more accessible.

Tall cupboards are great but you can't reach the top. You will need steps and somewhere to store them. This gets boring quickly.

You can't have too many sockets.

Think about having a pantry. This keeps the food stuff in one place away from the kitchen stuff. Old idea but a great one. We have added a shelf rack in our utility room and its been a revelation.

Utility room for dryer/washing machine/ chest freezer?

Have a look for open house viewings in your area, or go on Google and view any recent house sales. This will give you a good idea of what others have done.
 
I’ve got a diy kitchens kitchen, and I think it’s very good. Went for a solid wood painted finish. It was half the price of a Howdens kitchen, similar spec.

As mentioned as more light the better.

Space plugs were new to me, but they are great for fitting cabinets etc when walls might be out etc.

Look forward to seeing the install.

Merry Christmas (y)
 
Sponsored Links
I'll add some morr comments. You put a lot of effort into this.

Think about putting a window on the right wall.

Think about not having two sets of cupboards on both sides. That's going to make the space very cramped.

Where is the dishwasher going?

Think about the space behind.

Kitchens are tools but they are also communal spaces. You spend a lot of time in it so see if you can make it more accessible.

Tall cupboards are great but you can't reach the top. You will need steps and somewhere to store them. This gets boring quickly.

You can't have too many sockets.

Think about having a pantry. This keeps the food stuff in one place away from the kitchen stuff. Old idea but a great one. We have added a shelf rack in our utility room and its been a revelation.

Utility room for dryer/washing machine/ chest freezer?

Have a look for open house viewings in your area, or go on Google and view any recent house sales. This will give you a good idea of what others have done.

Thanks, really helpful!

The right hand wall unfortunately is internal. Side door will have a window eventually, which will help.

Yes I wanted to avoid cupboards on both sides so there'd be space for a little table and hopefully make it feel less cramped. However, I think the extra storage and worktop is needed. If I put the fridge in the old utility room it'd be fine but then it's a few extra steps from the cooking area to fridge and I'm lazy! The main area looks like below.
upload_2021-12-24_15-44-20.png

The utility bit is ~2.1m x 1.4m- I'll update the design to include it (as it'll help with deciding about fridge placement).. roughly it looks like below. I like the idea of a pantry but don't think it would fit.
upload_2021-12-24_16-44-23.png


The other idea was to change the side door (which I barely use) for a window to allow a full length (6m) worktop and base unit cupboards down that side.

Dishwasher felt a waste of space so I didn't include it. Probably you're right though it should be there or at least I'll do the plumbing and put in a 60cm base unit I can remove in the future.

Good point about sockets. I've got 3x doubles on the cooker side now but can fit 2 more (respecting the 30cm exclusion next to the cooker and keeping the fridge there).

This morning I scrubbed and primed the utility area floor- aiming to get the self levelling compound down after dinner :) The skirting at the back (low part of the floor where water pooled) is rotted but the plaster seems OK-ish.
 

Attachments

  • upload_2021-12-24_15-57-11.png
    upload_2021-12-24_15-57-11.png
    858.8 KB · Views: 106
I’ve got a diy kitchens kitchen, and I think it’s very good. Went for a solid wood painted finish. It was half the price of a Howdens kitchen, similar spec.

As mentioned as more light the better.

Space plugs were new to me, but they are great for fitting cabinets etc when walls might be out etc.

Look forward to seeing the install.

Merry Christmas (y)

Thanks!

Will grab some of the plugs https://www.screwfix.com/p/space-pl...-plugs-regular-30-50-x-2-x-30mm-10-pack/6085h , I hadn't come across them either.

Merry Christmas too (and to @BlueLoo )
 
OP,
Well done for the work so far, & thanks for the pics - lots of DIY'ers start full of plans but soon grow disheartened when the rubble and mess pile up and the amount of multi-tasking piles up with the debris.
You have a basic plan, and thats great & a necessity for kitchen fitting.

Given I dont know where you are up to this morning but anyway here's a few things:
Remove all units and appliances from the kitchen - it might be an inconvenience but work will flow better in a void room.
Make space in adjoining rooms for storage and assembly
Clean up and tidy up as you go - dont work over debris or units.

First fix elec, and plumbing centres must be firmly established, and first fixing is usually done before anything else.
Modern practice is the kitchen elec on its own ring.
The number of elec centres needed is often more than the householder's first estimate.
After first fix (including down lights) plastering then get a couple of coats of paint on all surfaces.
Check the external stop-tap works.


Your final FFL must be established early on - door thresholds are your benchmarks.
Search for internal damp & then examine external walls, gullies, ground levels, and any low roof.
Why the need for a "sound proof door" partition?
Do you have another rear door for back yard/garden access?
Check the external stop-tap works.
 
Looks good, well done so far.

If you don’t have one elsewhere, consider putting a downstairs toilet in that utility room. That will add a lot of value to the house and is much more convenient when you have guests/parties.

Looks like you could still use some of the space from the utility room to have in your kitchen, but a downstairs loo - even just a narrow one - is a must.
 
Morning all, hope you had a happy Christmas and thanks for the tips/encouragement!

Not done much :/ Got the levelling compound down in the utility area. It's a big improvement but I rushed it and overestimated how much it would self level. Washing machine runs quieter, an unexpected bonus.
upload_2021-12-29_9-43-20.png


soon grow disheartened when the rubble and mess pile up and the amount of multi-tasking piles up with the debris.

Yes, this happened when removing artex (loads of it). Now I try to "enjoy" the work more. Like you say cleaning up dust regularly really helps.

Remove all units and appliances from the kitchen - it might be an inconvenience but work will flow better in a void room.
I know you're right but I need to keep a functioning sink :) It can go in utility area while I'm working in the main part of the kitchen though.

First fix elec, and plumbing centres must be firmly established, and first fixing is usually done before anything else.
Modern practice is the kitchen elec on its own ring.
The number of elec centres needed is often more than the householder's first estimate.
After first fix (including down lights) plastering then get a couple of coats of paint on all surfaces.
Check the external stop-tap works.

Yes I have a new ring for the kitchen sockets. Current plan is 3x doubles (1 USB) on each side of the main area (and the single on the cooker switch)- they're done on one side but I still need to do the other side (which currently has a single socket wired between lounge and bedroom). That feels loads compared to the original kitchen but I might squeeze in 1 more. I haven't planned the lighting yet. Floorboards above are up so fitting down lights should be easy.
Other electrics to do:
-Move/replace cooker switch (at least so it's level with the sockets).
-Oven fused point.
-Hood fan fused point.

Plumbing needs more planning. I get bad water hammer and I think it's partly because the cold supply does a weird C shape around the kitchen with 90 degree compression elbows. I'll try a more direct route with gentle bends in the pipe. In the other direction I'll get 10mm hot water pipe in for the sink. This will need boxing on left of the window. Central heating and gas (unused) is already boxed on the right. I might just plasterboard all of the far wall round the window/above the worktop (18mm void should be enough and won't be noticeable loss). There's no stop-tap specifically for the kitchen (supply enters from kitchen floor) but the main one works (has had plenty of use :) ).

There's also an old broken air brick vent to deal with.

Your final FFL must be established early on - door thresholds are your benchmarks.
Search for internal damp & then examine external walls, gullies, ground levels, and any low roof.
Why the need for a "sound proof door" partition?
Do you have another rear door for back yard/garden access?

Damp- good call. There's a bit of mould by the broken air brick but I think it's because the old extractor hood was badly piped out there. Otherwise it looks surprisingly good.
upload_2021-12-29_11-18-35.png


The sound proof partition was for soil and washing machine noise. However, now I've seen the washing machine is much quieter on new flooring I won't bother (just box in the soil neater). So it'll just be open with space for a slim dishwasher, washing machine and a small sink down there.

upload_2021-12-29_10-20-25.png


There are only patio doors from the lounge. I've found that fine so far but perhaps it's because I use the lounge as a workshop so don't mind walking through in muddy shoes! So I'll probably keep that side door even if it wastes space.

Mind those floor tiles . they may contain asbestos. (y)

Yeah I got them tested :) I think they are 1990s, after our love affair with asbestos ended.

Kitchens are tools but they are also communal spaces.
Yeah when visiting family with big social kitchens I realised it's a drawback of mine. I live alone at the moment but might try to squeeze a small table or sofa in somehow.
 
Looks good, well done so far.

If you don’t have one elsewhere, consider putting a downstairs toilet in that utility room. That will add a lot of value to the house and is much more convenient when you have guests/parties.

Looks like you could still use some of the space from the utility room to have in your kitchen, but a downstairs loo - even just a narrow one - is a must.
Thanks! Already got a downstairs loo :)

I have enjoyed flicking through your build thread- although I should be working on my kitchen instead :)
 
OP,
I dont see any advantage in having a second sink or a dish washer located in the recess?
The d/w should be located as close to the main sink as possible.
The S&VP in the corner can be overboarded to suit.
Where is the washing machine discharging to - the S&VP or is there a gulley outside?

Where is the boiler - dont attempt to use a 10mm H/W supply - roll out a min of 15mm plastic pipe
but in reality you need a plumber on site to sort out (long?) runs? of h/w to various appliances and fixtures.
Kitchen rads can be vertical - jut like bathroom rads - to save space.
Stay away from Freezers - they will soon be costing a fortune to run.

FWIW: Over time, painted cabinets can begin to look dowdy - wash/wipe surfaces are my choice.
Remove all plastic plugs from walls.
Hack off bad plaster and then brick up & plaster over the inside skin of the old air brick opening, later you could brick up the outside air brick opening.
The mold is only a bit of condensation.

The 2nd sink will be handy for cleaning muddy clothes and DIY stuff away from food preparation area I think. I'll put the old sink there for a few weeks to see how it works out. I see the point about d/w and agree (either don't bother or put it somewhere convenient).

Boiler is directly above recess/utility area (old airing cupboard) so it's not a massive run- just the 22mm pipe makes it seem like a lot of water has to come through. 10mm plastic wouldn't support a dishwasher next to the sink for sure.

Yes the washing machine, downstairs toilet sink and (former) utility sink went straight into the soil pipe (all separately). If I keep that setup I guess noise control would be difficult. There is a pipe directly outside the wall under the path but I think it would be a lot of work to join into. I had thought about moving the whole stack outside but given the hassle and costs with BC it doesn't seem worth it.

Good idea on the vertical radiator.

Plastic plug removal is WiP.. there are two kitchens' worth!

Yes the mould scrubbed off easily. Cleaned up plaster this afternoon and temporarily filled hole with polystyrene. Tempting to cut out the broken part to get right to the cavity and then sticky foam onto the existing insulation so it's not a cold bridge.

upload_2021-12-29_20-45-51.png


Did a bit more chasing (until the neighbours came back- still needs chiselling out). The sorry lesson from today is that the cheap Henry knock-off bags are useless for plaster dust extraction on the chaser :( Serves me right for trying to save 50p per bag. Back to original hepa flo bags next time for me. AVOID https://www.ebay.com/itm/133285314354 (unless for normal household vacuuming)
upload_2021-12-29_21-6-10.png
 

Attachments

  • upload_2021-12-29_20-56-17.png
    upload_2021-12-29_20-56-17.png
    424 KB · Views: 64
  • upload_2021-12-29_21-0-30.png
    upload_2021-12-29_21-0-30.png
    936.1 KB · Views: 58
Last edited:
Links in this post may contain affiliate links for which DIYnot may be compensated.
Did a satisfying shift today, although didn't achieve as much as hoped.

Tiles came off fairly easily but I should have taken @tell80's to totally clear the room and units- planning to relocate the sink temporarily tomorrow at least.
upload_2021-12-30_20-50-40.png
upload_2021-12-30_20-53-3.png


Also pulled out the wall plugs (apart from the ones that disintegrated and left the stub in) and nails (had to just cut one out with angle grinder as my crowbar efforts were too wimpy).
Then the real work of scraping all the adhesive and loose plaster off began. After that I wire brushed, followed by vacuum brush and then PVA.

Before:
upload_2021-12-30_20-59-16.png

After:
upload_2021-12-30_20-59-42.png


This seems to have given a firm base I can skim over, although I'm still slightly tempted to hack away more plaster. Coincidentally there was a concealed back box behind the tiles almost in exactly the spot I had planned to put a socket- seems they couldn't make up their mind about height for the three old sockets!

Other wall close up:
upload_2021-12-30_21-2-8.png


Slowly getting there! Next- get the remaining units out, decide on dishwasher placement, finish chasing, bonding plaster in the bigger gaps and skim over. Not sure I'll be done by 3rd Jan!
 

DIYnot Local

Staff member

If you need to find a tradesperson to get your job done, please try our local search below, or if you are doing it yourself you can find suppliers local to you.

Select the supplier or trade you require, enter your location to begin your search.


Are you a trade or supplier? You can create your listing free at DIYnot Local

 
Sponsored Links
Back
Top