Options for roofing rear extension

Joined
11 Apr 2006
Messages
2,154
Reaction score
201
Location
Berkshire
Country
United Kingdom
Hi,

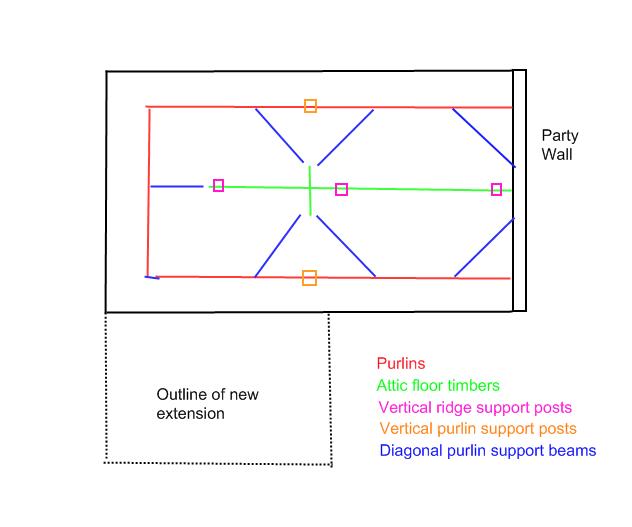
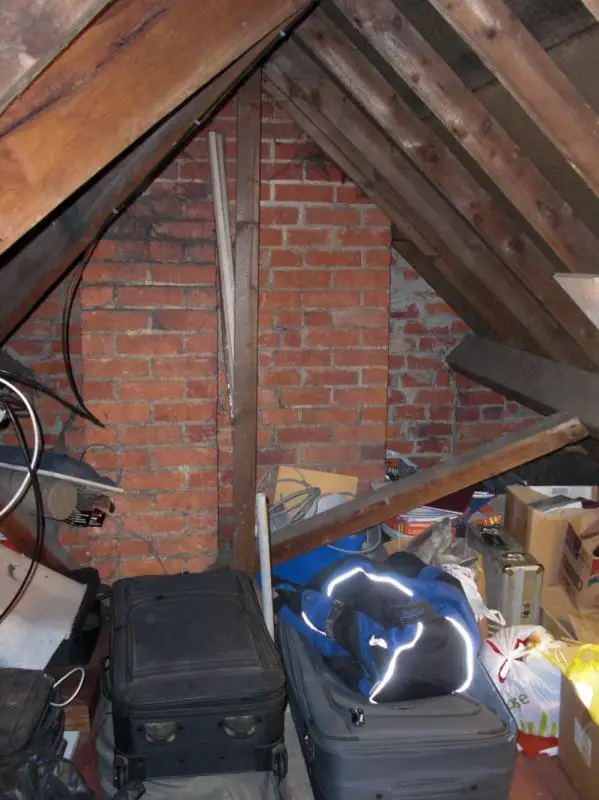
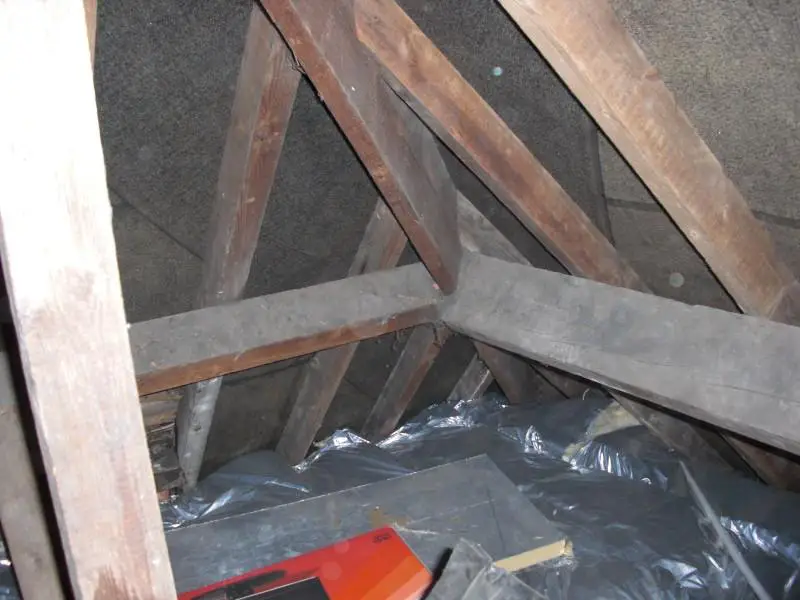
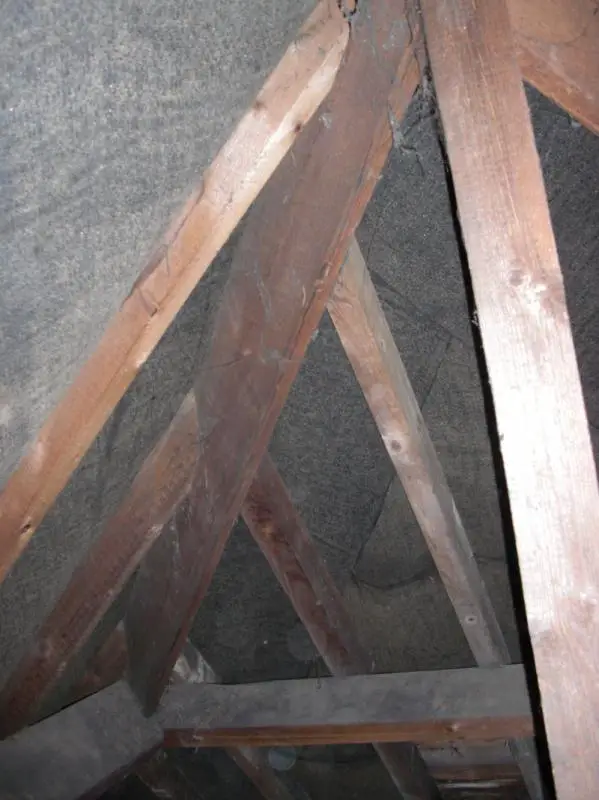
I'm building a two storey rear extension. The existing house has a hipped roof. It's a cut roof and has two large purlins running down either side, some king posts, etc. I can go in to more detail if required?

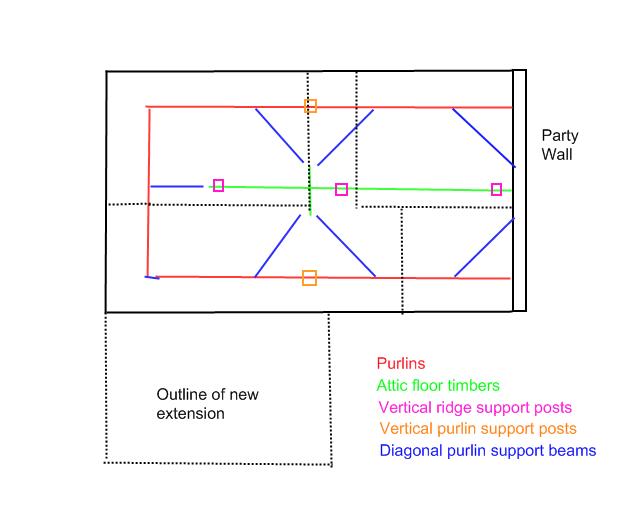
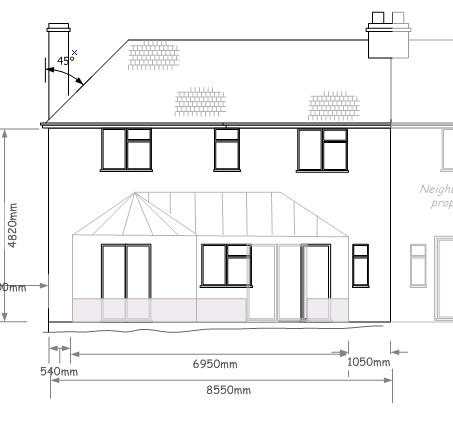
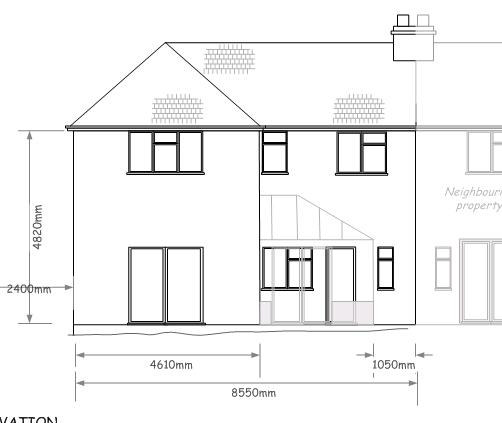
The extension will have a roof height matching the existing roof, and will be perfectly aligned with the end hip of the existing roof (i.e. when viewed in plan, the house will become L shaped rather than T shaped)

In this situation is the convention in to always continue the cut roof over the new extension, or is there an option to use prefab trusses on the new extension (I don't need the extra storage space in the attic) and then integrate the trussing in to the existing cut roof? I'm thinking not because I can't quite picture how the gap would be bridged between the existing ridge plate and the trussing, how the new valley would be formed without much larger timbers at that point than the existing rafters, etc.

Thanks

Gary
 
Sponsored Links
Why anyone would choose a cut roof over a trussed roof where there is little difference in cost is beyond me. Incidentally you can always get attic trusses that do provide an open loft space.
 
Are you the lad who built a porch, summer last year?
Regards your question. Without more details, of the top of the head would say that a cut roof will work out easier and cheaper than trying to use part trusses and part cut, especially if new addition is also hipped. If new addition is L shaped to main house then you can fly in of main roof, how ever overall plate of existing must be the same as overall plate of new addition.
1. Pitch of main? 2. Overall plate of existing? (See note above). 3. Depth of new addition? 4. Is new addition hip or gable? 5. Is existing purlin a wrap round and goes round and undere existing hip? 6. What is support to purlin at hip end? 7. Size of existing rafters? 8. Size of hip rafter?
Answer the above and will help you out.
oldun
 
Are you the lad who built a porch, summer last year?

Yep, that's me. That was a 2m x 4m front extension with double-hipped lean-to cut roof. I got quotes for trusses on that one and seemed way cheaper to make a cut roof (not accounting for the cost of my time, of course) I think it was you and noseall that made all that possible.

This time around I'm thinking the increased scale will make a truss roof a more sensible option, and I'll struggle to get the extension built by autumn so don't really want the roofing to run on in to winter so speed is more important than with the little front extension.

I'll draw up some diagrams and measurements to answer your questions and upload them later.

Interesting point about the attic trusses Freddie - I hadn't thought about that.
 
Sponsored Links
These are the rear elevations for before and after. As you can see it's a 45 degree pitch on one side, and on the other side I think it's going to be slightly shallower - maybe 40 degrees - the difference is mainly due to internal asthetic reasons bvecause of where the walls tie in to the house, but if that creates huge roof problems then I can bring that back in to 45 degrees.

By the way- if you/nose/FMT are ever about Berks, feel free to come round and sign a brick on the front extension! You may even get a bottle of wine out of it!

Thanks

Gary


Pretty picture, but of no help. Does not include the information requested. You have only answered one question.
Will repeat the critical information required.
1. Overall width of existing roofs wall plate? Front to back. Repeat over all plate.
2. Is existing roof purlin a wrap round? Does it return under the hip or stop of at hip rafter?
3. Either of the above two, how is purlin propped and strutted back down?
4. Size of purlin?
5. Size of existing rafters?
6. Size of hip rafter?
7. Depth of new extension?

Couple more questions.
Width of cavity existing house?
Width of cavity new extension?
oldun
 
Hi Oldun,

Apologies for the lack of info - I've been for a measure up:

1. The distance between wall plates from to back is 462cm. I can't actually get at the wall plates to measure it properly because we have one of those roofs that cut the corners off the first floor rooms - i.e. we have 6 inches of plasterboard at a 45 degree angle connecting the ceiling to the walls. So the 462 has been calculated from internal room dimensions. The roof was replaced 20 years ago and is still pretty straight though so I hope there's not much deviation from this along the length of the roof.

I know how much you like pictures so have tried to explain these in a diagram :)


2. The Purlin does wrap around the hip end, and at the opposite end it's embedded into the wall that separates our attic from next doors. The purlins are 17.5cm x 7.5cm.

3. There are four diagonal struts coming from a single point in the centre of the house. There are two others diagonal struts at the party wall. These are 7.5cm x 10cm. There are also three vertical purlin posts at the front and three at the back.

There are also three king posts supporting the ridge beam from the attic floor. These are 5cm x 7.5cm

4. The purlins are 17.5cm x 7.5cm
5. The rafters are 8.5cm x 5cm at 45cm centres.
6. The hip rafters are 22cm x 5cm
7. The new extension external dims are 3.5m deep and 4.6m wide - so 4.03m between wall plates.

The existing house cavity is 50mm. The new cavity will be 85mm.

I can see I probably have a discrepancy between the new extension width and the current house depth if I want to keep things simple in terms of angles. I've not looked in to regs to see whether I'm allowed to replicate the 45 degree ceiling arrangements or whether that'd be a problem for insulation. Not replicating it will probably cause me ceiling level issues especially as one of the new rooms will and the landing will span the old house and new extensions.

Thanks

Gary
 
Words of advice first young man. Women’s knitting clubs work in cm, in the building industry you always work in mm. For joisting, you work internal measure to determine depth and then add on your bearings. For roofs you work over all the plate for your measure, as all calculations are based on over all plate measure.
Back to your measure of 4620, should that now be 4845 over all plates and 5145 overall external brickwork?
What are size of existing ceiling joists?
How are they supported mid span?
Assume they are in two lengths?
Are any of the ceiling joists doubles?
Are purlins vertical or right angle to rafters?
Are the rafters joined on purlins?
You show the purlins two thirds down from the ridge. Is that correct or are they mid span?
Is the vertical strut to purlins under the scarf joint?
Is the long green line that the ridge hangers are fixed to a binder and if so what size and how many lengths?
What is the green short line that crosses the above?
Sorry about the questions, but can not get the head round why they have done the roof as such.
Is there any chance of some photos of the purlun strutting?
Keep an eye on your PM box.
oldun
 
I've been trying to give up the knitting but it's tough, especially if I've had a couple of beers.

Re: the measurements - yes - 4845 over plates and 5145 external brickwork.

The ceiling joists are 100mm x 50mm.
They're supported almost in the middle of their span in all of the house apart from above the stairs. I've added some dotted lines to the diagram below to show the supporting walls.

I can only get at half of them due to some flooring that's down in the loft, but I can't see a join in the ones I can see. I can't see any doubles.

The purlins are at right angles to the rafters and are all both one piece - no scarf joints in either. The purlins are indeed half way down the span of the rafters. They appear to be two thirds down to the eye but I guess that's because I keep forgetting that the actual wall plate is a fair bit lower than the loft floor.

I've taken a few photos - hopefully they'll help.


Party wall end. This has a central chimney so the purlin struts aren't symetrical:

Close up of the central meeting point of the struts

Wider view of central struts

The vertical strut. By the way I was mistaken saying there are three on each side. There's only one on each side, but there are three king posts:


The end of the roof that's going to have the extension meeting it (on the left as you look at it in this picture)

Close up of right hand corner of the previous shot...

and left hand corner...
 
Why anyone would choose a cut roof over a trussed roof where there is little difference in cost is beyond me. Incidentally you can always get attic trusses that do provide an open loft space.
Diminishing valley sets thats why!! :evil:

Even when we are forced to use trusses i will not under any circumstances use their valley sets. I ask them to send me the loose timber complete with layboards so that i can build my own.

Many a site bonfire has been kept burning with discarded valley sets so i've been told.
 
They are a pain to fit.

There are about six parameters to get right before you can fix them.

Each one of these parameters fights the other so you end up push-pulling, twisting, leaning the effing valley piece until you are red in the face.

It would be nice to simply fix a thrust batten to the existing rafters, then rest the valley piece on this then line through, if only you knew exactly where to position the thrust batten.
 
So what you is saying then is you is you is a bit crap at maths? :mrgreen:
I'm actually cool wiv maffs.

Unfortunately pitches differ from one elevation to another and truss companies do not always get their pitches correct.

What this amounts to is, that even if you mathematically worked out a way of positioning the thrust batten spacings, be prepared to be disappointed with the results. Either a valley too high or too low.

The upshot is, only trial and error will position a valley set correctly whilst working on existing roofs. And trial you will.

Freddy, if you know of a simple way please P.M. me ASAP! ;)
 

DIYnot Local

Staff member

If you need to find a tradesperson to get your job done, please try our local search below, or if you are doing it yourself you can find suppliers local to you.

Select the supplier or trade you require, enter your location to begin your search.


Are you a trade or supplier? You can create your listing free at DIYnot Local

 
Sponsored Links
Back
Top