Post fitting barge boards

Joined
22 Dec 2020
Messages
76
Reaction score
4
Country
United Kingdom
Good Morning

I'm in the processed of constructing a double skin block work porch and have now come to the roofing element of the project.

I would like some barge boards fitted to the front elevation / front gable to create a finish like so.
finish.png


Unfortunately at the time of having the roof rafter fitted I did not have an external rafter fitted on the outside gable face (fixed through the block work and onto the inner rafter) to carry the barge board. I understand the detail should have looked something like this.

Ladder.png


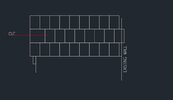
Instead what i have is this....


Porch.png


My thoughts are that it would be possible to mechanically fix a timber board to the front face of the block work and then through fix a barge board to that.
The cement board could fly over the front edge of the block work by 50mm giving the appearance that is desired.

Do we have any competent tradesmen that can advise if my proposal is a suitable solution or weather i need to have the additional rafter fitted to the external face (punching some holes through the constructed block work).

Advise is very much welcome and appreciated !
 
Sponsored Links
Why not fix timbers to the blockwork to follow the profile of the roof with roof above and bargeboard to the front.

Or if the porch is as shown, grind out suitable pockets in the blockwork and drop new rafters in of the required length.

Blup
 
The 'outer rafter' in the drawing could just be fixed externally on battens fixed into the block work. Add counter battens if you want to bring it out more. No need to grind anything.
 
The 'outer rafter' in the drawing could just be fixed externally on battens fixed into the block work. Add counter battens if you want to bring it out more. No need to grind anything.

This was my thought exactly but had been advised against this... I still can't see why it would not be a suitable installation.
 
Sponsored Links
The 'outer rafter' in the drawing could just be fixed externally on battens fixed into the block work. Add counter battens if you want to bring it out more. No need to grind anything.
Just giving the options, no problem with option 1.

Blup
 
On a small porch like that ridge/batons and fascia's would be plenty, but it looks like you have cut your ridge short!
 
On a small porch like that ridge/batons and fascia's would be plenty, but it looks like you have cut your ridge short!
My ridge board is sat into the inner block work skin.

Are you saying that is should have protruded to the outside skin?

How does this impact on the proposal of fixing a rafter directly to the external blockwork skin?
Can you give some more detail please.

Thanks!
 
Well if you were planning to have bargeboards! then it would have been a good idea to have the wall plate and the ridge sailing over the external wall, that way you would have somewhere to attach the bargeboards, the wall plate isn't much of an issue as you can use the fascia's but at the ridge you now have nothing! The problem with drilling green/fresh masonry is that it is likely to come loose whilst drilling it. You could use the batons ,fascia's and splint the bargeboards together at the ridge, depending how far you are intending to have the bargeboards overhang then it might be an idea to place a piece timber in the middle of the bargeboard that will be hidden from view and will act as a spacer , plus you could place a fixing.
 
Evening,
I'm setting out my tiles to be installed onto my porch roof. I will be installing Redland plain tiles @ 164mm wide for standard tile and 249mm wide for tile + 1/2.
My roof is a total of 1520mm wide from the existing property wall to the verge. This includes a 50mm overhang.
This has left me with an approx tile gap of 40mm when using standard tiles and an extra 40mm when using the tile +1/2.

Can anyone tell me.
1. Which tile should i be cutting for the tile + 1/2 row? I was thinking the first standard fill after the tile + 1/2 verge tile.
2. How do I go about dealing with the 40mm tile width which would be required. This seems to be not the correct way of doing this.
3. When installing the soffit tiles, do i need to cut the first set of tiles? The nibs on the back of the tile are approx 22mm down from the top of the tile meaning even by installating a second batten up tight to the first i would not get a full lap before entering the gutter.

Sketch for clarification.

Any help is much appreciated!
 

Attachments

  • Tile cut.JPG
    Tile cut.JPG
    26.5 KB · Views: 57
Last edited:
Put the cuts against the wall .There would not be a 40 as it would be a T&H cut
Thanks for your reply. Putting the cuts against the wall also makes sense.
Can you clarify what you meant by T&H cut?

Cheers!
 
You will need to cut t&h and cut tiles on alternate courses . You won't have any slithers
 
You will need to cut t&h and cut tiles on alternate courses . You won't have any slithers
Yes, but what does T&H stand for?
Tongue & horse?

Sorry i'm clearly not a roofer so i'm not all 'hip' with the lingo.
Cheers !
 
Awesome! thanks for the clarity!

Just to confirm the arrangement is as shown on the snap shot, to keep half bond on the tiles.
So I will be cutting the:
Row 1: T&H
Row 2: First (verge) and last tile.
Is this correct?

Is there anything else I need to bear in mind when installing the under soakers?


Cheers!
 

Attachments

  • Tile cut.JPG
    Tile cut.JPG
    33.5 KB · Views: 52
Last edited:

DIYnot Local

Staff member

If you need to find a tradesperson to get your job done, please try our local search below, or if you are doing it yourself you can find suppliers local to you.

Select the supplier or trade you require, enter your location to begin your search.


Are you a trade or supplier? You can create your listing free at DIYnot Local

 
Sponsored Links
Back
Top