Texecom Premier 48 Install

Joined
1 Nov 2012
Messages
35
Reaction score
0
Location
Lincolnshire
Country
United Kingdom
Hi there.

Just been busy installing a Texecom Premier Elite 48 Alarm Panel.

I think I have got just about there and been sort of doing a bit of programming of the system. I have only 2x PIR's on the system at the moment as I'm new to this alarm fitting.

I am trying to set the system up but I'm not quite sure if I have wired the PIR's up correctly. I have added some images for anyone to have a look at.

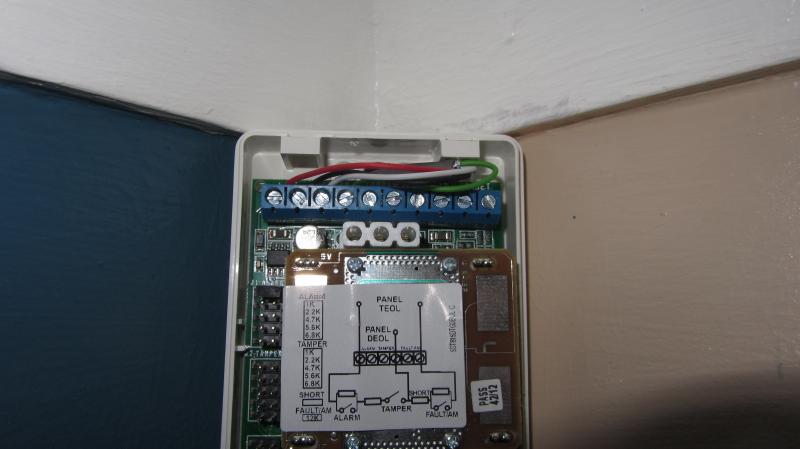
This is the 1st PIR on zone 1. The entry/Exit route.

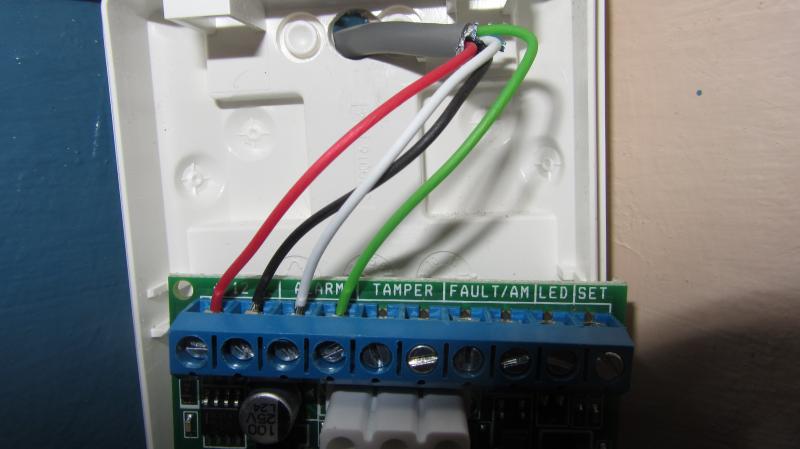
These are the images of the second PIR in the lounge on zone 2

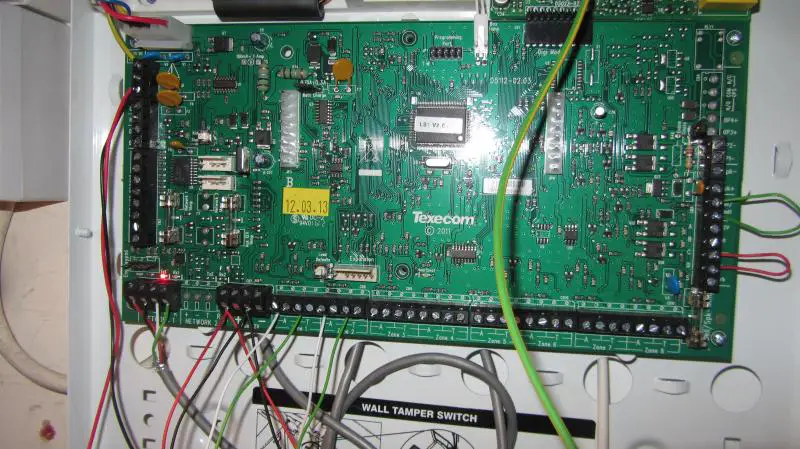
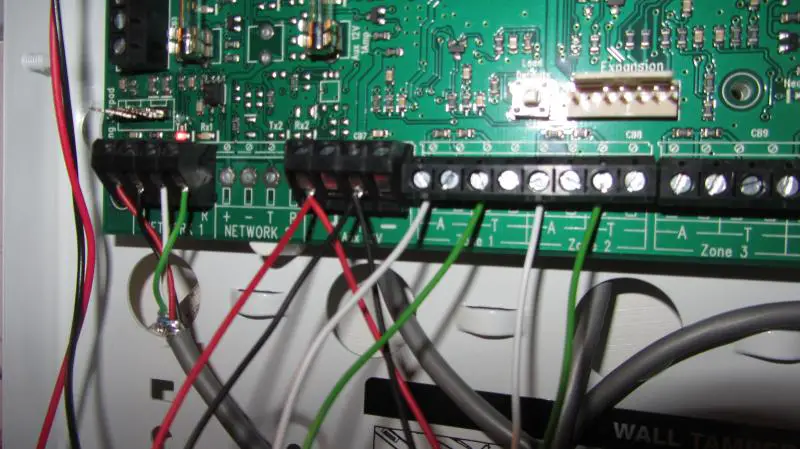
This is the panel and how I think it should be wired.

I'm open to complete and utter constructive criticism so don't hold back.

Dan
 
Sponsored Links
PIR End is ok but at the panel, the alarm circuit (green & white) should be connected to the terminals marked A. The Green you have connected to the tamper terminal therefore your loop isn't complete.

Move the green to the terminal to the left and put a link between the two terminals marked T

Hope that helps
 
nope all wrong what are you wanting to do ? 4 wire no tamper or eol wiring ? as it is at moment you need to either fit resistors or lose the tampers, if you want to lose the tampers wire into the first two connectors on the zone ( alarm ) and link out the tamper zones also you have a jumper on the detector set a 1k remove it. to be honest if your having problems wiring this you are going to struggle programming it.
 
Im not too bothered about tamper. Ok so i will remove the green from the T side of the zone and stick them in the right terminal on the A side of the zones then Link the T's together?

I have now removed the jumper.

I will get there in the end. The programming looks like the good bit.

Dan
 
Sponsored Links
Ok, it's DiY, so do what you like.

But while you diminishing the security of your alarm system, don't moan when something happens that the anti tamper circuit could come into its own.

It's not there just to protect things from 'being played around with'.

Just because you're 'not too bothered' about tamper.....

Oh I give up, what's the point, of having a tamper circuit then?
 
I'm just not bothered at the minute! I will eventually add the tamper as I install more of the PIR's. I'm learning this as I go.

Don't get so frustrated about this. Lol.

Dan
 
I'm open to complete and utter constructive criticism so don't hold back.
Ok. :D

What sort of cable is it? It doesn't look like alarm cable. Its shielded but the shield isn't connected to anything. Its huge!

The holes in the back if the PIRs where the cables enter want sealing with silicone.

Label the cables in the panel so that you can identify them in 6 months time if something goes wrong.

If you twist the wires together in pairs they will be easier to identify and route neatly within the panel.

Use resistors and wire it EOL to use the tamper. Do it now, not later, much easier to do it once correctly than change it later.

The holes in the back of the panel where the cables enter should have rubber grommets in them.

Those loops of cable on the right are about twice as long as they need to be (just me being picky ;) )

Don't use a PIR for entry/exit, use a magnetic contact on the door.
 
What sort of cable is it? It doesn't look like alarm cable. Its shielded but the shield isn't connected to anything. Its huge!
Never seen or heard of a Galaxy panel then?

That's the cable used for the Data Lines.
 
I'm just not bothered at the minute! I will eventually add the tamper as I install more of the PIR's. I'm learning this as I go.
Don't get so frustrated about this. Lol.
Dan
So you are going to re-cable then?
 
Never seen or heard of a Galaxy panel then?

That's the cable used for the Data Lines.
Never fitted a Galaxy panel, but thanks for the info. :D It's not the best cable for wiring PIRs to a Texecom.

Europlex said:
They are manufactures holes, they don't need grommets.
All metal holes get grommets if I'm doing the fitting.
 

DIYnot Local

Staff member

If you need to find a tradesperson to get your job done, please try our local search below, or if you are doing it yourself you can find suppliers local to you.

Select the supplier or trade you require, enter your location to begin your search.


Are you a trade or supplier? You can create your listing free at DIYnot Local

 
Sponsored Links
Back
Top