Tiling around socket

Joined
3 Oct 2002
Messages
46
Reaction score
0
Country
United Kingdom
I'm tiling the mother in laws kitchen!!! Only two tiles left to do, around a double socket (plastic types) on the wall. The socket sits right on the join of both tiles (if that makes sense).

Question is, do I:

a) cut out a rectangular section of both tiles, so that the socket sits against the wall, sunk below the level of the tiles.

OR

b) drill out holes for the fastening screws, and the wires, so that the socket sits on top of the tiles, with the box behind the tiles.

Any help gratefully received, as I'm supposed to be finishing this off tomorrow.
 
Sponsored Links
I think it would be quicker to remove the socket then tile it and it's neater. The problem if you cut the tile around the socket box the tile could run out of line if you're not careful.

Don't forget to turn the mains off.
 
masona said:
I think it would be quicker to remove the socket then tile it and it's neater. The problem if you cut the tile around the socket box the tile could run out of line if you're not careful.

Don't forget to turn the mains off.

Flipping 'eck, that were quick.

So, I remove the socket, drill out holes for the mains wire and the screws, fit the tiles, then screw the socket back on. Is that correct?

By the way, good comment about turning the mains off!!!!
 
Take the socket off the wall and cut and fix the tile before putting the socket on again. Also make sure the electric cable is not rubbing on a sharp edge of the tile.
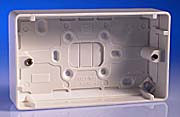
Do you mean this one? If so you will have to guess where the old rawlplug is, might be easier to move it slightly to left or right for new fresh hole and make sure which way the cable is running for safely
MKK2142.JPG
 
Sponsored Links
I always unscrew the socket (after turning off) pull it out as far as possible and then notch the tiles, but smaller than you described earlier, so that the notches are behind the socket. Then put the socket back using longer screws if need be. Looking at the piccy of the box you are aiming for the tile to hang over it edges by about a 1/4 of an inch or so.

If you are using an electric cutter it is is easier to do notches by a series of cuts about 1/4 inch apart and then snap the individual pieces off.
 
Cheers Masona, David and Julie - good comments those. By the way, it's not the box shown by Masona, which I understand sits out from the wall, its the one where the aluminium box sits in a recess in the wall, and the switch plates screws into this.

Other than that, I think I know what I'm doing now, so thanks for your help. If there's a sudden power loss in the West yorkshire area around 7pm tonight, you know what it is.

Cheers
Rolyan
 
Rolyan said:
the aluminium box sits in a recess in the wall, and the switch plates screws into this.
Turn mains off, undo the 2 screw, pull it out slightly, fix the tile, you can buy longer screw if the old is not longer enough, put socket back very gently with screw and don't tighten then give it approximately 24 hrs before tighten the socket screw again
 
masona said:
Turn mains off, undo the 2 screw, pull it out slightly, fix the tile, you can buy longer screw if the old is not longer enough, put socket back very gently with screw and don't tighten then give it approximately 24 hrs before tighten the socket screw again

Thats exactly what I did last night. Really pleased, looks pretty good, a lot better than the other socket someone did several years ago, with the tile cut around the socket.

Thanks to everyone for their advice
 

DIYnot Local

Staff member

If you need to find a tradesperson to get your job done, please try our local search below, or if you are doing it yourself you can find suppliers local to you.

Select the supplier or trade you require, enter your location to begin your search.


Are you a trade or supplier? You can create your listing free at DIYnot Local

 
Sponsored Links
Back
Top