

Hi all any assistance on this would be greatly appreciated.
(this is a fairly long and possibly complicated post.. please bear with me)
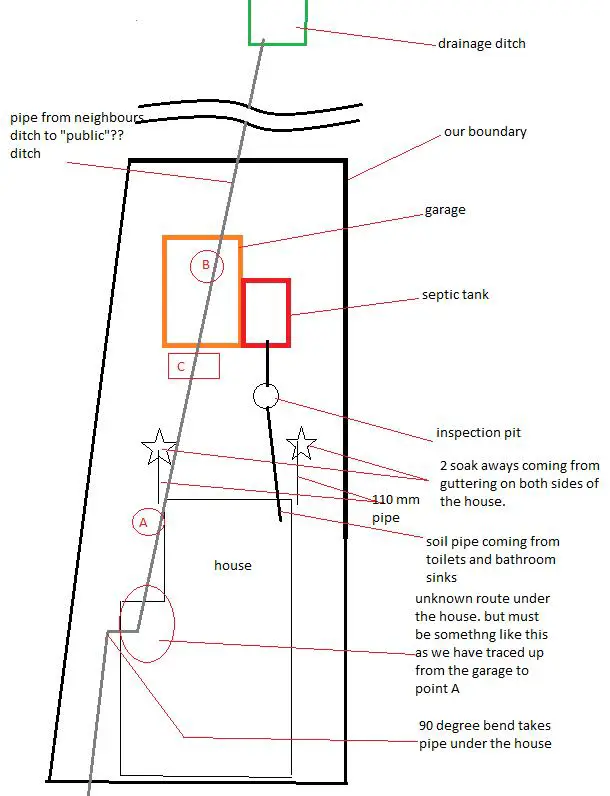
On the attached sketch of our property you will hopefully see a grey line. this is (i believe) supposed to be a surface drainage pipe coming from the neighbours ditch through our property and on to another ditch.
(I should point out that we are on a slope and they are higher up that us..)
The issue is that the pipe is blocked and their manhole overflows under our fence in the bottom left of the sketch.
I have been trying to investigate where is blockage is.
So far I have dug 2 holes between the bottom left boundary and the point where the pipe goes under the house. The pipe located in these 2 holes was 110mm orange plastic (standard underground drainage pipe).
The neighbour has been able to rod between his manhole and the bend, cant get round this bend as its a 90degree!!
I have rodded up from the ditch to point B on the sketch (approx 20 odd meters). I know that its under the garage because i hired a cat3, sonde (mouse) and cobra (150m yellow fibreglass rod).
I wasn't able to get any farther than point B.
I then estimated the position the pipe would be on the garden side of the garage and dug a trench at point C on the sketch. I located the pipe and performed some surgery to allow access.. no water came out and I found that the pipe was 90-95 percent full of soil, clay, sludge, gravel and bits of coal.. yes coal.
From point C i was able to rod up towards the house (and use the CAT) to get a semi accurate position for the pipe, but was unable to get past point A on the sketch. neither drain rods nor the cobra were able to penetrate this point.
I also rodded in the other direction (under the garage) and again was unable to get past point B. my hook attachment on the drain rods did bring me a nice piece of coal though.
So.. what should I do..
1) How can i shift the blockage just inside the front of the garage?
2) What can i do about rodding the 90degree bend(s) under the house.
(I think there may have been a manhole there at some time in the past?)
3) Leave it to the neighbour to sort out.. as strictly speaking i think, since we don't discharge into the pipe at any point, it is their problem.
(The pipe is 180mm, so i have to source a coupler to repair it.)
(this is a fairly long and possibly complicated post.. please bear with me)
On the attached sketch of our property you will hopefully see a grey line. this is (i believe) supposed to be a surface drainage pipe coming from the neighbours ditch through our property and on to another ditch.
(I should point out that we are on a slope and they are higher up that us..)
The issue is that the pipe is blocked and their manhole overflows under our fence in the bottom left of the sketch.
I have been trying to investigate where is blockage is.
So far I have dug 2 holes between the bottom left boundary and the point where the pipe goes under the house. The pipe located in these 2 holes was 110mm orange plastic (standard underground drainage pipe).
The neighbour has been able to rod between his manhole and the bend, cant get round this bend as its a 90degree!!
I have rodded up from the ditch to point B on the sketch (approx 20 odd meters). I know that its under the garage because i hired a cat3, sonde (mouse) and cobra (150m yellow fibreglass rod).
I wasn't able to get any farther than point B.
I then estimated the position the pipe would be on the garden side of the garage and dug a trench at point C on the sketch. I located the pipe and performed some surgery to allow access.. no water came out and I found that the pipe was 90-95 percent full of soil, clay, sludge, gravel and bits of coal.. yes coal.
From point C i was able to rod up towards the house (and use the CAT) to get a semi accurate position for the pipe, but was unable to get past point A on the sketch. neither drain rods nor the cobra were able to penetrate this point.
I also rodded in the other direction (under the garage) and again was unable to get past point B. my hook attachment on the drain rods did bring me a nice piece of coal though.
So.. what should I do..
1) How can i shift the blockage just inside the front of the garage?
2) What can i do about rodding the 90degree bend(s) under the house.
(I think there may have been a manhole there at some time in the past?)
3) Leave it to the neighbour to sort out.. as strictly speaking i think, since we don't discharge into the pipe at any point, it is their problem.
(The pipe is 180mm, so i have to source a coupler to repair it.)
 Or possibly better still, relay the entire run in a straight line! Is your neighbour willing to contribute to the cost to sort this out? Unlikely to prove cheap whichever way you go about it....