What function is white oval conduit supposed to provide ?

Joined
4 Nov 2010
Messages
6,141
Reaction score
656
Location
Cumbria
Country
United Kingdom
Bear with me if you think this is a daft question, but it's a genuine one.

The white oval conduit normally used to put cables in plastered walls, what function(s) is it supposed to provide ?

I can think of several, but the only one I can actually see being an actual function rather than theoretical is to hold the cables in place until the plasterer has been round.

Is that it, or have I missed something, or am I just unlucky in only having seen jobs done by cowboys ?[/b]
 
Sponsored Links
It protects against damage from the plasterers trowel.
You can pull a new cable through without destroying the whole wall.
 
It protects against damage from the plasterers trowel.
Fair point
You can pull a new cable through without destroying the whole wall.
I thought that might be one - and it is the way my father taught me to do it.
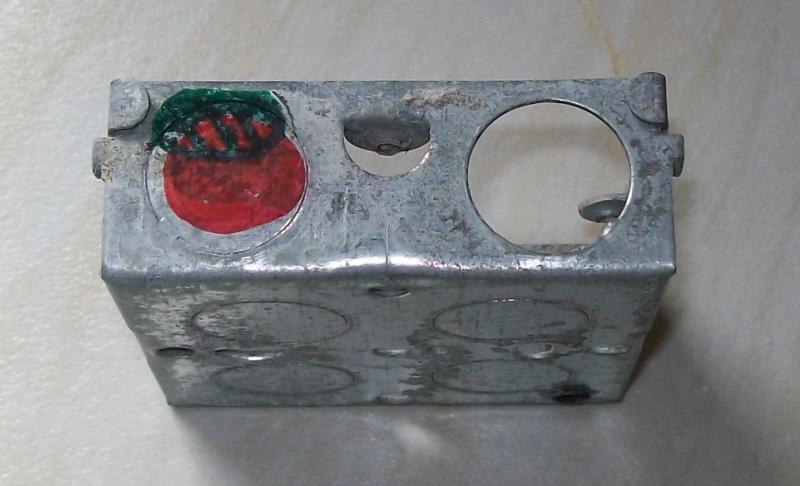
So what is considered "correct" when you get to the backbox then ? Granted I've very limited experience*, but I have never seen a professional job where the conduit actually goes into the box. In every case, the conduit has stopped short (or had the back nicked out) so the cable can be dog-legged to reach a convenient hole in the box - I guess making a suitable hole in the box is too time consuming (why don't they come with the right knockouts ?). As such, typically the last inch of cable is plastered in (and not protected from plasterer's trowel - but they should recognise the presence of the box !) and even if it wasn't, the dog-leg prevents the cable being replaced.

Plus, in my new house, the joints have been put so close to the wall that access behind them is completely impractical.
As it happens, I wanted to pull a (phone) cable out as I want to re-arange where things go. I hacked out above the backbox a bit till I had access to the end of the conduit, and tried pushing my rods up - thinking I could push them up till the end appeared at the top of the joist and attach a draw wire. They went one metre up then stopped dead - absolutely solid dead.
I've since managed to peek a view at the top end with a mirror and the top end is shared with the wire to the door bell push. I assume there's a gap in the middle where the bell wire comes out and it's been filled with plaster. I suppose it's only one more hole to dig out to get access - but at the moment I seem to be digging holes faster than I'm filling them :rolleyes:
I wonder if the builder and the sparky he employed all wore stetsons - from this (and previous things I've found) I reckon they had to be cowboys.


* Handful of houses, and being involved in a couple of building projects through work - I'm in IT so get involved with the data cabling.
 
To get oval conduit through a round hole, just squeeze the end with pliers till it's nearly round, and then put the end into the hole.
 
Sponsored Links
Or use these MK Masterseal conduit adapters.

MK56462.JPG


Or....


IMGP3408.jpg


disimulo.gif
 
To get oval conduit through a round hole, just squeeze the end with pliers till it's nearly round, and then put the end into the hole.
It's not about getting conduit into a round hole - the smaller stuff fits through a 20mm hole anyway. It's about the conduit being near the front edge of the box, but the 20mm knockouts being much further back - ie nowhere near being in line with the run of the conduit unless the box is shallow and the plaster incredibly thick.

Typically, if the conduit were taken all the way to the box, it would be almost, or completely, blocked by the wall of the box. Hence it seems to be standard practice to either cut out the back of the conduit, or just stop it an inch short, to allow the cable to be doglegged to go through the knockouts provided in the box.

I've seen some of the shallower (ie light switch) boxes with oval holes sized/positioned to suit, but it's not universal. Once you get deep enough for a socket, then they just seem to have a selection of 20mm (and 25 on deeper boxes) round knockouts.
 
Or use these MK Masterseal conduit adapters.
MK56462.JPG


Or....


IMGP3408.jpg


disimulo.gif
BAS being as helpful as ever. Perhaps you could explain the relevance to the query, because I can't see any.

If I were using round conduit then I would indeed use the appropriate bush on the end of it. As the second picture shows, it requires considerably deeper chasing that white oval. It's also not much help when dealing with what the ever so helpful stetson man originally installed.
Sorry, I missed off that if you chase out a bit deeper, then at least for the smaller sized, the white oval will just poke through the 20mm knockout - then there's no problem. But that requires the conduit to be chased in deeper, and if not careful it can create a bow that makes it stick out further up the wall.
This doesn't seem to be standard or common practice either.
 
The other tool at your disposal is a heat gun. Bend the tube to suit. (Stuff something heatproof inside to stop it flattening when you bend it.
 
BAS being as helpful as ever. Perhaps you could explain the relevance to the query, because I can't see any.

If I were using round conduit then I would indeed use the appropriate bush on the end of it.
Those Masterseal ones are soft rubber - the large end squashes with fingers to allow oval conduit in, and the other end stays round and fits into a 20mm KO like a grommet.

Takes seconds. They aren't cheap though.


As the second picture shows, it requires considerably deeper chasing that white oval. It's also not much help when dealing with what the ever so helpful stetson man originally installed.

Indeed not, but your query wasn't just about how to resolve problems with already installed oval conduit, it was also about general good practice with the stuff, so I presented an alternative.

Slightly whimsical - note the
disimulo.gif
 
So the consensus, which I agree with, is that there is no problem at all terminating white oval so that it's end is in the conduit box.
Yet I've never seen that done, other than an occasional DIY job.
The norm seems to be to stop the conduit short of the box to allow the cables to be doglegged as needed to go through one of the holes - and the whole lot is plastered in.

Here is a box I've just taken out. In red I've marked the approximate area within a standard 20mm grommet, and in green I've marked the approximate area of a small white oval. You can see that there is a fairly small overlap, and except for the smallest of cables (eg phone) it's going to be very difficult in practice to pull new cables into that - even harder is the box is sunk a bit deeper and so the green area would be a bit higher up in the photo.
 
Not sure what the point of this discussion is.

Standard knockout boxes with 20 mm holes allow for 20 mm conduit and swa as well as regular twin and earth cables.

It is usual to knock a bit extra brickwork away near the cable entry to allow the cables to neatly enter. Sometimes it is a good idea to cut a small section out the back of the end of the conduit just to allow the cables to enter the box nicely. It is also a good idea to sink the conduit slightly into the brickwork to allow a decent covering of plaster, to avoid it cracking.

No need for oval cable to enter the box if a grommet is used. If the cable is installed when the conduit and box are installed, all should line up reasonably well and it's fairly likely you will be able to draw a replacement cable in (assuming there are not too many cables, and there are no dodgy joins in the conduit).

Oval conduit can be pushed into a 20 mm knockout, sometimes with a bit of modification. This practice is useful if you need to install the box and conduit, but will install the cable later.

On new builds, plasterers can plaster over capping better than oval conduit, if fixed directly to the blockwork.

It is always a good idea to use oval conduit or capping, particularly as you have a better chance of making a future repair or alteration without messing up the wall too much.
 
It is usual to knock a bit extra brickwork away near the cable entry to allow the cables to neatly enter. Sometimes it is a good idea to cut a small section out the back of the end of the conduit just to allow the cables to enter the box nicely. It is also a good idea to sink the conduit slightly into the brickwork to allow a decent covering of plaster, to avoid it cracking.

No need for oval cable to enter the box if a grommet is used. If the cable is installed when the conduit and box are installed, all should line up reasonably well and it's fairly likely you will be able to draw a replacement cable in (assuming there are not too many cables, and there are no dodgy joins in the conduit)

...

It is always a good idea to use oval conduit or capping, particularly as you have a better chance of making a future repair or alteration without messing up the wall too much.

Which just about confirms what I have been saying.
The obvious function of using conduit (to allow future cable replacement) is something you pay lip service to. If you are only "fairly likely" to be able to replace a cable, then that's a fair admission that it's not guaranteed. If you look at the photo I posted last, and imagine how little of the green overlaps the red if the box is sunk just a few mm deeper, and it's not hard to imagine that there'll be ****-all area left - is that what you mean by "line up reasonably well" ? And of course, since you'll have (in many cases) the ends of the cable plastered in (depending how hard the plasterer pressed) ...

So like I say, it seems that consensus is that it's quite possible (and not hard in general) to guarantee no problems (by getting the conduit actually into the box), but that's not common practice.
 

DIYnot Local

Staff member

If you need to find a tradesperson to get your job done, please try our local search below, or if you are doing it yourself you can find suppliers local to you.

Select the supplier or trade you require, enter your location to begin your search.


Are you a trade or supplier? You can create your listing free at DIYnot Local

 
Sponsored Links
Back
Top