Taking forever to pressurise central heating system. Why is this so?

Normally under the sink?
I just checked while cooking supper. There's a stopcock under the kitchen sink. one inlet and a 3 branched outlet. One branch goes to the kichen cold water tap. and the other two disappear under the kitchen tiles to God knows where. From the discussion so far I'm assuming that one of the two disappearing branches goes to the EV, and the other to the loft storage tank.
 
Sponsored Links
I just checked while cooking supper. There's a stopcock under the kitchen sink. one inlet and a 3 branched outlet. One branch goes to the kichen cold water tap. and the other two disappear under the kitchen tiles to God knows where. From the discussion so far I'm assuming that one of the two disappearing branches goes to the EV, and the other to the loft storage tank.
That's the hope :)
 
@BlueLoo
Thank you for taking the time and making the effort to walk me thru' the entire process. I really am grateful for the clear explanations in post #45.

I have a confession to make. Earlier this winter, when at the end of my thether with the time it was taking to pressurise the blooming EV, I turned the red knob on top of the EV (which I now know is the PRV). A gurgling sound occurred (presumably caused by water venting out of the outlet pipe), no change in the EV pressure gauge took place and I turned the knob back to where I THOUGHT IT WAS BEFORE I TURNED IT.

But how can I be sure that the PRV is correctly set? The plumber who installed the EV made sure that the top of the knob is not visible, as you can see from the EV photo in post #9. I just put an inspection mirror over it and lit it up with a torch. All I can see are the words "3 bar" and an arrow to show which direction to turn the knob in.
 
From the discussion so far I'm assuming that one of the two disappearing branches goes to the EV, and the other to the loft storage tank.

The two, seems unusual, unless they go in two completely different directions? Usually it would be one, branching where it is needed to branch off.

One way to work out where they go, is to draw some water, at which the pipe will go from room temperature, to much colder.
 
Sponsored Links
The PRV is a spring-loaded safety valve. It snaps shut again* on its own. It's not adjustable. Leave it alone.


You mention PTFE tape. You won't need it on any thread involved in replacing this filling loop.
If used at all on a compression joint it goes on the olive, never the thread.


*Do however have a quick look outside of your house for the open end of the PR pipe (the copper pipe that goes into the wall just to the right of the PRV) and check for any drips or stains on the wall.


Edit: pressure reducing valves, also sometimes abbreviated to PRVs, are adjustable. Yours on top of the expansion vessel is a not one of these.
 
Last edited:
The PRV should be at the boiler, no?
And it should be non adjustable to 3barg.
By opening it, you've just made sure it's working (Not jammed)
 
Normally under the sink?

I am not a plumber... but over the years, I would guestimate that only about 5% of the properties that I work in (and need to isolate the mains) have the stopcock under the sink.
 
I am not a plumber... but over the years, I would guestimate that only about 5% of the properties that I work in (and need to isolate the mains) have the stopcock under the sink.
Interesting.
Where is it normally?
 
I am not a plumber... but over the years, I would guestimate that only about 5% of the properties that I work in (and need to isolate the mains) have the stopcock under the sink.

It will depend on whether there is a cellar, how old the property is, and whether it has had the kitchen layout revised. Mine comes in via my drive, with an isolator in the footpath, sweeps around the house, in at the rear, to where the kitchen is, straight in below the kitchen sink, the meter and the stopcock.
 
Interesting.
Where is it normally?

In many of the victorian houses that I work in, it is under the floor in the hallway, near the front door.

I guess that was where they originally ran the supply. Path of least resistance /etc
 
It will depend on whether there is a cellar, how old the property is, and whether it has had the kitchen layout revised. Mine comes in via my drive, with an isolator in the footpath, sweeps around the house, in at the rear, to where the kitchen is, straight in below the kitchen sink, the meter and the stopcock.

The 50's property that I live in, it comes up in the kitchen, back of property, in what would have been the galley kitchen prior to us building the extension. 3m away from the kitchen sink though, and it would have been 2m away from the original kitchen sink.
 
Its been a busy day at my end. But now I'm finally able to type a response to all the posts after #48.

I managed to get the name of the installing plumber, by searching through my emails. Rang him up, he couldn't remember the manufacturer of the PRV but said that he bought it from Wolseley. So I took a photo of the PRV (also attached to this post), emailed it off to Wolseley and in the interim seached thru' their online catalogue's PRV section. I found a similar one, but with 3 connectors (my one has 4). The one I found was made by Grant.

So next I emailed the photo off to Grant asking that their PRV techie to phone me. A1 service from him, he phoned me back within 10 minutes. He explained that the release pressure is fixed at 3 bar, and that turning the knob simply vents water out thru' the release pipe after which the valve automatically reseats itself. So that's one possible issue sorted.

Today I got my bike pump & Jubilee clips for the hose. No snow down here yet thank God. So fingers crossed I'm all set to activate the plan at 10 am tomorrow.

The property that I live in was built just after WW2, which may explain why the water mains stopcock is under the kitchen sink.
 

Attachments

  • IMG_8363.JPG
    IMG_8363.JPG
    291.2 KB · Views: 23
Any updates?
The new braided coupler tubing from 
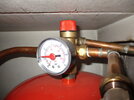
Screwfix was successfully installed. Before doing this, I opened the water mains stopcock in the kitchen and confirmed a good flow from the flexible grey plastic mains water feed pipe. The EV was completely empty. It was removed, its air bladder pressurised via Schrader valve & Bike pump to 1.5 bar. The EV was then put back into its original position & the CH system was refilled, rads bled, and the EV water pressure raised to 1.2 bar, in under a minute, using the black valve knobs on the newly installed Screwfix loop connector. It all went smoothly as I followed your instructions.
I also bled the pump of trapped air by using the screw valve on its fascia.
Unfortunately when the electrical power to the boiler was switched back on, the pump and boiler were on for 3 minutes and then shut off. Thinking that there was a problem with either the boiler's internal overheat thermostat or its Thermistor temperature sensor, I today bought new ones from Wolseley and put them in place of the old ones.
This made no difference to the situation. Its so FRUSTRATING!

Just to provide more detail, before I started work on the CH system, we had constant hotwater (always on) and heating for 3 hours in the mornings and 3 hours in the evenings. The HOT water was OK, reliably hot all the time but the CH was very temperamental, off more often than on during its 'ON' period.

Now both are off even with the programmer set to Always ON for both CH & HW. I've attached the Potterton Kingfisher MF manual to this post for any who are interested in it.
 

Attachments

  • Potterton_Kingfisher_MF CFL 40-100_Install 7.pdf
    3.1 MB · Views: 47
Last edited:

DIYnot Local

Staff member

If you need to find a tradesperson to get your job done, please try our local search below, or if you are doing it yourself you can find suppliers local to you.

Select the supplier or trade you require, enter your location to begin your search.


Are you a trade or supplier? You can create your listing free at DIYnot Local

 
Sponsored Links
Back
Top