150mm Kingspan warm roof - flashing???

Joined
28 Mar 2010
Messages
24
Reaction score
0
Country
United Kingdom
Hello from a fresh newcomer.

I am preparing to convert the garage that is attached to my house into a private recording studio.

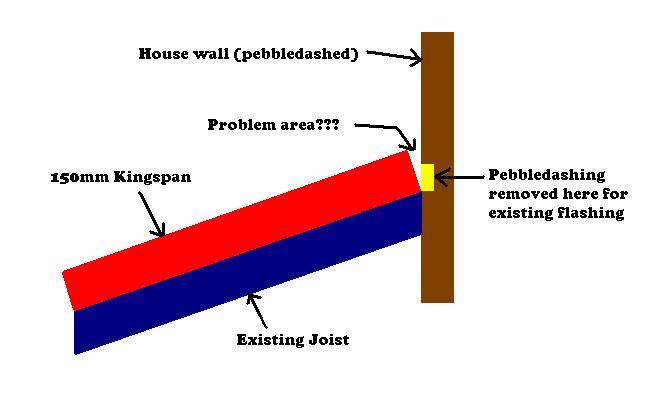
In brief, this will entail building a decoupled room inside the existing shell, but without going into those details, the big problem I have is that the existing garage roof is simply corrugated plastic sheets fitted above the joists --- and these are "flashed" into the pebbledashed wall where the garage meets the house.

It would take some time for me to go through all of the details relating to the build requirements for a studio environment, but once completed, I would essentially have a double layer of 5/8" Gypsum as a ceiling, about 4" of rockwool insulation above that, then at least a double layer of 18mm OSB.
There may be a small air gap between the rockwool and the underside of the OSB, but I cannot ventilate this space as I need to seal every possible gap and make it as airtight as possible (in theory).

I therefore need to build a warm roof and having researched as much as possible, I have been advised to fit a minimum of 150mm of Kingspan above the OSB decking to avoid condensation.

If I lay 150mm of Kingspan as well as 2 x 18mm OSB on top of the joists, then I will be faced with two problems.
Firstly, there will be a natural angle caused by the slight pitch of the roof where the Kingspan meets the house (see diagram) and the uppermost surface that would need to be waterproofed would end up above the strip on the house wall that is already stripped and chased of the pebbledashing (this strip is where the current flashing for the plastic roof is attached to the wall).


I am loathe to have to chase a new strip further up the wall, so am wondering if anyone has any ideas for these two issues?

Many thanks.
Steve
 
Sponsored Links
Indeed- but it is a DIY forum :LOL: . Consider having a strip of pebbledash rendered over , proud. then use flashband over that :idea:
 
Hi. The problem area as you describe it only requires the king span to be cut at the angle to which it abuts. With a 9" grinder and diamond wheel cutting a chase to secure lead flashing will take approx 3 minuets a meter. When veiwed against that which you are proposing is a small part of the total and worth the effort. Good Luck
 
Sponsored Links
Hello and thanks for the advice so far --- it's a long story and many of the points may seem odd, but my initial choosing to avoid doing anything to the wall is a result of a whole bunch of options and angles on approaching this build.

House is a rental, but owner has given me full permission to build the room within a room design for the studio (this entire assembly including the ceiling will not be touching the existing shell at all, so taking it all down if/when we move would be painful but possible, thereby leaving the garage in its' original state as such).

According to Kingspan tech support, there is a way to fit their product mechanically which would allow me to remove the £600 worth if we moved house.

If I were to chase a new channel, this would be awkward to cover up if I returned the roof to its original state.

I do have two questions regarding this and an alternative option though.

Questions:

1. I know I should be reading up on this, but if I did chase a new channel, is it necessary to strip the pebbledashing to create a flat, bare section of wall beneath the channel, or is it possible to cut a channel that is just wide enough for the lead to be "hammered" in and then running the leadwork down over the pebbledashing and onto the roof?

2. If it IS possible to avoid stripping/baring the wall beneath the channel, then what is the minimum width and depth that needs to be chased in order to take the lead?

As an alternative option - although it involves a lot more niggly work for me, is to fit the 2 x layers of 18mm OSB cut to size to fit between the existing joists so that the TOPSIDE of this OSB deck (once fitted) is 75mm below the top edge of the joists --- then cut 75mm sheets of Kingspan and fit them from the top in between the joists, but now resting on the "countersunk" OSB deck - so that this first layer of Kingspan ends up flush with the top of the existing joists.
I could then lay a second layer of 75mm Kingspan over the top and this would bring the roof up to a level where I could probably still use the existing section of the wall that is stripped and chased for the existing flashing if you know what I mean.

What I do not know is if this method will cause some sort of problem with the joists acting as some sort of bridging element and negating the warm roof science.

Any comments appreciated.

Steve
 
Hi. If you were to cut a chase and fit lead flashing? in the event of removing kingspan at a later date, you can simply leave the flashing in place an dress to existing roof.
Have you considered screwing sat 3"x2" timber on existing rafters? So as the insulation can be accommodated within the existing building.
 
Hi.

If I am understanding your suggestion correctly (that being to house the entire 150mm of Kingspan within the existing joist space as such) - then the only problem with this is ceiling height within the inner room, once built.

This is because I am starting with a ceiling height (floor to underside of joists) of 2.4m at the house side and 2.3m on the opposite wall, and the construction method for the studio build includes resting a NEW set of joists on top of the stud frame that will be built, with the inner room ceiling fastened to the underside of these new joists --- this ensures a completely decoupled inner room for the best sound isolation.
That would mean having to run 6x2 joists with 2 x layers of 5/8" Gypsum underneath the existing joists, so the ceiling height would come down by about 18cm which is quite tight on the low side of the pitch --- bearing in mind I still need to lay a tongue and groove floor on top of polystyrene (or similar) as the existing floor is concrete.

If the existing joist space was left unused (ie. if I put all decking on top and chase into the wall etc), or even "half-used" as per my awkward option in the previous post, then the new joists that would be resting on the stud frame would sit up and between the existing joists, so that the Gypsum ceiling boards would end up only an inch (or so) beneath the existing joists and ceiling space would be saved.

If I have to lose the height to make the job less problematic, then so be it --- but losing precious ceiling height will be a tough mental fight for me :evil:

It may be the easiest option to chase the wall, which would probably make fitting the Kingspan (and OSB decking with Vapour Barrier) much quicker and easier AND save ceiling height.

Any suggestions as to the depth (and "thickness") of the cut --- and is it OK to only make the groove/channel without removing any pebbledash?
If this "how to chase and apply lead to pebbledash wall" is covered in other threads then please let me know and I will get a cup of tea and start searching :)

Thanks for all suggestions so far.

Steve
 
Hi

If I were you I would leave the existing roof covering alone and concentrate on putting the insulation on the inside - if you use a PIR insulation you can halve the thickness of insulation required.

First step, place PIR insulation between rafters - leaving 25-50mm gap between existing roof covering and top of insulation assume you have 100 x 50 rafters therefore around 50mm insulation between rafters and then go over the face of the rafters with another minimum 50mm thickness of PIR insulation. PIR has a high vapour resistance and you should not get problems with condensation.

Then get on with your decoupled room!

Regards
 
Fair point and I will look into this.
One question, when you mention "going over the face of the rafters", do you mean the vertical face, so that each rafter is kind of wrapped in insulation as such?
Rafters are 150mm x 50mm.
Thanks
Steve
 
Hi

No your making it too complicated! Place insulation between the rafters so that it finishes flush with the underside (narrow face) of the rafter and then place another layer over the whole of the underside of the roof structure just as if you were putting a plasterboard ceiling up, using screw to fix the insulation to the underside of the rafters, only in this instance you won't need the plasterboard ceiling as you are putting in a decoupled shell, which I assume includes a ceiling of some description. As the insulation alone will not provide the sound insulation that you will be looking for!

Putting it simply - put your red section on the underside rather than on the top of the rafters!

Regards
 

DIYnot Local

Staff member

If you need to find a tradesperson to get your job done, please try our local search below, or if you are doing it yourself you can find suppliers local to you.

Select the supplier or trade you require, enter your location to begin your search.


Are you a trade or supplier? You can create your listing free at DIYnot Local

 
Sponsored Links
Back
Top