Rising damp

Joined
6 Jun 2010
Messages
9
Reaction score
0
Location
Warwickshire
Country
United Kingdom
Hi,

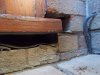
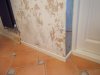
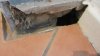
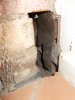
Can anyone help? I stripped the wallpaper of the kitchen wall to find rising damp on the wall about 500mm high from the floor at the door access. We have an extractor in the kitchen so no condensation present.

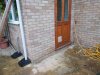
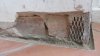
Looking outside and it looks like the DPC is bridged and this area seems to be wet all the time, see photo of flags abutting the kitchen wall. Even if the weather has been dry for weeks this is still wet. There is a mains water inlet below this area and sewer pipe. I have carried out the Vacuum test using a glass full of water with the tap outlet in the water and turned on, then turning off the main supply in the street and left this for 60 mins with no change to water height.

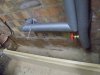
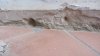
I have tested the sewer pipe best I can by blocking the output into the sewer and putting a red dye down the toilet, but I could see no sign of any dye. Looking at the photo you can see there is a green line that is wet, is this because it is constantly wet or because it is from the soil pipe.

We are going to part brick the doorway and fit a new window as part of the kitchen refurb and obviously need to resolve this problem first.

Any help will be much appreciated.
IMG_20151108_153736698[1].jpg
 
Sponsored Links
You've seen damp signs but you dont know yet what kind of damp it is.

Where is the DPC in the pic?

Is that 15mm copper pipe a gas pipe?

Do you have cavity walls or solid walls?

Do you have a solid floor or a suspended floor?

Will you post pics from inside the kitchen and further back on the outside - your focus is a bit blurred by the way.
 
Thanks for the reply the answer to your questions are below and I have uploaded more photos too.


The wall is standard cavity with cavity insulated by a reputable company.


There are two grids just on the corner of the building going into the sewer which is 3 meters away.


The kitchen floor is solid concrete and tiled.


There are no copper pipes, it is an Electrical cable on the first photo.


A soil pipe runs past the door and is below the flags at a distance of two meters from the door.


The DPC was not intact but had a repair and did overlap See phot


I have punched two holes in the wall as you can see to make sure the mains water pipe was not in the cavity.


The wall on the right is the garage wall and is mainly dry except for an area of 200mm or so. See photo. The pipes above the damp area have just been put there and there are no leaks.


The mains water stop cock is directly left in the corner as you go into the door, so about 1 meter from the corner that is damp.


The wall paper has been off the wall for 6 weeks, but the bottom corner is still very damp and the wall paper glue is sticky. The area I have marked with black pen is the wettest part of the wall.


I intend to remove the door after I have resolve this issue and brick part way, then a pvc window will be fitted.
 

Attachments

  • DSCN0098.JPG
    DSCN0098.JPG
    209.2 KB · Views: 152
  • DSCN0100.JPG
    DSCN0100.JPG
    208.2 KB · Views: 135
  • DSCN0107.JPG
    DSCN0107.JPG
    112.9 KB · Views: 138
  • DSCN0109.JPG
    DSCN0109.JPG
    178.7 KB · Views: 145
Hack off the plaster (cautious with the metal corner bead), & remove the skirting boards (past the rad) in pic 3. Examine the boards.

The dark smudges to the left of your annotation could be damp signs or condensation?

After hacking off, look for a membrane (DPM) flapping up the wall above the FFL.

Your FFL is below the outer DPC level.

When you block up the doorway, re-arrange the outer DPC and brick courses. FWIW: the bed mortar should, essentially, go above the DPC not below it.

What area of the garage wall is damp - pic please.

Are you confident that the cavity is clear?

I'd suspect the garage wall where it butts up and is caulked in?
 
Sponsored Links
As you are removing the door and block/bricking up the lower level anyway, why not secure the internal opening and remove the doorset complete. We can then have a good look at the construction detail and advise further.
 
I have removed the skirting board and some plaster, it looks to me like there is no DPM coming up the wall. There is evidence of a DPC in the wall (see photo) but the plaster is bridging the DPC I assume this is not right and the plaster should stop above the DCP to be covered by the skirting board.


The cavity seems to be clear at the door area where I have punched a brick out I can put my hand in and it is clear in this area. See photo.


When is said there is damp in the garage I was referring to a small area in the centre of photo DSCN0109 that has a damp patch where the concrete meet the wall. The wall on the left is the external garage wall as can be seen on photo DSCN0100.

The damp patch here is very small, but it is the same as the damp patch that I have below the back door, so I assumed I had a leaking pipe.


I understand what was said about removing the door to expose the problem, but I don’t want to remove the door until I have a clear solution and can just do the job on the day. At the moment I’m still not sure if I have some form of a leak in the door area below ground or are these damp patches normal?


Thanks for your replies it is much appreciated.
 

Attachments

  • IMG_0002.JPG
    IMG_0002.JPG
    83.9 KB · Views: 108
  • IMG_0007.JPG
    IMG_0007.JPG
    127.6 KB · Views: 135
  • IMG_0008.JPG
    IMG_0008.JPG
    114.6 KB · Views: 128
Where accessible, remove the skirting around the kitchen.

Scrape away all plaster to floor contact so as to leave the DPC free from any possible bridging.

Knock off any contaminated plaster at the corner and render up in sand and cement - a small bag from a plumbing supplies (its good enough for your patch).

Any leaking pipe would show more "signs".

Protect the cable with some metal capping or a shield.

AAMOI: why do you have two gullies so close together?
 
The kitchen gulley is going to the mains sewer, and

I guess that the RWP is discharging separately into a sump or some other disposal - thats good.
 
I opened the cavity fully this weekend and found that the cavity was bridged above the BPC with cement and rubble. Have cleared it out for about 3 feet, but i cannot get any deeper, so i suppose i will see if this area still gets damp. Could i use a chemical DPC in this area to stop any transfer of moisture.
 
Where did you open the cavity - from the corner to the rad?

I dont have much faith in chemical DPC's - your best bet is to clear the cavity in short sections making good as you go.

then render up to about 1000mm in sand and lime.
 
The door is mounted in the outer skin, so when the wall is viewed from the inside the first inch of it is actually the outer skin. I can't see a vertical DPC/proper cavity closer. First job is to clean out the cavity and see how it goes.
Frank
 
I opened the cavity at the door that I am going to replace with a window and removed the cement and rubble from the cavity to about one brick below the DPC. I can now see about 3 feet then there is an obstruction, which is cement bridging the two walls above the DPC. The only way to get this out is to punch a hole in the garage inside wall at that point as has been said. I will do this this weekend coming weekend.


There is a DPC between the outer wall and the door frame, see photo.


The tap is isolated in the garage for the winter period, so no leaks there.


Thanks for your input.
 

Attachments

  • DSCN0145.JPG
    DSCN0145.JPG
    114.9 KB · Views: 102

DIYnot Local

Staff member

If you need to find a tradesperson to get your job done, please try our local search below, or if you are doing it yourself you can find suppliers local to you.

Select the supplier or trade you require, enter your location to begin your search.


Are you a trade or supplier? You can create your listing free at DIYnot Local

 
Sponsored Links
Back
Top