Ensuring lintel is supported when exposing old fireplace

Joined
24 Apr 2020
Messages
11
Reaction score
1
Country
United Kingdom
Hello,

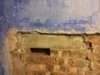
I've been exposing an old fireplace in my house, however, when it was bricked up one of these bricks supporting the lintel was removed and bricked up as well (I've attached some images).

Obviously I want to make sure the bricks above the lintel are supported, I also have some spares of the original bricks used to build the house. I would ideally like to leave the brickwork inside the fireplace exposed, although this is assuming the brick faces not yet visible are in good shape.

I've been trying to decide the best way to deal with making sure the lintel is supported, if anybody with experience could give me an opinion I'd really appreciate it, as I see it my options are:

1. Remove the modern brick and replace it with half an original brick.
Advantages
  • When finished the exposed brick header would look nice vs a modern brick chopped in half.
Disadvantages
  • Might not adequately support the lintel.

2. Remove the modern brick and the half of the original brick and replace it with a full original brick.
Advantages
  • Having a whole brick there would provide a lot of support to the lintel and bricks above.
  • When finished the exposed brick header would look nice vs a modern brick chopped in half.
Disadvantages
  • The lime mortar holding everything in place is ancient so and the material above looks like it could easily come away with the brick below.

3. Chop the modern brick in half leaving just the half supporting the lintel in place.
Advantages
  • This would be the least intrusive and wouldn't risk causing further problems with material above falling away.
  • It would take less time.
Disadvantages
  • The brick is already smaller than the others and only about a third would actually be left, this might not provide a huge amount of support.
  • The cut brick would have to be rendered over if I leave the rest of the brickwork exposed when finished.
IMG_1136.JPG
IMG_1137.JPG
IMG_1138.JPG
 

Attachments

  • IMG_1136.JPG
    IMG_1136.JPG
    291.6 KB · Views: 219
Sponsored Links
the opening behind there is probably at least 2ft wider than that lintel if it’s a downstairs room.

you could remove all the brickwork under that lintel, and the lintel, and nothing will budge.

can you take a picture of the width of the breast , i’m assuming there’s alcoves either side.
 
OP,
You want to expose the original fireplace for any particular purpose?
The original opening was wider and higher than the infill you show in your pic.
There would have been a brick arch higher up above the lintel - perhaps the arch is still there?
Why not remove the plaster for at least 500mm above the lintel, and towards the c/breast sides to within 50mm of the outside corners.
Dont remove any brickwork or lintel until you have removed the plaster as I suggested - then take a pic & post it.
 
It's in the upstairs bedroom. The downstairs fireplace is much wider, has an alcove and an arch.

No particular purpose to doing it other than the fact than it would make a nice feature and I have too much time on my hands at the moment.

The hearth is still there and extends about 3 inches either side of the opening and is level with the floorboards.
IMG_1139.JPG
 
Sponsored Links
That pic changes things a bit.
The filler obviously starts one brick in from the RH corner, and most of it can all be safely removed provided the right side of the lintel is jammed up - later, all the bits and bobs of brick can be removed and re-bedded neatly.
Its probably possible to now remove the lintel but for now leave it in place.
There's a fair amount of dust to be seen in the one brick opening - has the c/breast in the loft or the stack on the roof previous been removed?

Once you've opened up and cleared away all debris to hearth level then why not post another pic?
 
Ah so to be clear what you're saying is something along the lines of:
1. Remove the next brick along to the one I've already removed
2. Prop the lintel up in the middle with something along the lines of https://www.hss.com/hire/p/strongboy-wall-prop-head
3. Remove the rest of the filler bricks
4. Tidy up all the loose bits around the lintel and replace the now missing brick under the RHS of the lintel.
5. Safely remove the prop

The dust is from removing the render from the wall, although some did come down when I removed that brick, just old soot though, nothing from the chimney has been removed.

Do you think it's safe to remove the brick I've highlight on the picture below once the lintel is safely propped up, and replace with a complete brick spanning the full width, as the one two courses below is?
Also you mentioned it being safe to remove the lintel later on, any reason I'd want to do this, the current one seems fine - I'd assume I'd want to prop the bricks up above if I was removing the lintel though.
InkedIMG_1139[7081]_LI.jpg
 
Last edited:
While you are doing this or that, you could possibly dislodge the lintel - so, why not simply remove the lintel - the brickwork above will be safe.
Drop the lintel and remove the infill.

If you dont want to do that then leave the centre brick alone, and remove the marked brick, the one next to it and the bits below and above.
Tidy up and re-set the brickwork.
 
If you chop a bit more plaster off up the breast you'll probably find something like this (this is upstairs bedroom as well), depends what look you're after
IMG_20200425_105034793.jpg
 

DIYnot Local

Staff member

If you need to find a tradesperson to get your job done, please try our local search below, or if you are doing it yourself you can find suppliers local to you.

Select the supplier or trade you require, enter your location to begin your search.


Are you a trade or supplier? You can create your listing free at DIYnot Local

 
Sponsored Links
Back
Top