Help completing a Garden Room

Joined
9 Jan 2011
Messages
211
Reaction score
5
Location
London
Country
United Kingdom
Evening all,

I’m after some help with a garden room construction. I suspect the standard of this build is far below what many of you are accustomed to, but please bear with me because I need to salvage what is currently there and try to make the best of it. In this post I’ll mainly let the pictures do the talking, so it might get a bit image heavy.

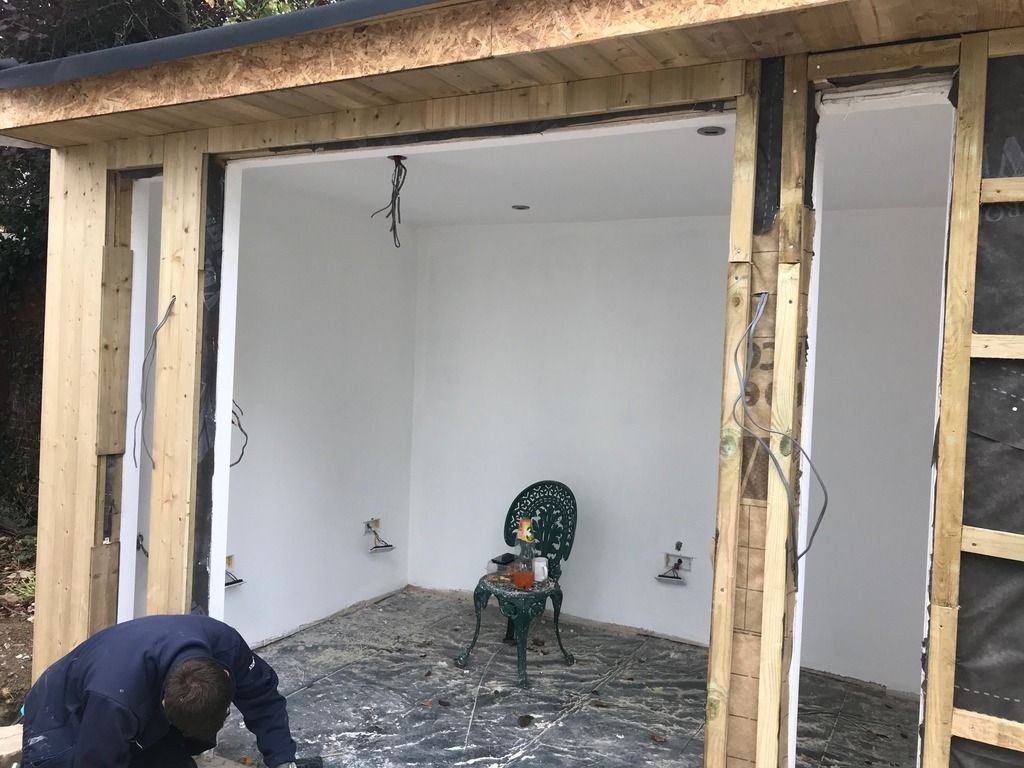
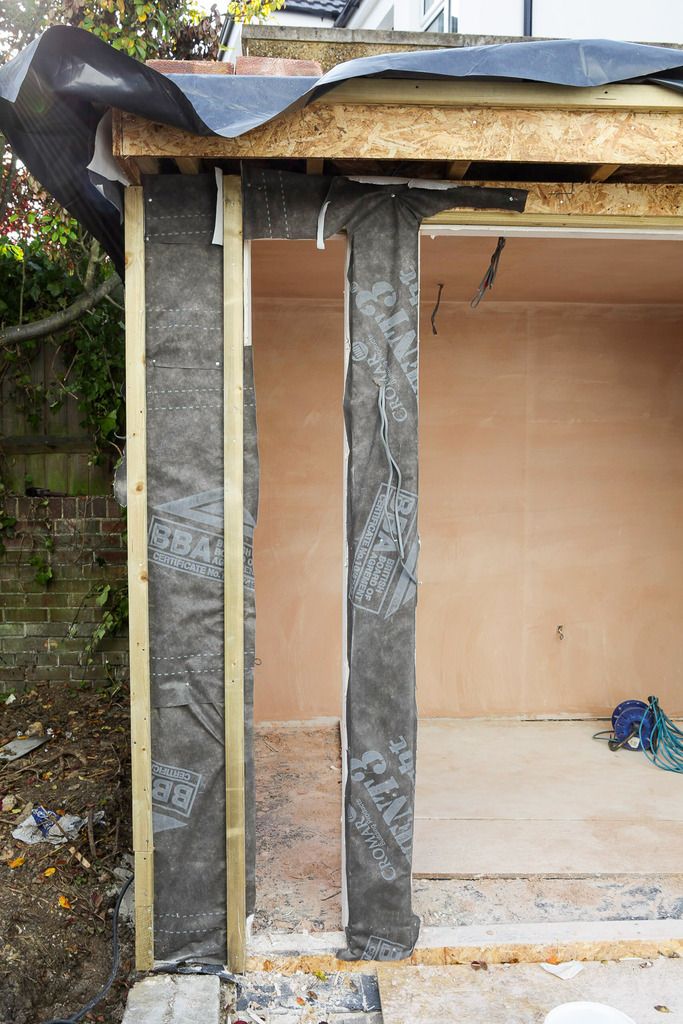
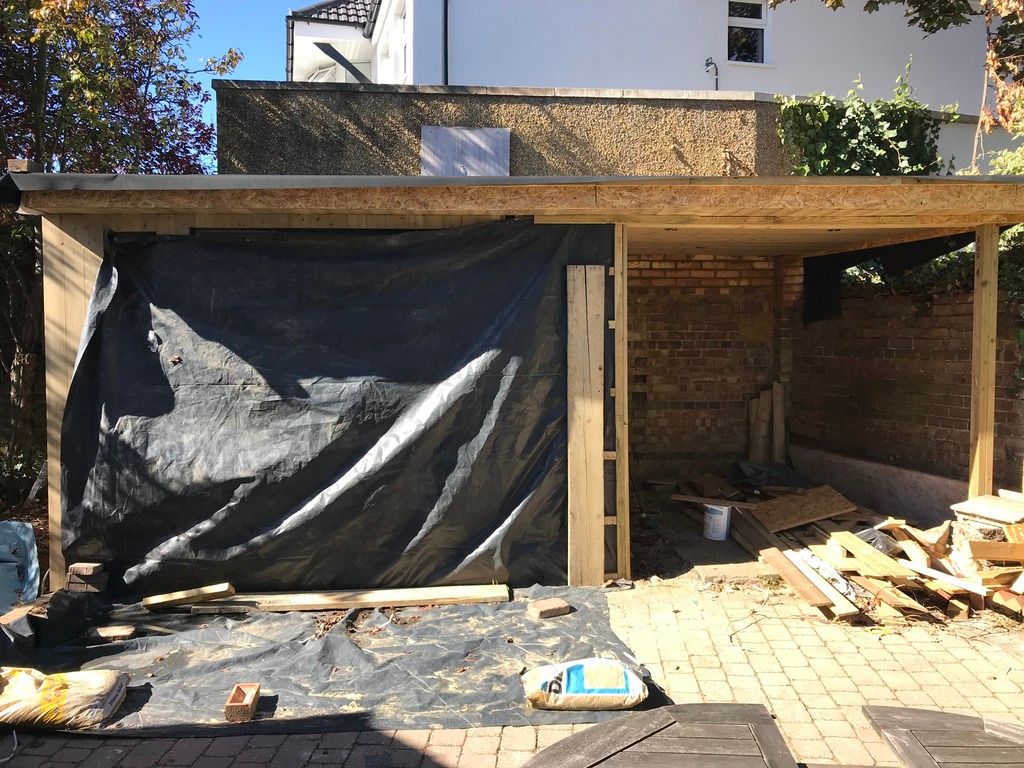
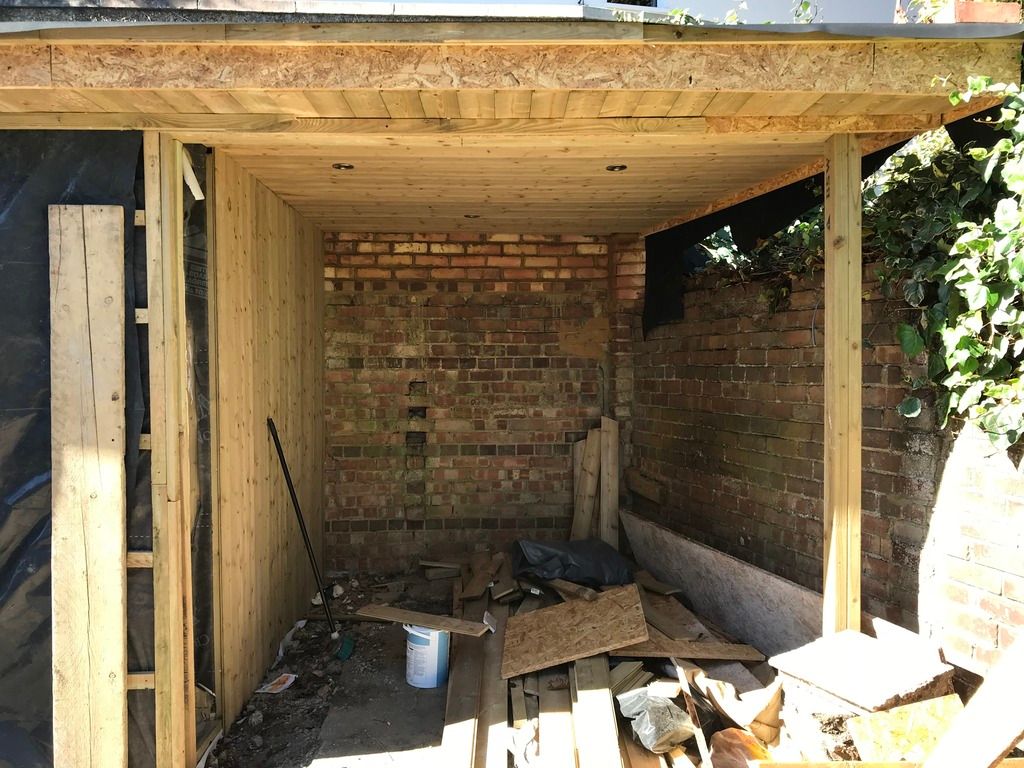
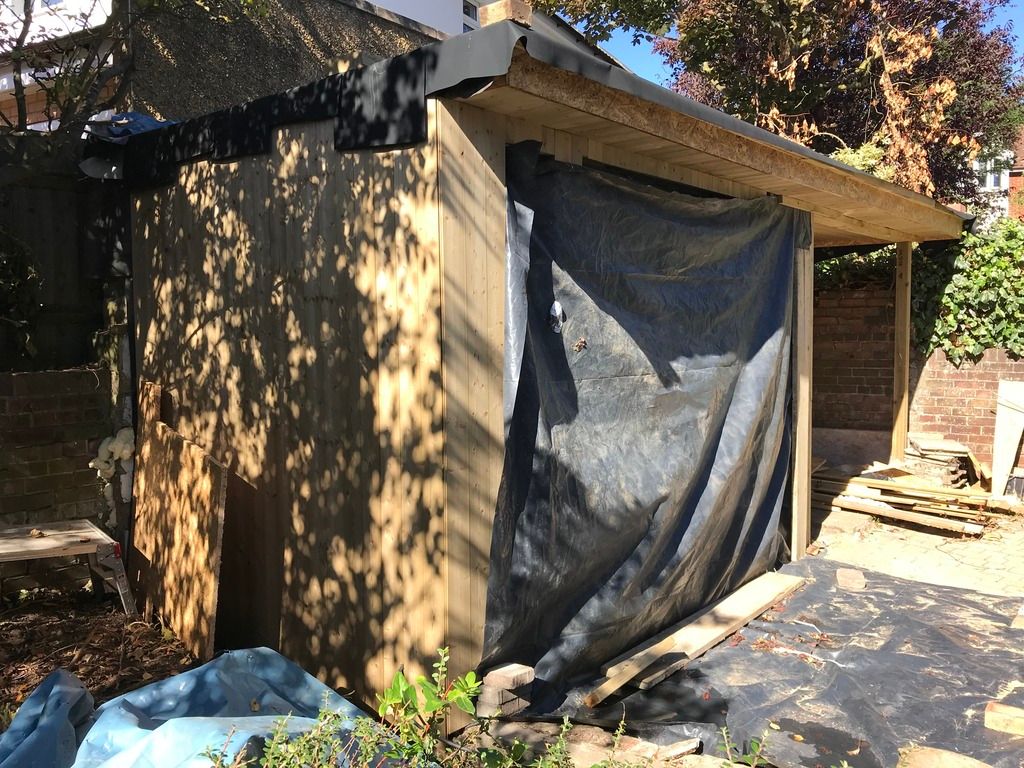
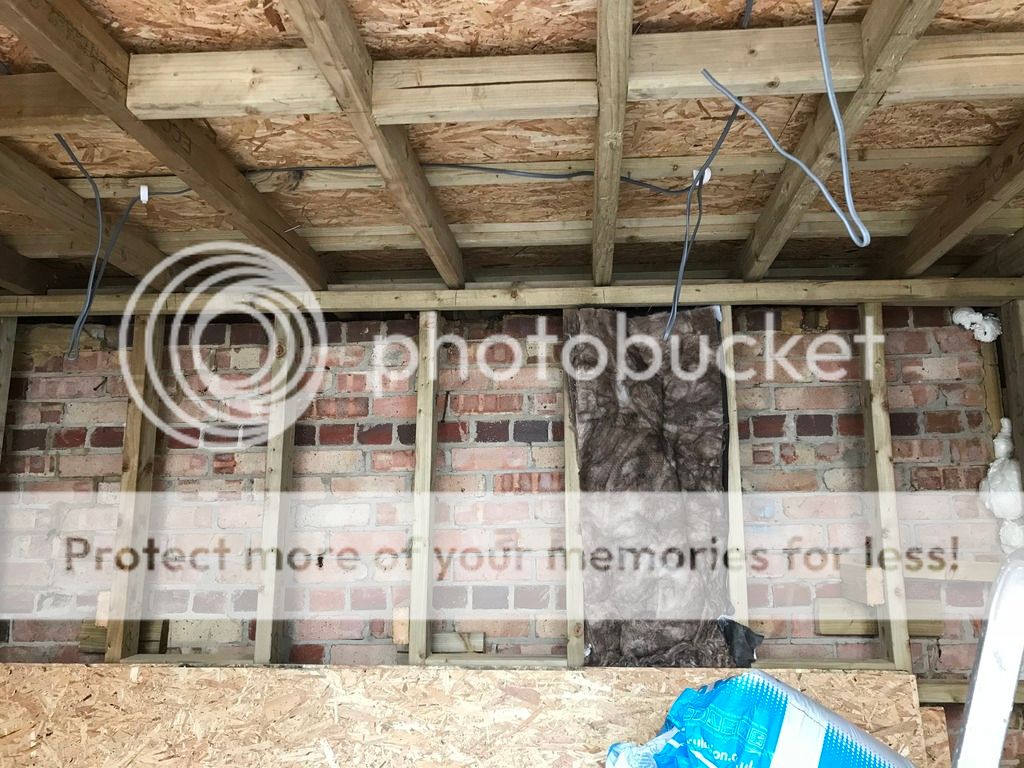
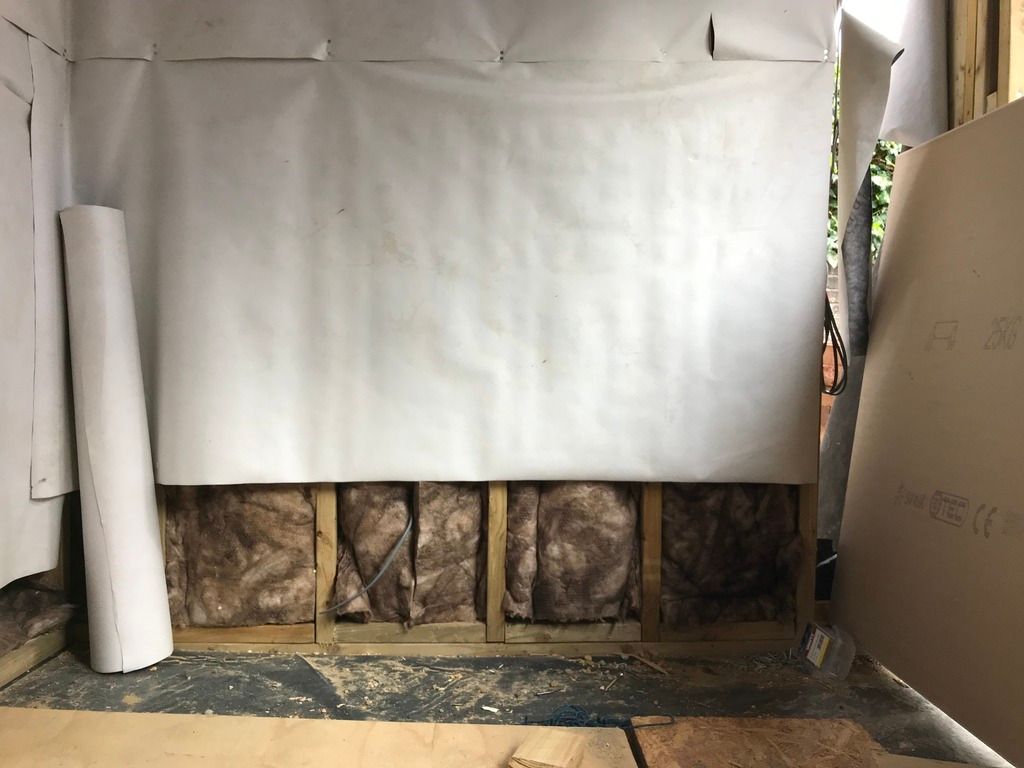
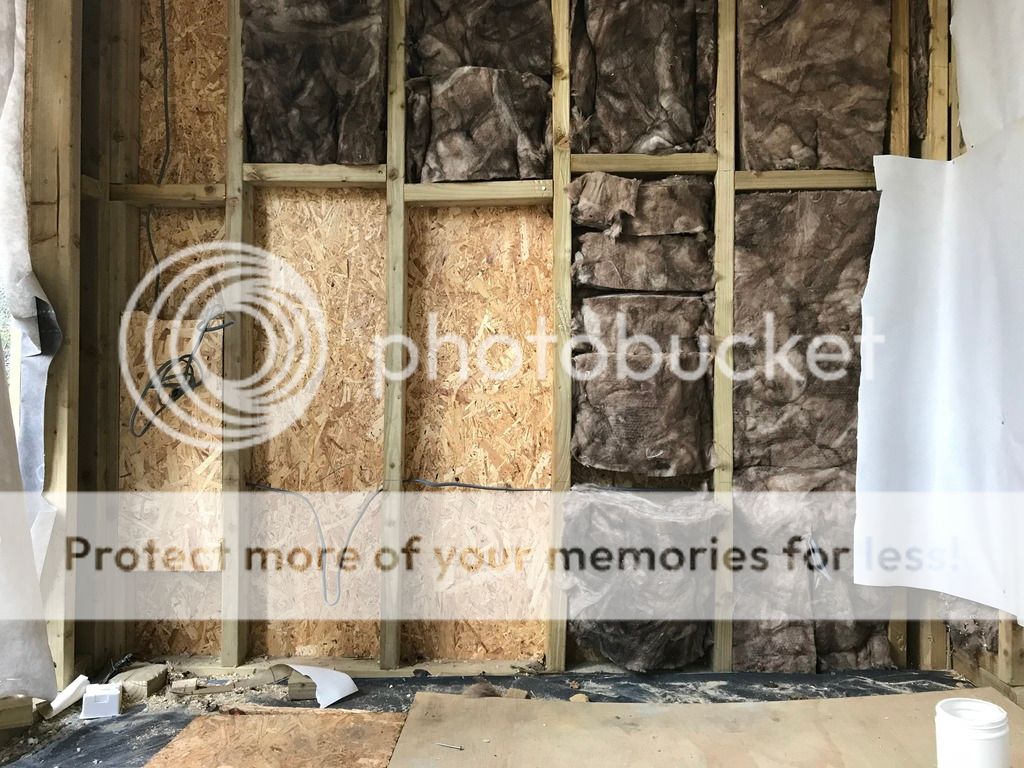
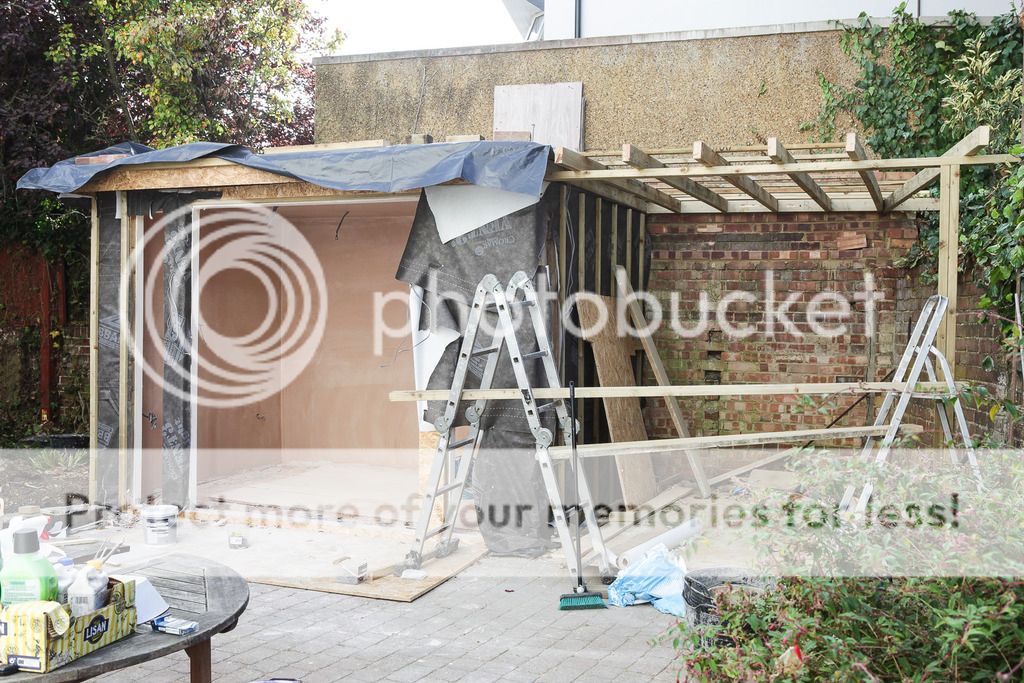
This is it as it stands as of now:

IMG_7283.jpg


IMG_7281.jpg


IMG_7282.jpg


IMG_7284.jpg


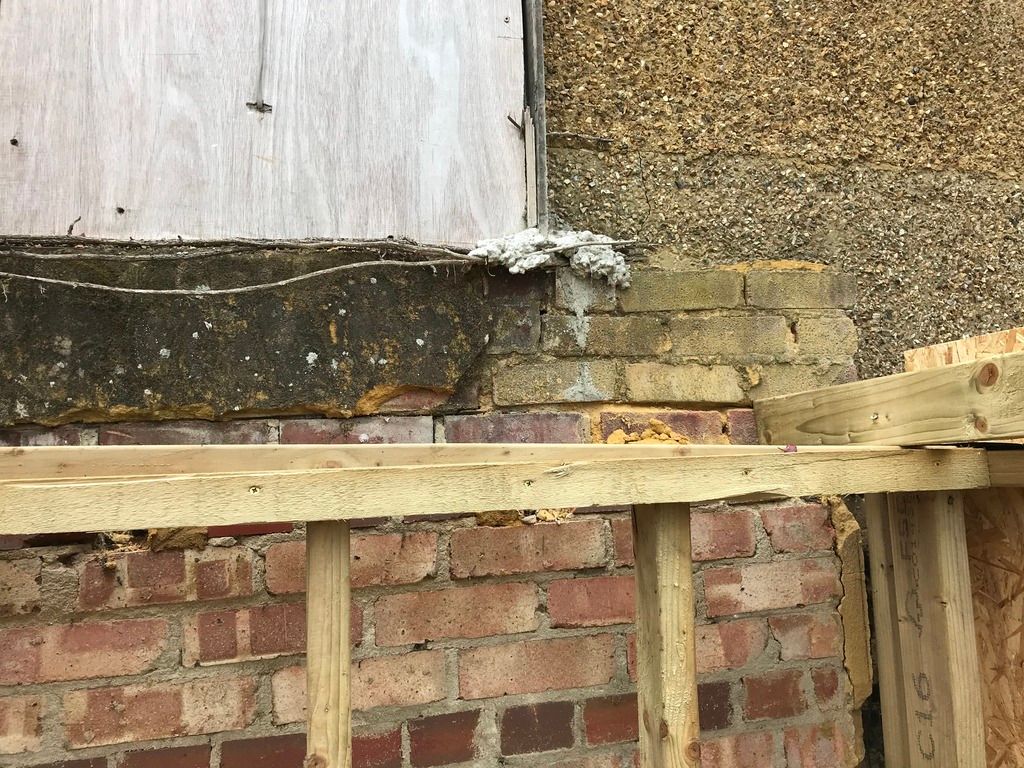
Originally there was a brick shed here, circa mid-century. Then in the late 80’s or so that was replaced by a blockwork shed on the same plot.

IMG_5795.jpg


IMG_5801.jpg


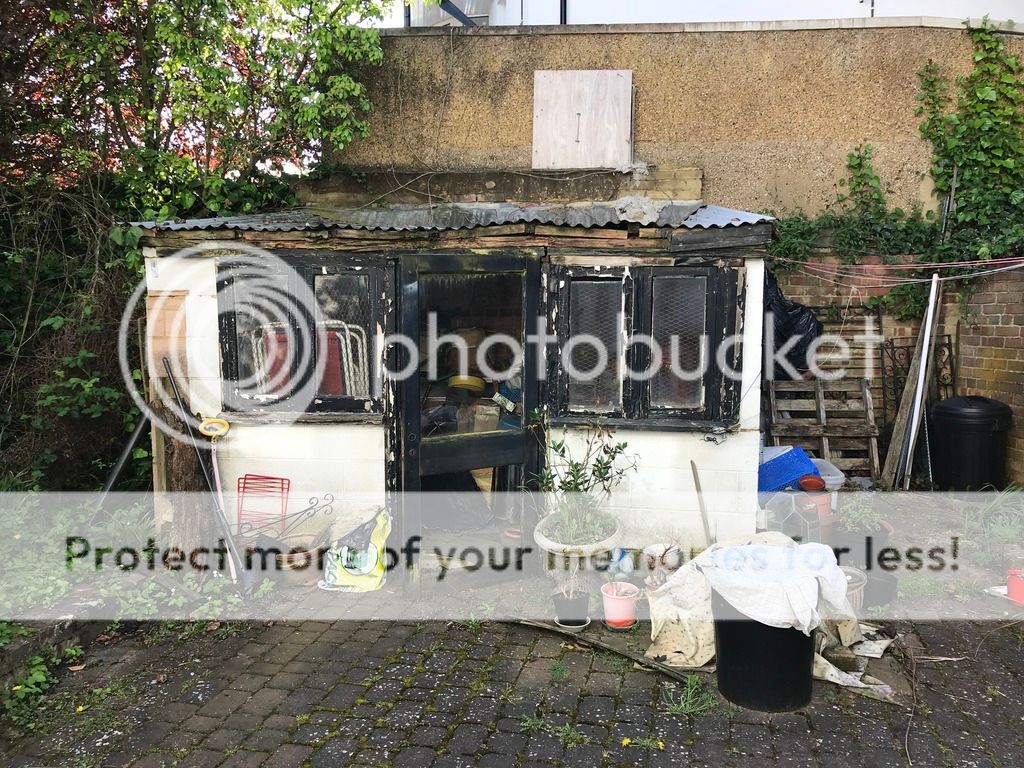
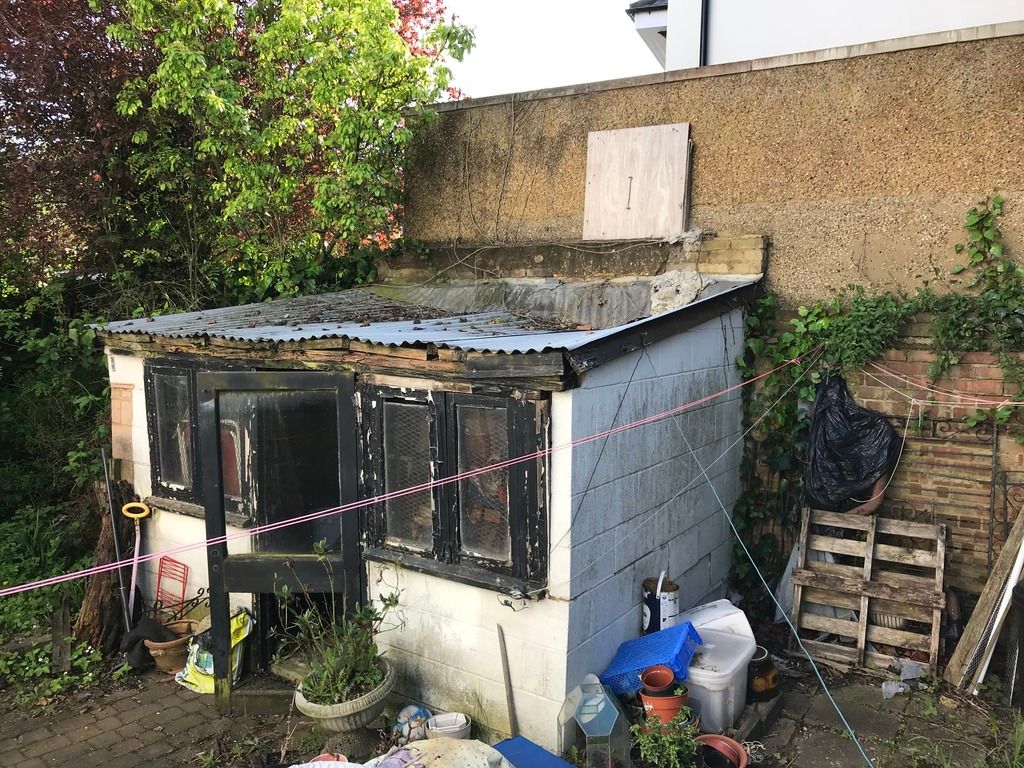
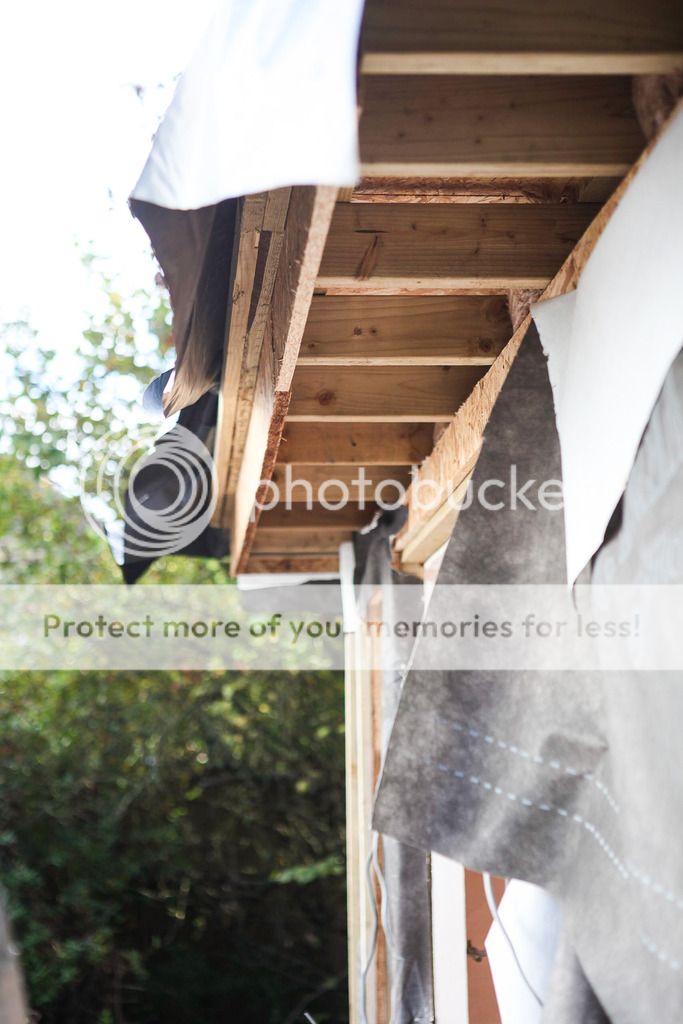
As you can see this structure was well past it’s prime, so a month ago I had it knocked down and the new timber structure erected in its place. I mention this because no additional ground work has been done; the timber frame has simply been put up on the footprint of the previous shed, which I presume had rudimentary concrete footings or plinth.

PJYV2753b.jpg


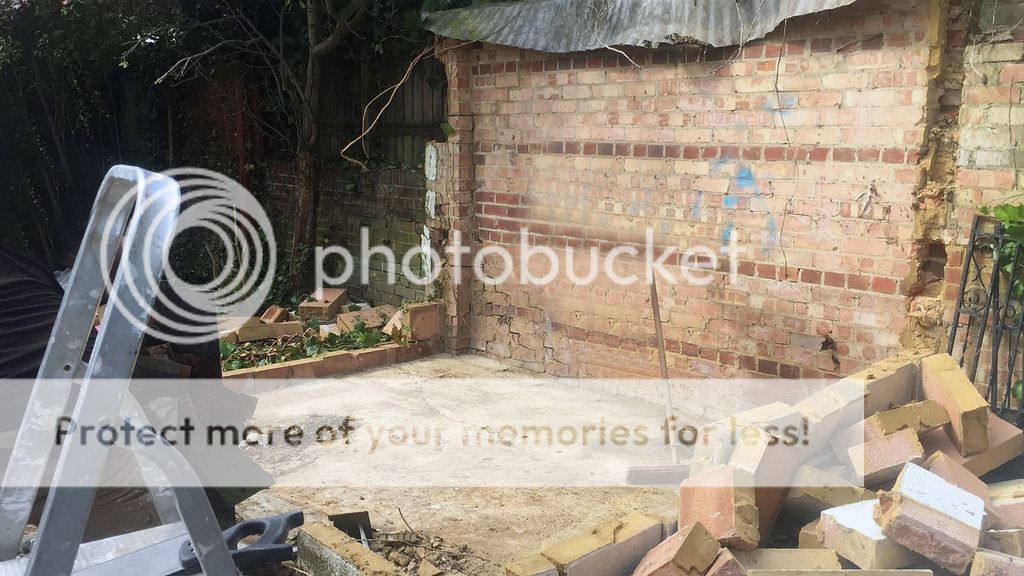
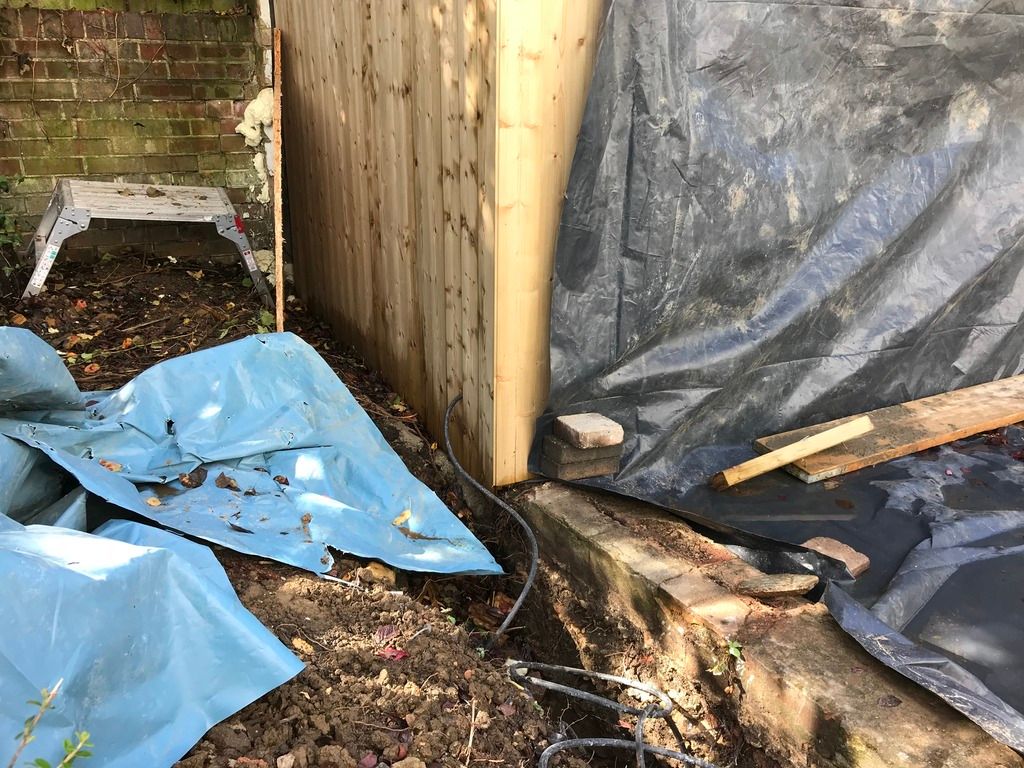
The firm I had do the work cleared the site while I was away and put the frame up before I was back so I never got a chance to inspect the rear walls or ground, both of which are uneven and have some cracks.

IMG_6944.jpg


IMG_7049.jpg


IMG_7054.jpg


IMG_7069.jpg


IMG_7105.jpg


IMG_7106.jpg


shed-11.jpg


shed-15.jpg


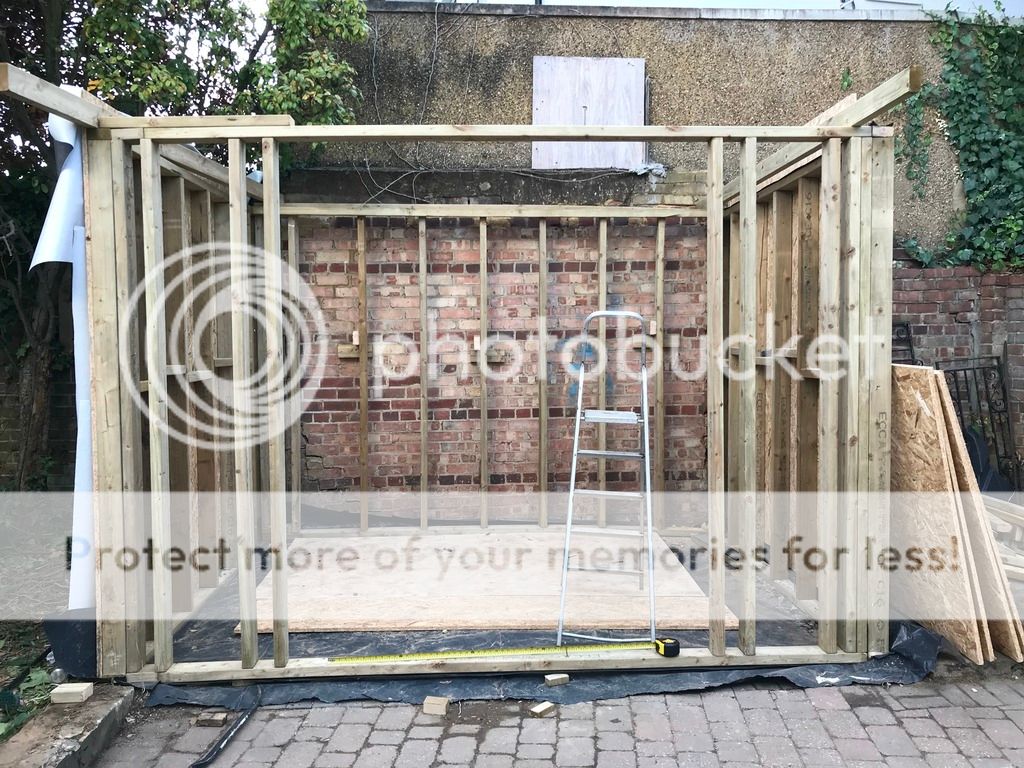
They builders have now abandoned work and left me to it and I have these main problems to address:

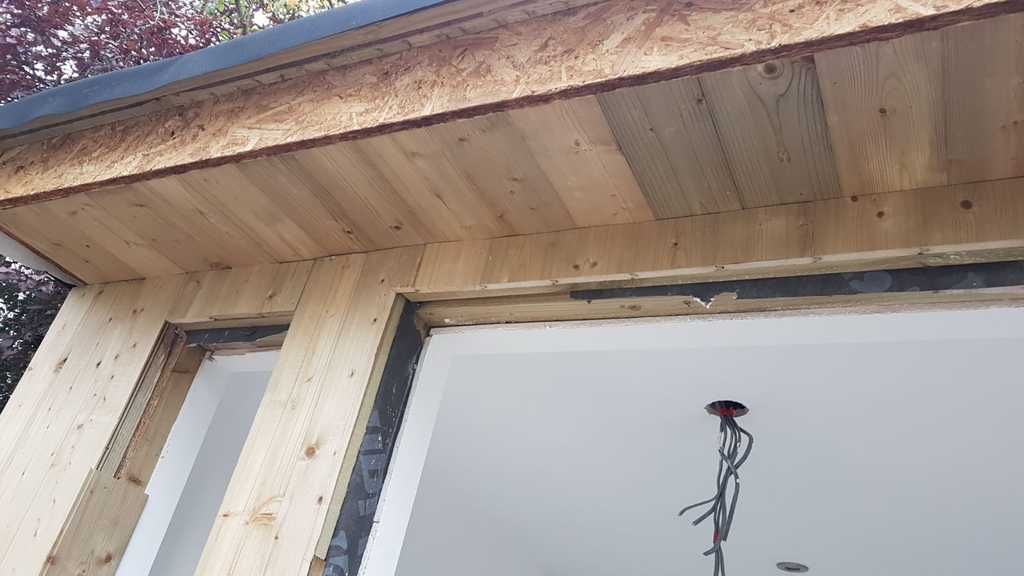
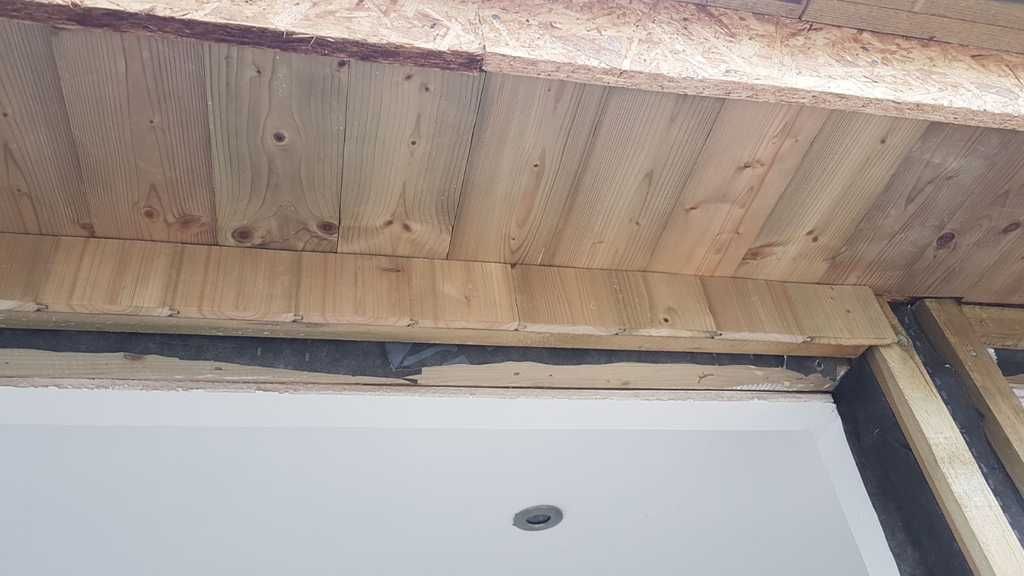
1 - The roof is leaking, and the flashing at the rear wall is appalling.
2 - The pre-existing concrete base, which is the floor of the current room, is uneven with a 6cm discrepancy in heights.
3 - Doors and windows need to be measured up and installed
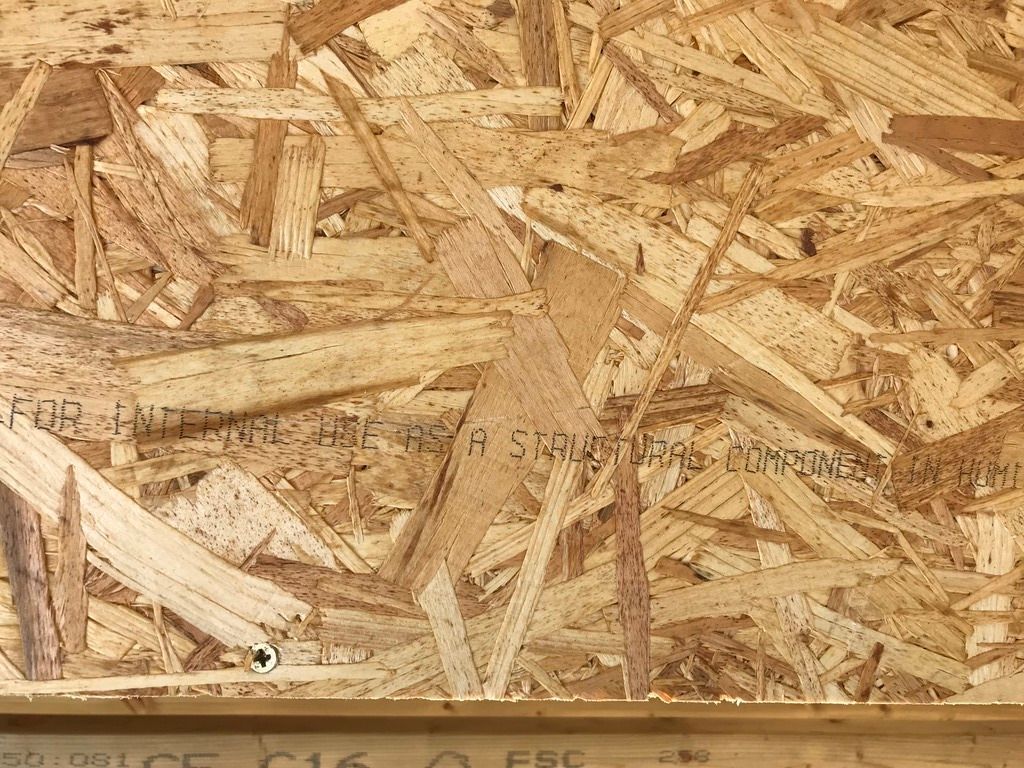
4 - The OSB is left unclad in places, and seems to be interior grade OSB anyway.
5 - The wiring is behind plaster and unlabelled so will need to be identified.


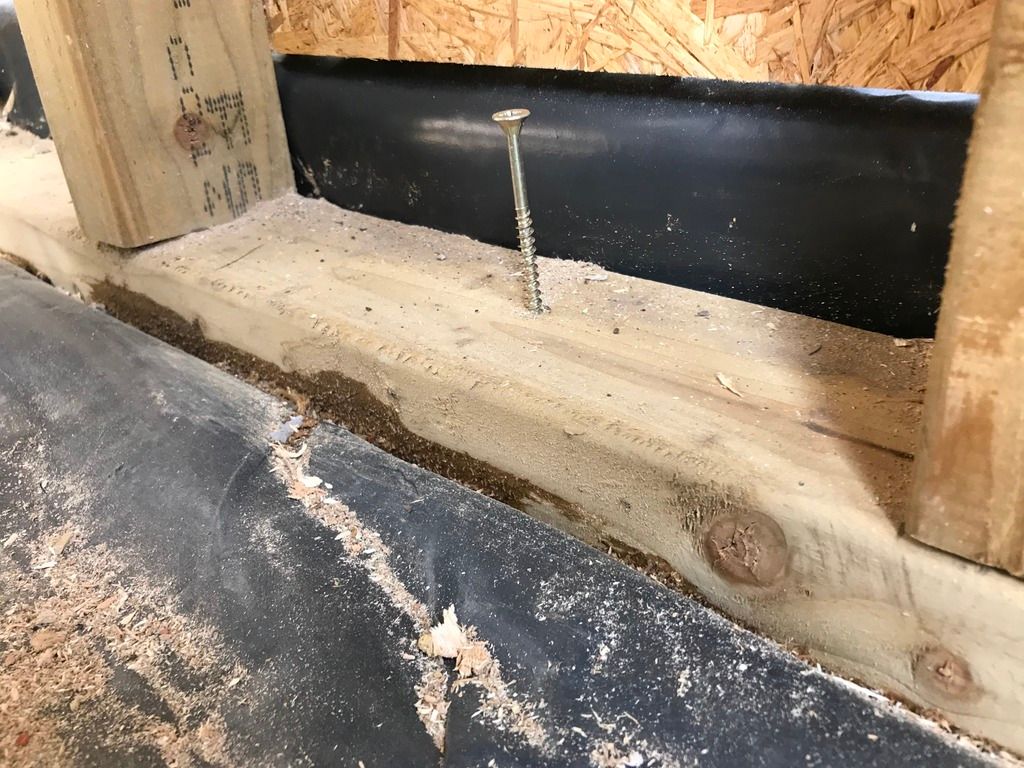
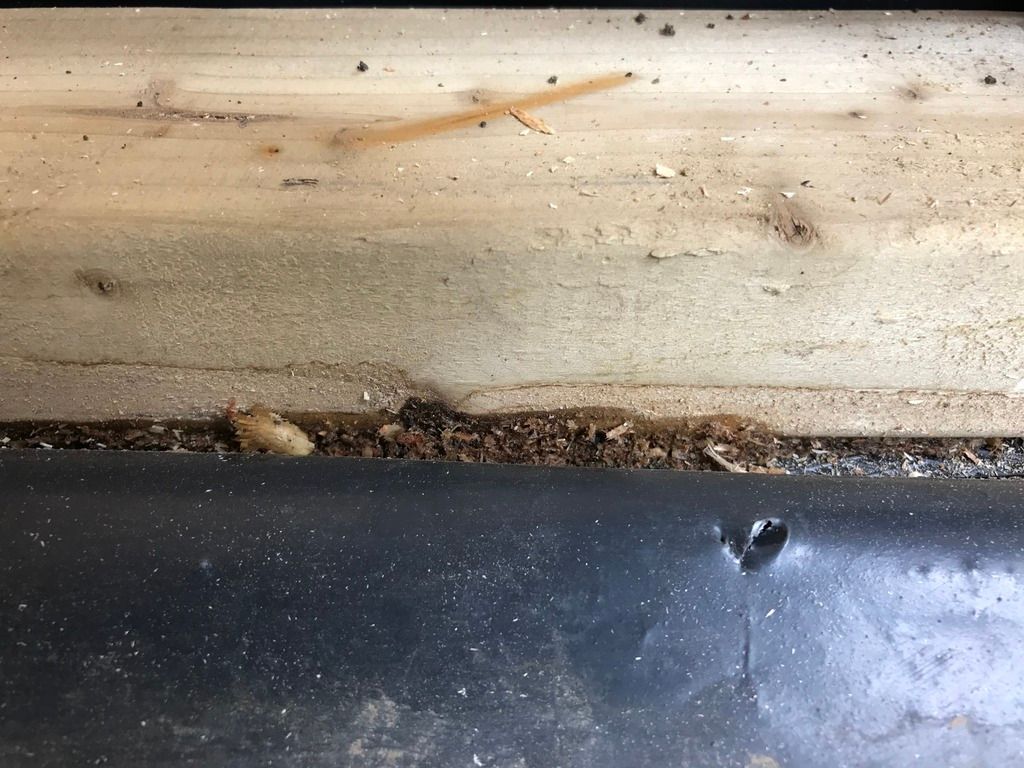
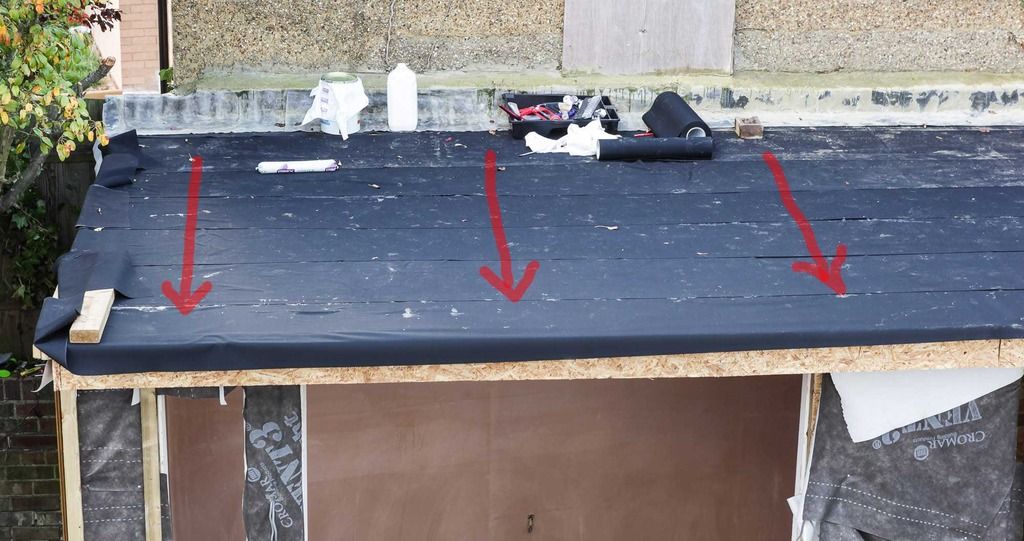
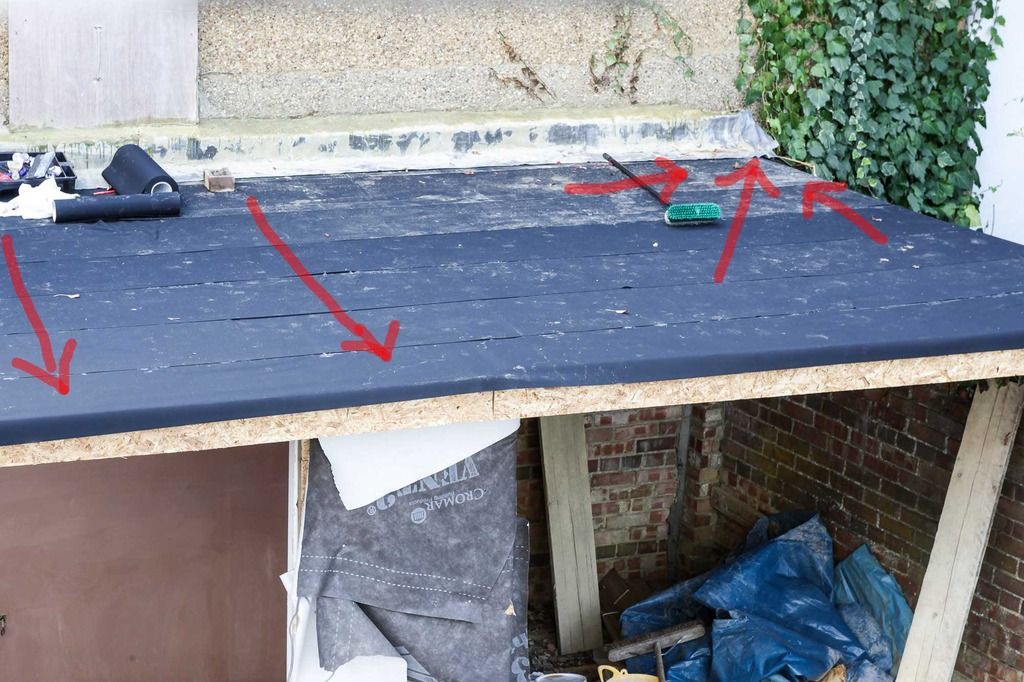
1 The builder laid 50 or 60cm rolls of CORTEX EPDM membrane system by OBEX UK. It's used for lining frames, etc, not roofs. The primary advantage of EPDM for flat roofs is that it can be laid in one sheet with no seams or join. This mess is full of creases, wrinkles, unsealed overlaps and the rear is just loosely laid on lead flashing. It’s not even bonded down, so rain is streaming through the roof.

EPDF_ROOF-3.jpg


EPDF_ROOF-1.jpg


IMG_7237.jpg


IMG_7240.jpg


IMG_7231.jpg


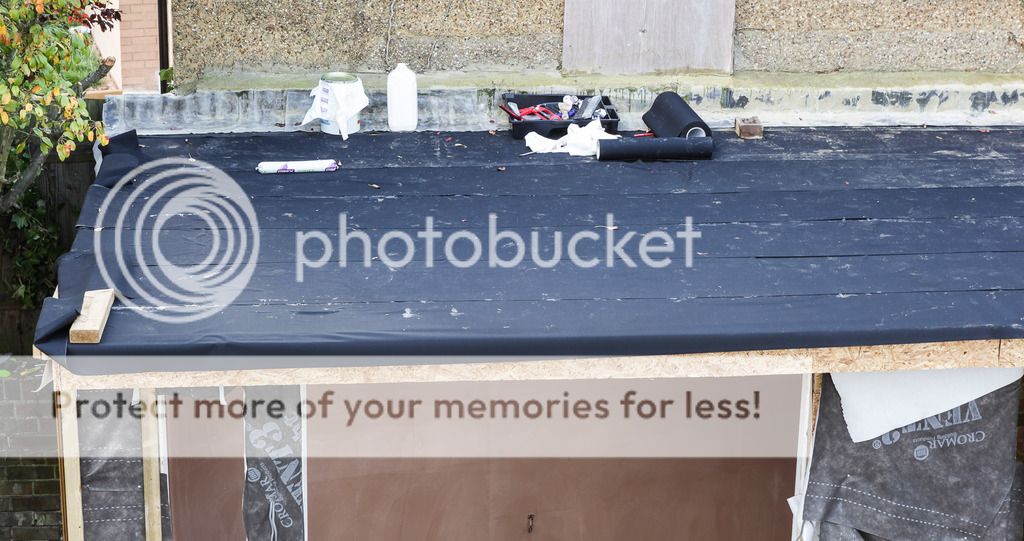
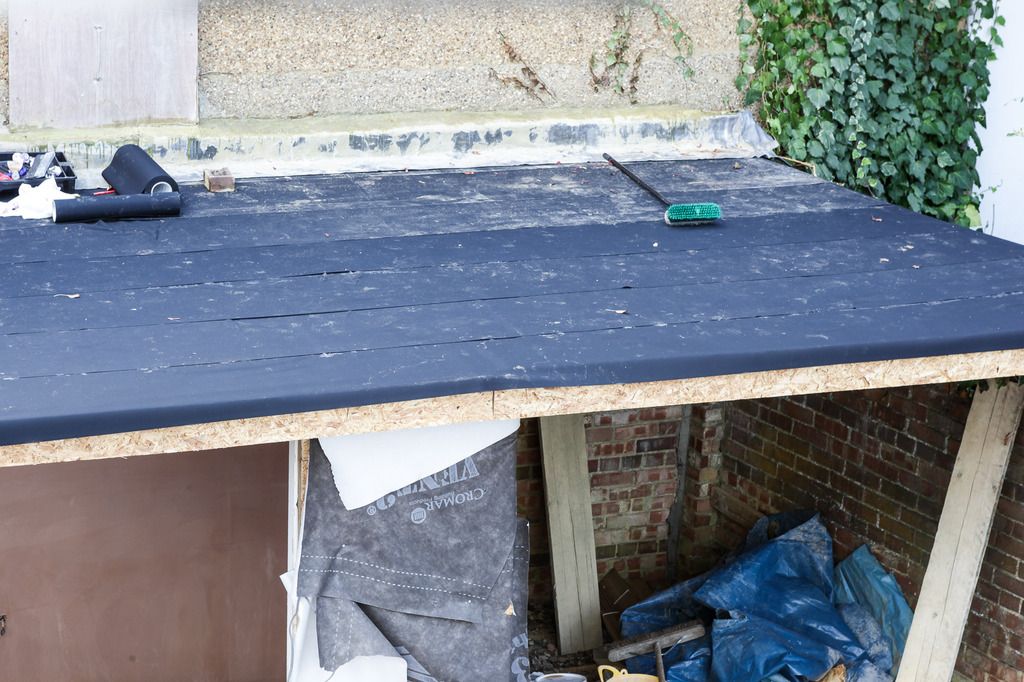
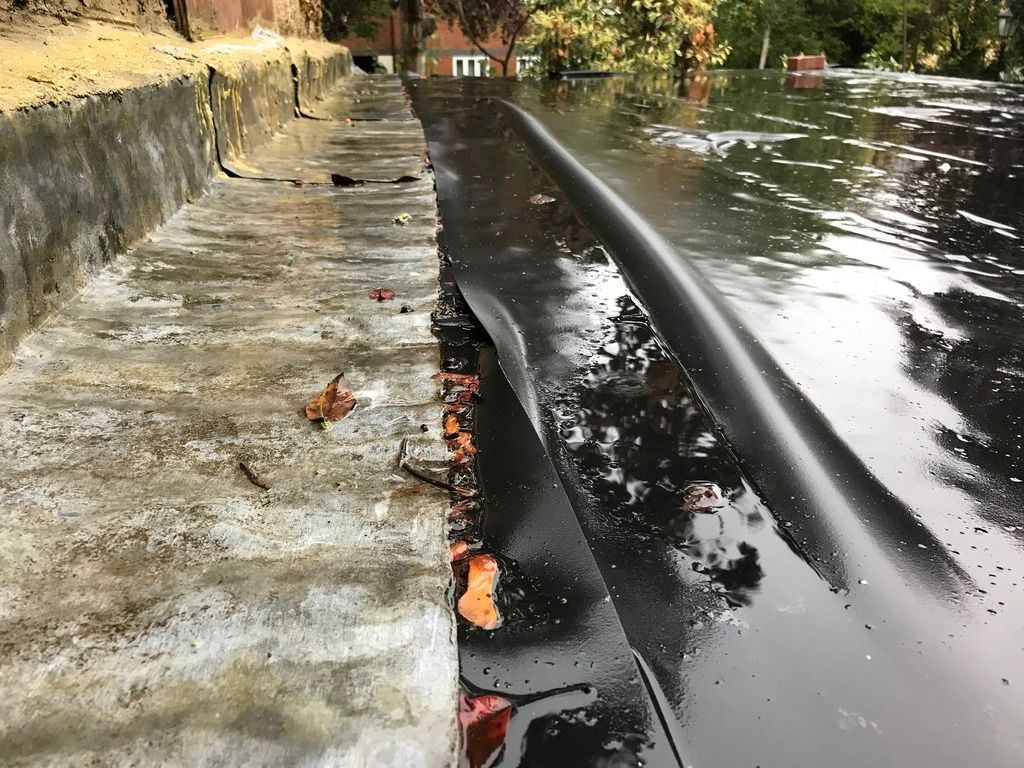
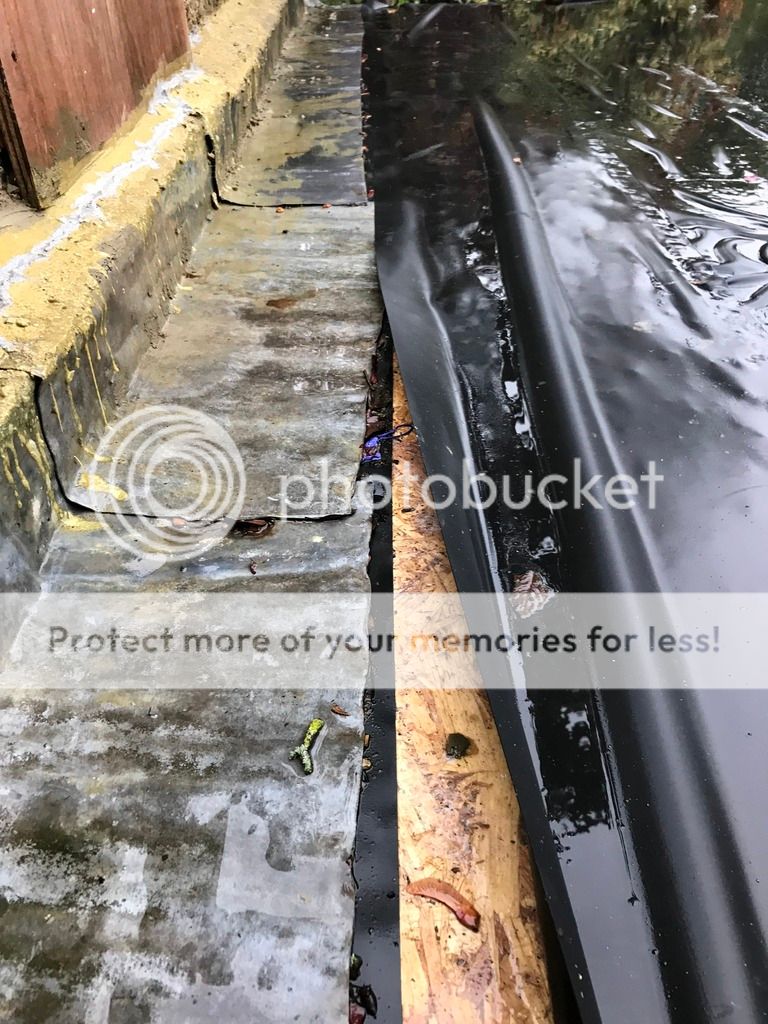
What I need to know is the simplest way to weatherproof this. I thought I might just be able to overlay it with a single sheet of proper epdm, but I believe it doesn’t bond to itself, or is not recommended, so I have to explore other options. Maybe tape to bond down all the seams. Probably redo the flashing so the rubber is chased into the wall behind. Perhaps it’s possible to just physically secure a sheet of epdm over the whole roof and just pin it all the way around the fascia without necessarily bonding it down? Failing that I would just be forced to rip it up and do the whole thing again. Potentially difficult, messy and more expensive. Or I could maybe over board it and do a new roof with better pitch?
 
Sponsored Links
2 They didn’t make a floor. They said they would do it after plastering, painting and decorating! The underlying concrete has a 50cm wide bulge at the back about 5cm high and then a dip to the right and dips down to the threshold at the front. It’s really unusable, but raising it a great deal isn’t practical due to headroom. It’s too late to add timber joists and plywood, so I probably need some sort of leveler or screed. The problem is that without digging down there probably won't be enough depth to give a screed or concrete layer strength. Also it would be nice to have some sort of insulation down. What are my options now for a floor?

IMG_7211.jpg


shed-3.jpg


3 the door aperture is currently 180cm wide times 210cm high and windows are 30 x 210cm each. How practical is it to reduce the door width? Could I just narrow it by screwing some 2x4 on either side? or is that not going to be strong enough to support the frame? Will most fitters be able to deal with poor, non-square structures by planing and chiselling out room for the frames? (I’m just preparing for the revelation that it’s not built true and no one can fit the doors).

4 The larch wood cladding on the front roof overhang seems to come up to the OSB edge, but no cover it. This is wrong isn’t it? Do I need to remove all the cladding, add batons over membrane to onto the OSB and then over clad that to fully enclose? Also, I see no provision for ventilation in this roof. Should I be placing vents in that overhand too between each joist?

shed19sept4.jpeg


shed19sept3.jpeg


shed19sept1.jpeg


Anyone care to take this job on??
 
It depends - do you want a bodge up which will last a year or two, or are you planning to stay in the house and use the room for years to come?

If the latter, you really have no alternative but to rip it down and do it properly. You can reuse most of the timber and insulation. But if you don't get the base right at least, the whole thing will be rotten and stinking from damp within a year. There's plenty of guides on how to do it right. PS the footings are probably fine for a garden room.
 
Thanks ivixor. That's a really grim appraisal, but appreciate your advice. Realistically I just don't have the budget to rip it down and start again as I've already sunk a lot of cash into it. I would like to get some years out of it and salvage what is now built. What needs to be done to improve the base roughly?

A builder has been round and suggested they dig the existing floor and relay a new floor with 100mm king span insulation and 100mm screed to give me a level floor, but that doesn't address the actual base I guess.
 
Sponsored Links
Get yourself a sheet of 1200g (also known as 300MU gauge) damp proof membrane and cover the roof

Screwfix or toolstation sell it

It protect the roof while you get it sorted.

My initial concern is that the studwork seems to go to the floor. Its not clear, but I wouldd've though it best to have laid a course or 2 of bricks first. If you are keeping it up, I would see of you can lower the outside adjacent to the studwork so that the rain will fall below the bottom plate.

Id be surprised if the OSB is not exterior grade -almost all sold is OSB3 with a waterproof additive.

It looks to me like the bottom plate has been set level because there is a mortar line its sitting on, so the frames are probably square.

Just cover the roof with epdm
https://www.rubber4roofs.co.uk/shop/classicbond-one-piece-epdm-rubber-roof-covering-1-20mm

The flashing isnt hard to do.

The framework sides look like they have been correctly formed -with breathable membarne and then 50x 25 batten vertically to create a cavity for the final cladding which will be horizontal boarding of some sort.

You can add whatever studwork you want to adjust the openings, if they are out of square thats irrelevant really in terms of windows / doors.

The floor -you dont need to dig up the existing and lay a slab, you cant use self levelling because it would be unbonded as there is a dpm. I would suggest getting joists fitted which are tapered to level up the floor -they could taper down thin -to say 10mm. Then fix your floor to them -its not ideal and a pain to do, but at least you wont lose too much headroom.
 
My initial concern is that the studwork seems to go to the floor. Its not clear, but I wouldd've though it best to have laid a course or 2 of bricks first. If you are keeping it up, I would see of you can lower the outside adjacent to the studwork so that the rain will fall below the bottom plate.

Yes, you're correct, it's pretty much built right on the plinth or whatever the previous block work shed was on. They told me they put down liquid bitumen and 1200 gauge dpm first. But there's no aeration zone. I was concerned that the bottom timber on the right was damp a week after it went up, even though there'd been no rain and despite the fact that it's sitting on top of the membrane. It's all cased in now so can't check it:

IMG_7048.jpg


IMG_7049.jpg


IMG_7047.jpg


Id be surprised if the OSB is not exterior grade -almost all sold is OSB3 with a waterproof additive.

It's OSB3, but it says "for internal use as a structural component in humid environments" whatever that means. Sounds like it may be adequate.

IMG_7050.jpg


IMG_7051.jpg


It looks to me like the bottom plate has been set level because there is a mortar line its sitting on, so the frames are probably square.

Not quite unfortunately. The pre-existing plinth dips down at the rear right hand corner which they only discovered whilst trying to secure the rear frame. Instead of leveling the floor, or building the frame to accommodate the dip, they just forced it down by bending it into the corner and then screwed at baton across the top to hold it in that position.

IMG_6967.jpg


The floor -you dont need to dig up the existing and lay a slab, you cant use self levelling because it would be unbonded as there is a dpm. I would suggest getting joists fitted which are tapered to level up the floor -they could taper down thin -to say 10mm. Then fix your floor to them -its not ideal and a pain to do, but at least you wont lose too much headroom.

There's a bulge in the concrete base towards the center of the back, and a dip in the rear right corner. The floor is about 6cm lower at the front than the back. I could level it I suppose if I cut out the dpm, but am worried that it wouldn't have much strength where it feathers out to nothing at the very back. It won't have to support much weight, but certainly a person and furniture, etc. It also won't offer the opportunity to insulate, if that would be recommended. I would tile on top of this instead of laminate in case on damp issue further down the road. Joists are a good solution but I'd loose about 10 - 15cm overall. Still OK. So how would that work? I would need to break the plasterboard, find the 2x4 base timbers and attach to those? My only concern is that the floor might end up a bit 'springy' and unsupported in places, but it's only about 2.5x3m afterall.
 

Yeah, thanks. I had already priced something up there and it's not too expensive. About £170 for the rubber and another £80 odd for the adhesives, then trims, flashing etc.

However, the huge drawback with EPDM is that I can't just bond it over existing EPDM. So I'd have to remove it first, or over-board it. Neither is ideal, the I suppose I could try ripping it up with a hot air gun or something. Such a shame I can't leave it underneath as it would serve as a useful additional barrier if nothing else. I've even considered overlaying another sheet without glue and just using contact adhesive and pins to secure it all the way around the edge. with only 3x6m it might be feasible. Either that, or someone is giving me a quote for torch-down roofing.
 
You can't just mortar the sole plate of timber frame onto DPM over level ground, as it looks like they have done. Water will track into and under the timber. The frame needs to be rebuilt on a brick plinth with a DPC under it. Sorry.
 
You can't just mortar the sole plate of timber frame onto DPM over level ground, as it looks like they have done. Water will track into and under the timber. The frame needs to be rebuilt on a brick plinth with a DPC under it. Sorry.
Yes, this is my worst fear, but it's too late to do anything about that now I think and I don't have the budget to do this all again. There are some factors that might mitigate some of the worst effects or rain: The side overhang on the right means that the right wall is shielded. The rear brick wall and flashing at the roof means that again, hopefully, that will be shielded. The ground at the front on this structure slopes away so water largely drains down the block paving away from the garden room rather than ponding against it. That just leaves the left wall:

IMG_7270.jpg


This has been timber clad down to the ground (as you can see after the last rain), but I could trim that up a couple of inches, cap it with some plastic drip trim, and then dig back the soil at the side to introduce some sort of drainage there?

Yes, I know, it's not how I would have planned it, but must try and make things work as best they can now.
 
It will rot. You really can't make a silk purse out of a pig's ear. The person who put this up is not a builder. I know it's not what you want to hear, and I sympathise. But trying to fix that is going to be a lashup.
 
I've already sunk a lot of cash into it

I'm really sorry but you haven't sunk a lot of cash into it - you've had a lot of cash stolen from you and you've been left with a pile of materials worth a few hundred. Take it down and start again - even if you only manage a waterproof shell to start with you can fit out the inside over time. Try and claw back some cash in other ways - windows, doors (surplus/mismeasures) etc can all be bought off eBay cheap.
Your obvious understanding of what is wrong with this "building" suggests that you are more than capable of doing a better job yourself.
 
I've done a better job myself, more than once, and I don't claim to be a builder. People here will be more than willing to give you advice on footings, damp proof courses and floor construction. None of which is rocket science so you have to wonder what the so-called builder was thinking.
 
Wow, have you gone through small claims to get your money back?
If you have defiantly pull it down and start again.

What ever you do, as already stated, you're going to be fighting with it.

You're going to get water ingress over the dpm and into the timbers especially the front.
You can't have timber in contact with soil and expect it to last.
The cladding battens are wrong, you need a ventilated void and they have stopped this by not counter battening.
Have they counter battened the roof to add slope or for ventilation, has the roof got a slope?

You could probably just pull the roof epdm off and stick some new stuff on with contact rather then water based adhesive.

I am just wondering if you could jack the whole lot up and put it on timber joists and concrete block bearers but it's fixed to the wall behind....
 
The cladding battens are wrong, you need a ventilated void and they have stopped this by not counter battening.
Have they counter battened the roof to add slope or for ventilation, has the roof got a slope?

You could probably just pull the roof epdm off and stick some new stuff on with contact rather then water based adhesive.

Thanks. Yes, the flat roof is supposed to pitch forward, but hardly does. I think it’s something like a 3cm fall to the front along most of its width, but at the left corner is actually pitches to the back and side. The red arrows indicate what I think it’s doing, but mostly it’s more or less flat.

ROOF-FALL1.jpg


ROOF-FALL2.jpg


I’ve been considering various options for improving things, which will mainly mean re-doing the flashing (with something like this) and sealing the whole surface, but might include increasing the pitch.

- To entirely redo the surface in EPDM I would need to remove the existing EPDM back to the OSB/3, or overboard the EPDM without removing it. Overboarding with OSB would be difficult for me, but also add far more weight to the structure than I want. In order to install wedges and raise the pitch though I would need decent boards, like 18mm. If I don’t change the pitch though an alternative is just overboarding with lightweight 4mm WBP Ply External Plywood. 6 boards would only weight about 42kg. Strength isn’t an issue because it would just be screwed right on top of the existing surface, and then another EPDM sheet stuck on this.

- I could also try ripping up the EPDM and replacing it with a proper one, but that could be long and messy.

- Another alternative a colleague suggested was just sealing the existing EPDM properly and then overlaying it with lightweight Polycarbonate boards to create an additional layer. I might even be able to investigate lifting it higher at the back using spacers or batons to improve the pitch, but obviously the structure won’t be strong enough to stand on, (not that this will matter)

- I guess corrugated PVC board could be used as well as it’s cheap. None of this will be seen from the ground as it’ll hidden behind the fascia and guttering that it’ll overhang into I guess.


The soffit does not provide any ventilation to the rafters. I will have to introduce that myself. From what I can see the cladding on the fascia and soffit is completely wrong anyway because the OSB edge is left exposed. I need to remove that cladding, use a membrane wrap, fit some batons over that and then clad over that completing boxing-in the OSB. I would leave holes for ventilation and either fit soffit vents, or something like this and forego the cladding completely:

copings-01a.jpg


I am just wondering if you could jack the whole lot up and put it on timber joists and concrete block bearers but it's fixed to the wall behind....

Yes, you're right, it's a lean-to and fixed to the rear wall, so I have no access. I am talking to someone who say's he can level the floor by digging down, laying insulation and screed on top. I would want to raise the floor a bit anyway and also reduce the height and width of the doors/windows right down too to reduce their weight and get them further off the floor. I'm wondering about digging around the perimeter though to create a fall away from the structure in concrete. These are mostly managable little jobs I can get done to salvage some years out of the building. The alternative is to leave it unfinished and loose my garden to an overgrowth or plants, ivy, rubbish and overall neglect.
 
Last edited:
You would be making a lot of work to little avail. Why not pull it down, and do it properly, bit by bit as money allowed?
 

DIYnot Local

Staff member

If you need to find a tradesperson to get your job done, please try our local search below, or if you are doing it yourself you can find suppliers local to you.

Select the supplier or trade you require, enter your location to begin your search.


Are you a trade or supplier? You can create your listing free at DIYnot Local

 
Sponsored Links
Back
Top