Dear All,
we have an Ideal Isar HE24 boiler, which usually still works perfectly well, so that we don't see a reason to replace it now.
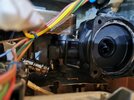
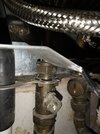
Recently, it started dripping. It's hard to see where it exactly comes from, but (after some moderate disassembly) it looks like a pipe connection. I'll try my best to describe it:
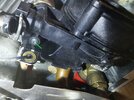
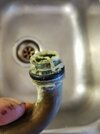
It is below the plate heat exchanger, on the right side. The pump is silver in the front and has black plastic parts in the back. These black plastic parts go below and connect with the plate heat exchanger. From the back, there are two pipes going into this black part attached to the pump and plate heat exchanger. I think it is the left pipe, where it connects with the black part. The water goes onto the metal plate which is directly below the plate heat exchanger and drips down from there.
From the manual, I would guess it is the "DHW cold in".
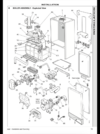
In the boiler manual I have, in the exploded view, it is probably item 60, labelled as "DHW inlet pipe"
I have already replaced the plate heat exchanger before, so I guess I'll get to it.
My questions:
What parts would I ideally get before disassembling it? I'd prefer to spend a bit more money to be on the safe side I have everything at hand, instead of assembling/disassembling a couple of times until I have the right bit.
- Just a new rubber seal?
- A new inlet pipe? (to replace the bit between the main pipe with shut off and going into the pump, just a short knee shaped bit)
- A new 'back' part of the pump (the black plastic part), in the exploded view probably no 70, "Pump manifold"
What else might I need? I think back then I also had silicone grease or something like this?
As you probably have guessed, I'm not a plumber or alike, but I do stuff around my own home.
Best wishes,
Andre
we have an Ideal Isar HE24 boiler, which usually still works perfectly well, so that we don't see a reason to replace it now.
Recently, it started dripping. It's hard to see where it exactly comes from, but (after some moderate disassembly) it looks like a pipe connection. I'll try my best to describe it:
It is below the plate heat exchanger, on the right side. The pump is silver in the front and has black plastic parts in the back. These black plastic parts go below and connect with the plate heat exchanger. From the back, there are two pipes going into this black part attached to the pump and plate heat exchanger. I think it is the left pipe, where it connects with the black part. The water goes onto the metal plate which is directly below the plate heat exchanger and drips down from there.
From the manual, I would guess it is the "DHW cold in".
In the boiler manual I have, in the exploded view, it is probably item 60, labelled as "DHW inlet pipe"
I have already replaced the plate heat exchanger before, so I guess I'll get to it.
My questions:
What parts would I ideally get before disassembling it? I'd prefer to spend a bit more money to be on the safe side I have everything at hand, instead of assembling/disassembling a couple of times until I have the right bit.
- Just a new rubber seal?
- A new inlet pipe? (to replace the bit between the main pipe with shut off and going into the pump, just a short knee shaped bit)
- A new 'back' part of the pump (the black plastic part), in the exploded view probably no 70, "Pump manifold"
What else might I need? I think back then I also had silicone grease or something like this?
As you probably have guessed, I'm not a plumber or alike, but I do stuff around my own home.
Best wishes,
Andre
")