Loft insulation and boarding choices

Sponsored Links

See post
Yes, in the original post I meant the generic term 'loft legs'. I had only had heard about the poorer versions of loft legs from Dial etc. See my post before yours. More than happy to learn about better versions. So, cheers all!

My big concern is how on earth will I get the floor level with the leg system. Or am I overthinking it? A lot of nice videos on how great it looks like. I couldn't find any on the intricate details of using the leg system.

Some concern about the sheer amount of carp we have to store...few 00 kgs ging on top of plastic. Plus the concern of 'point loading' (stresses being more concentrated with legs it looks like).
However, I should decide after joiner tonight has a look. Fingers crossed.
 
Last edited:
You're right; it's because I saw pictures of these awful 'Dial'? banded legs that had been almost destroyed over time by boarding/storage lol.

I will see what the joiner says tonight (if he's good value), otherwise 15-18 boxes of Loftlegs it is. Best to get more and return unused ones I guess.

You said no cutting with the legs. Due to early shift today, I'm on about 4 hrs sleep and can't think straight. Surely some cutting involved? Like when I come near a hangar (see attached images). Is it best to start in the middle and work outwards?
Thanks v much.

I saw the Dial legs when I bought my genuine Loft Legs. Don't think they are as strong. Don't look it.

No cutting to get the boards to fit the legs. Or to get them into the loft
The B&Q loft boards are small enough, you could possibly miss a board when you come to obstacles. Each board 1.2M x 0.3M
Cutting around would be neater of course.

I would start in the middle.
You will need to work out where the legs and boards will finish.

Good luck with the exam (y)
 
After a lot of had scratching and debate, I've decided to go with the framework using 4x2s.
This will give 200mm insulation everywhere, and I will lay out an extra 100mm to unboarded areas. The house is cold, but this should be sufficient to slow down the rate of heat loss.

New framework/battening
Please see attached terrible drawing.
New 4x2s C16 (at 400mm centres) across and over existing 4x2 joists (these are @ approx 400mm). No glue.
80mm/100mm screws, something like this
https://www.screwfix.com/p/screw-ti...ad-cutting-screws-4-5mm-x-80mm-100-pack/713fy
or
https://www.screwfix.com/p/screw-ti...ead-cutting-screws-5mm-x-100mm-100-pack/486fy

2 either side, 30-45 Deg skew to secure to each other.
Optional: drill notch in new joists for any cables (2 rooms, 1 standard ceiling rose each + there's a bathroom with 6 LED downlights)

With a bit of luck, (please see image in original post), there will only be a couple of areas where I will need to join the
new 4x2s together to form a longer (>3m) length. For a novice, what would be the easiest way to do this? 'Sister' them with screws? Lap joint?

Boarding: P5 or OSB3, T&G, otherwise 'normal' flat boards. No idea if levelling is a pain, Hardboard or plastic shims to help level out? Open to both options.
Whichever is cheaper but I don't think there's much in it. Not looking for a pretty job as it's just for storage.

Should the boards be placed perpendicular to the new joist or to the original joists please?

Do you recommend any kind of 'finishing' (varnish, 'lino' overlay etc.) to the boarding to increase protection/cover up slightly raised board edges?

Insulation: Total 200mm. This will mean no air gap, however, as I understand it, Knauff 44 doesn't require it. There's a bit of a draught in the loft anyway...
100mm Knauf 44 one way and 100mm across. Existing vermiculite to be sweeped up and disposed (there's only an inch or 2 at present - non dangerous type)
Unboarded areas (approx 10m2) - roll out an additional 100mm across the 2nd layer to bring the unboarded areas to 300mm insulation.
1 unboarded area covers a bedroom that's being used, so this worked out nicely.

Precautionary / optional: -lap vents to be used

I will get on with doing a final measure and an accurate diagram.
DIYers, thanks for the input so far. It gives newbs like me a lot of confidence.
I've got to now go and recap my notes from the forums on how to drill through tile to put up a glass shelf lol
 

Attachments

  • PXL_20240307_112338304.jpg
    PXL_20240307_112338304.jpg
    222.1 KB · Views: 17
Last edited:
Sponsored Links
This will mean no air ga
Where were you thinking you wanted this gap?


new 4x2s together to form a longer (>3m) length
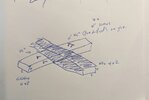
4x2 is available in longer lengths, possibly even 6m if your local BM is any good

-

Your diagram looks like you've got the 4x2 lying down so the top face is the 4 ?

Why not the "just lay rigid insulation over the existing timbers and board atop it" route? Vastly easier than dragging timbers up there

Not looking for a pretty job
You don't need to faff about using spacers to level up a boarded floor in a storage loft. The boards will deform to follow the shape of the joists they sit on

I personally would put the boards long side at 90 degrees to the supporting joists they are screwed to

I wouldn't bother with any floor covering either; board edges aren't going be distinct if you TnG and only a couple of mm at most if non TnG. You said yourself it's a storage loft and doesn't need to be pretty; it'll likely still be better than some places in the house, with their knackered old floorboards
 
Last edited:
Why not the "just lay rigid insulation over the existing timbers and board atop it" route? Vastly easier than dragging timbers up there

I said something similar earlier. The weight, the thermal bridging, the compromise on insulation performance etc.
 
Many thanks robinbanks and sorry, cdbe, for glossing over your post.
Truth is I have never looked into rigid insulation - will do that asap.

I take it 100mm of the rigid stuff is equivalent to 200mm (or more?) of the popular, rolled out wool type stuff?
If it is, and there's no requirement for any kind of spray foam, then it looks like the way to go.

Suppose I wanted another 100mm (rigid type or wool) in the future, then the option to '4x2' over the top (storage area only) and add more is there, right?

In response to the other questions - everywhere I read kept mentioning air gaps, air gaps, so this got into my head. Since then, I found out Knauf 44 doesn't need it, and from your responses, it is clear that the rigid stuff doesn't need it, which is fab.
- the diagram is carp; yes, the joists are long side up.

Thanks for the reminder about the boarding (longest edge) to be 90 deg to joists.
 
.
I said something similar earlier. The weight, the thermal bridging, the compromise on insulation performance etc.
Sorry, I should have said "cdbe's route" - I was querying for feedback on your proposal :)
 
take it 100mm of the rigid stuff is equivalent to 200mm (or more?) of the popular, rolled out wool type stuff?
It depends. Some wool is rated 0.033, some is 0.044 (Knauf 44), rigid is typically 0.022. Those numbers represent how good at conducting heat they are, higher numbers conduct more heat

so yes, 200mm of 0.044 is notionally as good at keeping the house warm as 100mm of 0.022. Wool is easier to install in places where it needs to fit around awkward shapes mind.. cutting and foaming PIR between joists is much more a faff than laying wool, but probably best is compound; wool between and PIR over

any kind of spray foam,
Careful, depending on the kind spray foam it can totally screw things up for insurance and possibly even mortgage

Suppose I wanted another 100mm (rigid type or wool) in the future
Just lay more rigid over the top of the old, after moving the walking boards out of the way
everywhere I read kept mentioning air gaps, air gaps
It's for ventilation of the cold part of the loft. The insulation should clearly delineate the warm and cold parts of the house envelope with no possibility for cold air to reach the plasterboard that separates the loft from the room

My vote, simplest fitting, would be wool between the joists, well fitted (cut to exact size ignoring manufacturer pre perforation unless it's accurate an helpful) by cutting the entire roll with a wood saw before it is unrolled then rigid insulation over and walk boards butted up
 
Last edited:
What I did was make 8” strips from OSB in 8 ‘ lengths.
Fitted 2x1 to each side top and bottom to create an I beam.
these were then screwed down to the original loft beams and I used pre-made chipboard loft panels screwed in a brick bond.
Obviously with insulation.
No need for glue as it all holds together.

Also, no need to go right to the edges, if you can’t get a 30-50 cm box against angle of the roof after flooring it, why bother?
 
create an I beam.
You're not alone..

1709964837472.png

On the right, DIY 4.8m I-beams at circa 20 quid each, quite a saving on bought in ones at 20 quid a metre

On the left, the jig for them..

In this particular scenario for that approach it may be better to create C beams using the existing joists and just one top rail.. More space for insulation, less head height removed, stronger structure aseffectively upgrading the original joists rather than asking them to carry the new load.. Bit of faff
 

DIYnot Local

Staff member

If you need to find a tradesperson to get your job done, please try our local search below, or if you are doing it yourself you can find suppliers local to you.

Select the supplier or trade you require, enter your location to begin your search.


Are you a trade or supplier? You can create your listing free at DIYnot Local

 
Sponsored Links
Back
Top