

Hi,
I did have an account on here a few years back but can't login.. So I'm converting our basement into the babies future playroom but I'm stuck on floor choice. My current substrate is the original brick type floor which was possibly laid when the house was built c.1870. My main goal is to minimise loss of floor to ceiling height.
What I've done in the basement so far..
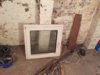
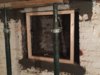
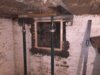
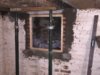
Took out tilt and turn upvc window which was in a timber frame?! Who puts a upvc window in a timber in basement! It was rotten, initially I thought I could treat it but by this point of my dream basement conversion I wanted to do everything properly so in went some acrow props and out came the window and slightly rotten wooden lintel. It looks as though the window had become structurally integral to the GF dining room joists . Next I cut out brick to accommodate the new lintel, put in new lintel. There wasn't enough room to put the lintel on a proper bed of mortar so I packed mortar all around it which I was satisfied with. Next I had to replace the quite wide old rotten timber window frame with brick. I built myself a window size timber frame to make sure the bricks were straight, etc. I also laid a concrete slab at the bottom of the coal chute so the window had some thing level to sit on. I waited a full 5 days after lintel and bricks went in before removing acrow props. I then put the window in. First window (and lintel) I've ever fitted and it was fine. I was using 6mm drill bit and 7.5mm screw which was fine for brick but for the concrete slab, it needed a very worn 8mm drill bit (probably realistic 7mm) and then the screw. Have a good few of those torq bits if, like me, you are having to go through concrete! and long drill bits so you don't scuff the window with the drill chuck bit. I then put expanding foam in the gaps. The only gap was really top of window to lintel as the made the timber pretty snug. Risky but worked.
Our gas main goes through the basement and is hastily fixed under the joists. It would've looked pretty messy with the finished ceiling so I got in our usual gas man and he moved the pipes into the loft after I did cut outs of the joists. There's Regs on cutting out service holes in joists so make sure they're followed. I only found this out through prior research. Gas pipe is now secure and protected in the ceiling and I'll hang a little not on the gas pipe saying that it runs through the joists and the route it takes.
Next I tidied up the walls ahead of prep for tanking membrane. Removing random screws, bolts, light fitting, etc. I ordered the tanking membrane and went for a mesh membrane as the plasterer wasn't sure if he wanted to batten or dot and dab. I hope he'll dot and dab as I'm doing 250 centres with the plugs which is bloody time consuming! Plus the walls are so uneven, I imagine battening would be challenging. My advice at this stage:
My big question is, which floor type? In an ideal world, I'd go DPM, insulation, screed but that's just not suitable owing to head height. So I've found Weber 4310 fibre flow. If I do a 30mm application of this on top of say SBR can I do away with the need for a DPM (it's a pretty dry basement which sits on min 2ft of bone dry sand)? This would be ideal as if I use a DPM I may have to increase thickness. Weber aren't open at the mo so no one to ask regards min thickness over DPM.
Does anyone have any other floor suggestions? In terms of floor insulation, I'll just be using insulating carpet underlay. Not the best but better than nothing.
I can add pic's if anyone is interested.
I did have an account on here a few years back but can't login.. So I'm converting our basement into the babies future playroom but I'm stuck on floor choice. My current substrate is the original brick type floor which was possibly laid when the house was built c.1870. My main goal is to minimise loss of floor to ceiling height.
What I've done in the basement so far..
Took out tilt and turn upvc window which was in a timber frame?! Who puts a upvc window in a timber in basement! It was rotten, initially I thought I could treat it but by this point of my dream basement conversion I wanted to do everything properly so in went some acrow props and out came the window and slightly rotten wooden lintel. It looks as though the window had become structurally integral to the GF dining room joists
. Next I cut out brick to accommodate the new lintel, put in new lintel. There wasn't enough room to put the lintel on a proper bed of mortar so I packed mortar all around it which I was satisfied with. Next I had to replace the quite wide old rotten timber window frame with brick. I built myself a window size timber frame to make sure the bricks were straight, etc. I also laid a concrete slab at the bottom of the coal chute so the window had some thing level to sit on. I waited a full 5 days after lintel and bricks went in before removing acrow props. I then put the window in. First window (and lintel) I've ever fitted and it was fine. I was using 6mm drill bit and 7.5mm screw which was fine for brick but for the concrete slab, it needed a very worn 8mm drill bit (probably realistic 7mm) and then the screw. Have a good few of those torq bits if, like me, you are having to go through concrete! and long drill bits so you don't scuff the window with the drill chuck bit. I then put expanding foam in the gaps. The only gap was really top of window to lintel as the made the timber pretty snug. Risky but worked. Our gas main goes through the basement and is hastily fixed under the joists. It would've looked pretty messy with the finished ceiling so I got in our usual gas man and he moved the pipes into the loft after I did cut outs of the joists. There's Regs on cutting out service holes in joists so make sure they're followed. I only found this out through prior research. Gas pipe is now secure and protected in the ceiling and I'll hang a little not on the gas pipe saying that it runs through the joists and the route it takes.
Next I tidied up the walls ahead of prep for tanking membrane. Removing random screws, bolts, light fitting, etc. I ordered the tanking membrane and went for a mesh membrane as the plasterer wasn't sure if he wanted to batten or dot and dab. I hope he'll dot and dab as I'm doing 250 centres with the plugs which is bloody time consuming! Plus the walls are so uneven, I imagine battening would be challenging. My advice at this stage:
- with older walls which are a bit damp is to use a smaller drill bit than is recommended. I'm using 10mm dryfix plugs and an 8mm drill bit, wack it in with a rubber mallet then put a 5mm screw (size 10 screw I think) through it in the piloted hole.
- The advice I was given was to use plugs without a premade seal (due to uneven walls) and instead use butyl rope. This was great advice. I can see how a premade seal just want offer the same coverage. I'd also recommend spending an evening wrapping your plugs with butyl rope as its a ballache to drill a hole, wrap a plug, repeat xxx no. of times. Much easier to drill band in a plug. I also didn't put the screw in straight away. I found I could get the membrane tighter if finished a section of wall with the plugs in, then put the screws in. Not sure if this is good or bad practice though..
- The perimeter of my basement is about 16m so I only needed a 2x20m roll of membrane as my ceiling is 1.97 at greatest. I thought I'd just be able to roll it around the rome, no chance! Theres's no slack in it. If you had two people you may be able to do this. Instead, Im just cutting and using butyl tape with material back to allow dot and dab.
My big question is, which floor type? In an ideal world, I'd go DPM, insulation, screed but that's just not suitable owing to head height. So I've found Weber 4310 fibre flow. If I do a 30mm application of this on top of say SBR can I do away with the need for a DPM (it's a pretty dry basement which sits on min 2ft of bone dry sand)? This would be ideal as if I use a DPM I may have to increase thickness. Weber aren't open at the mo so no one to ask regards min thickness over DPM.
Does anyone have any other floor suggestions? In terms of floor insulation, I'll just be using insulating carpet underlay. Not the best but better than nothing.
I can add pic's if anyone is interested.
Attachments
-
 B7BB2B12-743F-4D0D-B11C-16C2C52AC327.jpeg305.1 KB · Views: 396
 -
 42F7CF33-556C-43A3-9D61-887048738D74.jpeg256.2 KB · Views: 383
 -
 2B70FD34-7F57-41B1-BA8B-6B94FB853DC7.jpeg281.4 KB · Views: 381
 -
 E0296199-62E5-4CB9-B931-C7894DFCDB74.jpeg290.8 KB · Views: 363
 -
 65061774-3C7C-48F6-8E48-701821EAE379.png753.8 KB · Views: 380
 -
 2FE4856C-5D55-4228-8F29-D85EAA7F0129.png2.1 MB · Views: 358
Last edited: