nest 2nd gen install

Joined
30 Jan 2017
Messages
2
Reaction score
0
Country
United Kingdom
Hi can anyone help me with wiring heatlink. n and l to heatlink n and l. number 4 is nest 3 any ideas on 1 and 3.I know the thermostats wiring,
any assistance much appreciated
 

Attachments

  • IMG_20170123_204449.jpg
    IMG_20170123_204449.jpg
    117.8 KB · Views: 87
  • IMG_20170123_204513.jpg
    IMG_20170123_204513.jpg
    59.3 KB · Views: 87
Sponsored Links
It's just a matter of removing the wires from the existing programmer and putting them in the terminals at the Nest that do the same function. You have posted a photo of the connections for your Danfoss programmer (I assume it is a programmer and not a programmable thermostat, as you don't actually tell us what it is) and you will have instructions for connecting your Nest Heatlink that came with it.

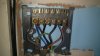
From your photos, the wiring at the existing backplane can be identified as:

N Neutral
L Live
1 Heating Common
3 not used
4 Heating On (Heating Call for Heat)


The wires from these terminals then need to be moved to the Nest terminals that carry out the same function:

N Neutral
L Live
2 Heating Common
3 Heating Call for Heat

Connection terminal 3 of the Danfoss programmer has no function, so it has just been used as a convenient connection for the Black & Grey wires. They will need to remain connected together by putting them in a separate screw terminal connector.

If you want to power the Nest Thermostat from the Heatlink, then T1 at the Thermostat goes to T1 at the Heatlink, and T2 at the Thermostat goes to T2 at the Heatlink. Or you can use an optional plug in power supply for the Nest Thermostat.

If you don't have a separate existing wired room thermostat, then that's job done.

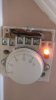
However, Because the Nest carries out the functions of a thermostat, any existing thermostat should be removed. I suspect that the grey cable with Black / Grey / Brown wires does go to an existing thermostat. If you can confirm this, it will need removing from the wiring and the switching terminals bridged. This can be done in 3 ways, in order of preference, they are:

1. Remove the thermostat and wiring, and modify the wiring so that the terminals where the switched wires were connected are joined together.

2. Remove the existing thermostat and replace it with a junction box, connect the switching wires together. Isolate the neutral if there is one.

3. Leave the existing room thermostat in place and set it to the highest setting. (Or put the switching wires in the same terminal)

EDIT

If you can confirm the existence of a thermostat and provide details of it, I can advise how to take it out of the circuit.
 
Last edited:
Having read my above post again, it seems a bit over complicated and difficult to understand even to me as the writer!

If, and only if, the grey cable with the grey / black / brown conductors does go to an existing room thermostat, and every indication is that it does (but please check) then proceed as follows:

Remove the grey cable with the grey / black / brown conductors. This is no longer needed. Then with the wires that are left

The blue wire in N goes to N at the Nest
The brown wire in L goes to L at the Nest
The black wire presently in 1 goes to 2 at the Nest (heating common)
The grey wire presently in 3 goes to 3 at the Nest (heating call for heat)

Please make the connections better than they are now, there is too much conductor showing below the terminals and wire whiskers poking out. You are running the risk of a short circuit with them like that. This is more what it should look like. Don't take any notice of where the wires go in this photo. It's just used as example of better wiring practice.
 
Thanks for the info those wires are indeed for room thermostat was hoping I could replace this with nest and use existing wires is this not possible.Also not got nest had to send back as screen damaged waiting for replacement to arrive so I can't proceed yet.
 

Attachments

  • IMG_20170129_111816.jpg
    IMG_20170129_111816.jpg
    48.2 KB · Views: 60
Sponsored Links
Good, so your installation will be fairly simple then. Just follow my second erm... shorter and less confusing post.
was hoping I could replace this with nest and use existing wires is this not possible.
If you mean that you want to use the grey cable for powering the Nest Thermostat from the Heatlink, yes that's entirely possible. It will still need to be removed from the mains wiring first because the Nest Thermostat only has a 12v supply. Once the cable is disconnected from the mains wiring, use two of the cores to connect terminal T1 at the Heatlink with T1 at the Nest thermostat, and T2 at the Heatlink with T2 at the Nest thermostat.
 

DIYnot Local

Staff member

If you need to find a tradesperson to get your job done, please try our local search below, or if you are doing it yourself you can find suppliers local to you.

Select the supplier or trade you require, enter your location to begin your search.


Are you a trade or supplier? You can create your listing free at DIYnot Local

 
Back
Top