Patio door profile.

Joined
13 Jan 2008
Messages
155
Reaction score
3
Location
Tyne and Wear
Country
United Kingdom
Hi all
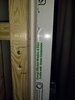
I'm fitting a patio door made from Selecta profiles. I'm wondering why the outside of the frame sections slopes inwards at the edge. What I mean is the outside of the frame, all four sections, look like in the photo attached.
Can anyone tell me why it's made with that shape profile? Why is the profile not like a window and just a box section?
Is it meant to have trims fitted over the gulley that is created when the door has been fitted?
Thanks for any comments.
 

Attachments

  • IMG_20220425_231322262.jpg
    IMG_20220425_231322262.jpg
    207.3 KB · Views: 67
Sponsored Links
I'm not totally sure what in the picture you consider untoward or which part of the frame I'm looking at. I have actually fitted one of these but I don't remember many specifics except having to prise some bits out to avoid having screwheads visible.
 
The picture is part of the left jamb viewed from the outside. Where it contacts the wood frame it's chamfered about 45 degrees. The frame is that profile on all four pieces. The inside of the frame doesn't have that chamfer and I'm wondering what is it there for? As the door is between two rooms I'll be plaster boarding up to the frame and that chamfer is going to make it harder.
I'm not totally sure what in the picture you consider untoward or which part of the frame I'm looking at. I have actually fitted one of these but I don't remember many specifics except having to prise some bits out to avoid having screwheads visible.
 
I'm pretty certain it's so you can link them to other frames like windows with frame couplers say like if building a conservatory where standard window frames are 70mm wide where as a patio will be at least 100mm if its an inline/bypass slider so they taper the frame down to 70mm
 
Sponsored Links
Ah, the shadow in the pic was tricking my eye. Yes I do actually remember that now, it was a bit unwelcome because the brickwork was uneven and it made it all but impossible to put any trim over the gap so I ended up using trowel mastic :mrgreen:

As for the purpose, I'd say it's just to make the door look less chunky
 
I'm pretty certain it's so you can link them to other frames like windows with frame couplers say like if building a conservatory where standard window frames are 70mm wide where as a patio will be at least 100mm if its an inline/bypass slider so they taper the frame down to 70mm
Yeah that makes sense. The frame is 88mm and that chamfer is 18mm so reduces it to 70mm.
As Cackat says it makes it look less bulky but, I think it looks a bit crud and creates extra problems for me. If I'd realised it was like that before buying I'd have bought elsewhere. Ah well you live and learn. Thanks for the replies Crank and Cackat.
 
I think all pvc inline sliders are chamfered, every type I've fitted have been and I started fitting these in the late 90s
 
I think all pvc inline sliders are chamfered, every type I've fitted have been and I started fitting these in the late 90s
Ah well that's cheered me up. If they're all the same then buying elsewhere I'd still have the problem. I'll likely put 25mm D mouldings between the frame and the plasterboard and cover the chamfer.

One other thing I've got a problem with is getting the capping strip off the end of the sliding door. I need to remove it to adjust the rollers at some point. I've removed the other caps so I can screw it into the wall. They were difficult to get off but the one on the door end won't budge. Are they normally very difficult to remove?
 
I would have thought the most discreet way of hiding the chamfer would be to have the plasterboard kissing it at the edge then just caulking down. Gonna look a bit ropey along the bottom though I suppose.

Do you have a pic of the bit you're trying to remove? As I recall I just slid putty spatulas etc into the gaps but there could be a screw you're missing?
 
The one on on the door is quite tight, try getting under it with a hook or an Allen key and pliers and pull it, you may also need to trim it down in length too, I alway put a little notch in the bottom with a suitably sized drill bit to clear the runner. The side mouldings make sure your fixing screws don't interfere with that trim too or you won't get it in
 
I would have thought the most discreet way of hiding the chamfer would be to have the plasterboard kissing it at the edge then just caulking down. Gonna look a bit ropey along the bottom though I suppose.

Do you have a pic of the bit you're trying to remove? As I recall I just slid putty spatulas etc into the gaps but there could be a screw you're missing?
I think I've give up trying to remove that trim. I've actually had a 4" wide scraper behind it at the bottom and it still wouldn't pull away. I pulled it away a couple mm almost it's full length using a number of scrapers but it just popped back again. I feel if I apply more force it will damage it.
 
The one on on the door is quite tight, try getting under it with a hook or an Allen key and pliers and pull it, you may also need to trim it down in length too, I alway put a little notch in the bottom with a suitably sized drill bit to clear the runner. The side mouldings make sure your fixing screws don't interfere with that trim too or you won't get it in
I think I'll just drill a hole in the bottom of the trim to get a screwdriver in. I can always put a white screw cap over the hole.
There is a space at the bottom but I couldn't get the angle for a screwdriver. I lifted the door up at the bottom just a little which gave me space to get in and that allowed me to raise the rollers and then lift the door out.
The side mouldings cover a deep gully so screw heads won't be a problem.
There's also no problem with covering the chamfer along the frame bottom. The door is between two rooms so I didn't get a cill. So by the time the flooring and under boards go down the chamfer will be covered.
 

DIYnot Local

Staff member

If you need to find a tradesperson to get your job done, please try our local search below, or if you are doing it yourself you can find suppliers local to you.

Select the supplier or trade you require, enter your location to begin your search.


Are you a trade or supplier? You can create your listing free at DIYnot Local

 
Sponsored Links
Back
Top