Plaster cracking

Joined
25 Oct 2008
Messages
1,185
Reaction score
145
Location
Cheshire
Country
United Kingdom
Hi all,

I'm after a spot of advice on fixing moderate areas of plaster cracking.

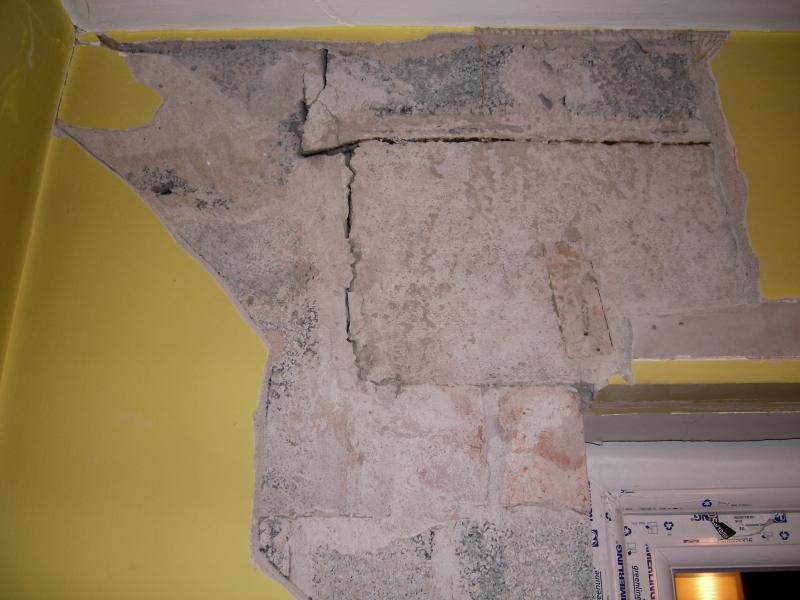
I've just moved into a new place which was buit circa 1970s. The brickwork is sound but there are are a few cracks in the plaster. (The survey was all clear, and mentioned that the foundations are on clay which can lead to plaster cracking - but no cause for concern e.g. subsidence). The plaster is all directly onto brick and grey in colour (base coat & finish coat). It has not been drylined with plaster board.

I'm now looking at remedying the situation - beyond pollyfilla.
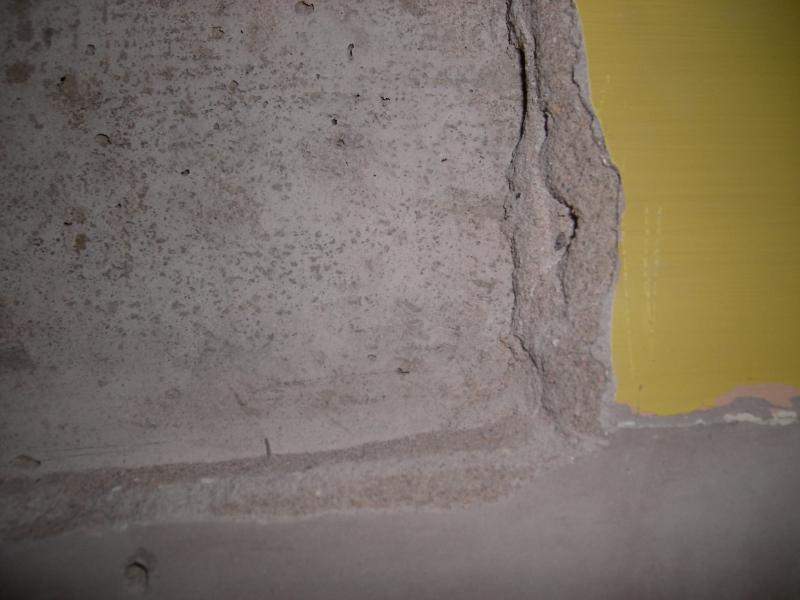
The previous owner never wall papered and so makes life a bit easier - only emulsion paint. :) Where the plaster needs some attention and there are cracks, (from tapping it) it sounds like it is no longer firmly bonded to the brick and sounds a bit hollow. On either side of a crack there may even be a fractional difference in height in some cases. These areas are typically only a small portion of a wall and most of a given wall can be fine.
Therefore, I'm a bit relunctant to rip off all the plaster back to the brick for all the complete walls!
My initial thought is to take off any small parts that are very loose and 'patch them up'. I was thinking taking these small areas back to brick, PVA 5:1 coat, then a bonding coat to patch. With healthy plaster nearby, should be easier to get level.
I was also toying with whether a cut piece of plaster board as a 'mini-dry lining' would be a possible alternative. (My concern was that it would mix up materials on the wall and be more likely to crack later :( )

Finally a skim over the top and feather in to blend in the healthy majority of the wall.

Any advice/tips/tricks gladly received !
 
Sponsored Links
If you're going to repair the loose plaster patches on the walls, "don't" go down the plasterboard patch route..... The way you mentioned,using PVA/bonding coat, and then multi finish would be the best solution. Once you have identified a loose area, make a cut with a stanley knife all around that area, and then break out the old plaster. By cutting around with a knife first, the plaster that you break out will not spread beyond the cut.... Once the loose plaster is off, give the bare brickwork a brush off/clean down, and wet it with a water brush, brush on the PVA, paying particular attention to the edges of the original plaster, and then put on your bonding coat while the brickwork is still wet and tacky. Bring the plaster out to around half the thickness first, and leave it to steady up a bit, before putting on the rest, bringing it more or less out flush, allowing for the odd ml of finish. When the bonding has set, put on the multi finish as smoothly as you can making sure it is feathered in neatly, to the surrounding plaster. Always clean the wall off around each patch with a wet sponge/brush as you go, it always looks much neater.

Roughcaster.
 
Thanks Roughcaster - a much better solution than I was originally going for.
Will definitely steer clear of the plasterboard!
 
if the brick is cracked i tend to find that the method above leads to further cracking again. The wall has lost its strenght since the brick has cracked, and just plastering over will not solved the problem, i'd guess dry lining would at least allow a small amount of movement before it recracks. just my 2 pence worth.
 
Sponsored Links
I know what you mean Steve, but in this case DIY'99 did say the brickwork was sound, just that the plaster had lost adhesion to the bricks in places. I think if an area of blown plaster was removed from a "sound, solid wall", and a piece of plasterboard was fitted into it's place and skimmed over, instead of filling it out with say, bonding plaster, it would probably be, in my opinion, a far weaker job, and more liable to crack all around the plasterboard filled patch. I would never carry out a repair in this way to a solid wall, or a lath and plaster wall/ceiling. Any wall where there are cracks in, or problems with the brick/blockwork should be rectified before any work/repairs are carried out with plaster or render anyway.

Roughcaster.
 
Once you’ve removed the base & top plasters from the block work you will see if there are any underling cracks in the wall; if there are, you must reinforce or it WILL crack again. I remove the plaster back to block around 200 -300mm either side of the crack & fix a length of stainless steel wire mesh (any BM or B&Q Trade centre) the entire length of the crack, overlapping the crack at least 150mm either side. Repair/fill the crack & apply a new base coat over the area working it well into the mesh, I tend to use sand/cement render for this but have used Bonding plaster as well. I always prefer to skim the entire wall rather than patch/blend so I fill out to the surrounding plaster; when dry I reinforce the edge where the two meet with a couple of layers of reinforcing tape, prep the entire wall & skim as usual. I’ve use this method dozens of times with almost 100% success rate but no guarantees obviously.
 
On the outside of the house all bricks are sound - there seems to be no cracking mortar at all. So hopefully this is a good indicator.
(In fact in the last place before we moved - a small new build had far worse cracking after just 12 months! Tho we were there for 7 years and didn't get any worse)

For this place (from the survey and talking to the neighbours) the builder had a very good local reputation in the 70s and produced a lot of very solid houses - so fingers crossed it is plaster only!
Behind the plaster, the internal walls are constructed of the large grey blocks. These are not the thermalite type, but the more coarse grain & heavier ones. Apologies for ignorance in not knowing their proper name!

I wanted to be clear what a best course of action would be, rather than diving straight in. Will bear reinforcement in mind if there are brick cracks internally.

Thanks for all your input.
 
Further info/question on the cracked plaster saga.....plaster a bit like 'granulated sugar'!

Two questions -
(1)
Started first room....I've used a stanley knife to cut out parts of the cracked areas (as previous suggestions). Most of the areas have complete brick behind. There are two cracks in the mortar where the lintel over the window joins. The LHS is worst - see img.
(The crack is vertical - the horizontal dark area is actually some type of black liner. No sign of any damage at all on the external brick). I'll use the techniques suggested by Richard & Roughcaster when I patch, so think this should sort.

What concerns me most is that where I cut the plaster away, the skim is still hard but the plaster underneath is softer. If for example you run a finger firmly down the plaster broken out it powders to the consistency of what I can best describe as 'granulated sugar'. The edges on show here seem a lot firmer and less weak. Closer view:

In the cracked areas it had lost adhesion to the brick and was easy to prise off with a screw driver.

I don't want to go too far - the patches are starting to get a bit bigger than I would like, but am concerned that I do enough. I guess I would expect plaster 30 years old is not pristine, but clearly don't want to decorate to find in 6 months it needed more. Any advice appreciated.

(2)
Also, I don't possess a Darby and may need something of that nature to get the bonding flat in the gaps. Anyone recommend a substitute or is it something highly valuable and should just bite the bullet and get one?

Thanks!
 
A lot of old brick walls have that powdery sandy floating coat, although some are worse than others, and you really could go on forever powdering it off.. Wet the areas/edges down with a brush, and seal the edges with PVA and leave it to dry, that'll firm up the powdery edges meantime... When you come to plaster it, give it another PVA, and plaster straight onto it while it is tacky..... You wont need to go and buy a darby just for a couple of patches. Once you've got the wall coated out, a small piece of skirting or similar would be good enough to level off the plaster ready for the float, by working from the hard surfaces surrounding the patches. You'll have a little bit of work to do building up the plaster around the reveal, but just use a small piece of wood as a straight edge to form the corner... I would carefully chisel out the old cement from the cracks in the brickwork, wet down/pva and repoint,then fix your wire lath over the cracks, and then coat out the patch in two stages, if you find it easier that way. I would also take off the small area of painted plaster at the top left of the pic, for all there is,,, and also,,if you don't need it, remove the piece of wood set into the lintel for fixing the old curtain rail. As I said, the PVA will stabilise the edges until you're ready to plaster. You've a fair bit of info in all these posts, so i'm sure you'll manage, if you need any more, just ask. ;)

Roughcaster.
 
Rough’s spot on, exactly as I would do it. As I said previously, I tend to use render as a base over the mesh particularly in areas where the corners of lintels are involved but I’ve been told it’s actually no better; emotional thing I suppose! Just make sure your extend the mesh lath well beyond the cracks.
 
After looking at pic number 1 again, I think it might be better to leave the small block of wood in place ( on the lintel), and use it to your advantage as a fixing/nailing point for the wire lath, when covering the cracked (soon to be re-pointed) cement joints. ;)

Roughcaster.
 
You can also get some "slithers" of slate and knock it into the cracks this will help by filling the cracks and also preventing further movement....

You can also "Spot" slate over the cracks.
Years ago this was done on gable ends of houses to act as a damp-proof barrier. Slates are a very versatile material in the "Building Trade"....
 
Thanks guys, more good advice as always.
Will take out the remaining bit in the top left also.

Just a final bit I'm not sure about and apologies for the naive Qs.... whilst I've messed about with Bonding and thought I'd only need to use that with the mesh - is render a normal cement/sand mix that goes on like plaster (but normally with a float to do big areas)?
Would it also be the same mixture used in pointing?

A work colleague who's spent time renovating his last house said to sort his cracks he scraped the edges to open a bit and then used dry wall bonding to fill initially before covering. Any feedback on this approach?
 

DIYnot Local

Staff member

If you need to find a tradesperson to get your job done, please try our local search below, or if you are doing it yourself you can find suppliers local to you.

Select the supplier or trade you require, enter your location to begin your search.


Are you a trade or supplier? You can create your listing free at DIYnot Local

 
Sponsored Links
Back
Top