Pointing below ground level advice

Joined
18 Apr 2008
Messages
17
Reaction score
0
Location
Yorkshire
Country
United Kingdom
Afternoon all,

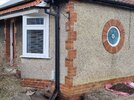
Looking for a little advice with regards to pointing, some of which is below ground level. We have 1930's bungalow and noticed damp in the back of a fitted wardrobe. On the other side of the wall is a downpipe and drain, next to this was a massive Wisteria which we cut off when we moved in a year ago (I hate plants growing up against walls).

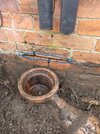
The drain was block and had roots in it, we diverted the downpipe onto the driveway in the short term and the wall dried out as expected.

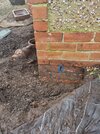
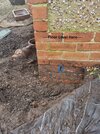
I've now dug out the drain and removed the roots. You can see from the pictures that there are some holes in the pointing where there were roots from the Wisteria had entered.

The plan is clean and rake these out and repoint them, the questions I have are around what to use? Should this be sand and cement or a lime mortar. There is a cavity.
I was thinking about using a lime mortar from https://www.lime-mortars.co.uk/lime-mortar but I'm not sure if this is suitable for the part which is below the ground level?

Any advice would be appreciated.

Michael.
 

Attachments

  • 20240303_143108.jpg
    20240303_143108.jpg
    574.4 KB · Views: 67
  • 20240303_143116.jpg
    20240303_143116.jpg
    719.3 KB · Views: 68
  • 20240306_131123.jpg
    20240306_131123.jpg
    679.8 KB · Views: 67
Sponsored Links
Lime mortar
(1) is prone to being eroded by long-term leaks
(As you have found)

(2) is often recommended for repairing old houses because it is less resistant to damp so allows walls above ground to "breathe" and lose moisture to the open air.

However

Underground brickwork is not exposed to the air so will not breathe

Cement mortar is stronger and hardens quickly even without exposure to air or drying out

So IMO repointing with cement mortar, underground, is better.

I suggest using a hose to wash mud and weak material out of the joints. There is probably more below ground level than you have already seen, full of mud. The hose will find it. Then repacking tightly with a stiff sand and cement mix. It will draw water from the wet bricks, so start fairly dry. This will make it stronger.

As it is underground it does not have to be as elegant as exposed brickwork. You will start at the bottom, and get better with practice.

When you have hosed it, you will find out how much old mortar has gone.

Edited
If erosion is very slight, and less than an inch deep, the brickwork will not have been weakened much so it won't matter which you do.
 
mjdresser,
1. Your gully is not trapped as it should be - and its retaining water which suggests a blockage - perhaps dig out a bit further to see if the roots had entered the drain further on?
2. Is this a rainwater gully only or does any waste water from fixtures discharge into it?
3. Does the drain go to a soakaway or to the main house sewer?
4. An angle grinder, & an old chisel, will work best to cut out 25mm from the beds & perps.
5. Use sand and cement for your pointing - small repair bags of S&C can be bought at plumbing suppliers.
6. Can you show, mark a pic, where the DPC is, and the position of the interior FFL?
7. Do you have a solid floor?

8. The render looks poor and the bits of dash stones are pathetic - given that you have a solid wall thats not good - moisture could get trapped behind the render, & slowly penetrate the wall.
9. Carefully search the bungalow walls for other damp issues.
10. Why not post pics showing the interior damp area mentioned above?
 
Sponsored Links
Hi, thanks for the reply.

Someone feel free to correct me, but the gully has a trap built into it hence there being water in the bottom and the output being at the top. The drain flows freely now as cleaned it out and had the hosepipe on full blast without any issues. This drain is purely for rainwater.

This drains into the main drain from out property into the sewer in the street.

First picture is clearly the damp, second was a few days after diverting the downpipes and removing the wall paper and it had dried out. Last pictures shows the floor level which have a cavity below them.

The render is pretty typical for the bungalows on this street. There is no damp anywhere else, only in this corner.
 

Attachments

  • 20231231_130638.jpg
    20231231_130638.jpg
    493 KB · Views: 27
  • 20240102_215651.jpg
    20240102_215651.jpg
    431.6 KB · Views: 24
  • 20240303_143116.jpg
    20240303_143116.jpg
    721.7 KB · Views: 26
The wet mark was surprisingly high. Was water coming out of the top of the downpipe?
 
It used to drip from the top, but I fixed that not long after we moved in which was a year ago. The damp appeared in the last 3 months with all the wet weather.
 
If I understand correctly then you have a solid wall and a suspended floor?
The outside of the brickwork looks to be clean & dry.
So it seems to be a condensation issue.
However, is the RH side of the wardrobe recess a chimney breast?

Thats good that the gully is trapped.
 
Maybe the damp was collecting behind the wallpaper
 
I've always assumed we have cavity walls as there was a cavity wall certificate in amongst all the crap we got when we bought the house. I suppose they could be for the extension on the back and the side(need to dig them out). It hadn't occurred to me that the external walls could be solid. They are very cold and the intention is as we do each room to insulate the external walls.

The right hand side of the wardrobe is a bay window, all of which is dry.
 
1930's and lime mortar does suggest solid walls, but the little amount of brickwork I can see could be cavity. Stand back and take wider pics of the wall to show the brickwork pattern please.

You can also measure the thickness of the wall at a doorway or window opening. It will approximate to 9" or 13"

The pebbledashing is probably concealing inferior material, possibly breeze blocks at that age. If you drill into breeze the dust is black.
 
The wall's are around 11" thick. I'll have a chat with the neighbor's, they'll know more about the construction of them.

I've not had to drill into them yet, there are 5 bungalows all different but all of the same style all with the same pebble dashing.
 

Attachments

  • 20240308_104521.jpg
    20240308_104521.jpg
    651.2 KB · Views: 19
OP,
Your first pics showed that low down to the left of the gully you can see brick headers, headers usually suggests a solid wall - with the new pics there are no headers to be seen higher up the walls.
 
Last edited:

DIYnot Local

Staff member

If you need to find a tradesperson to get your job done, please try our local search below, or if you are doing it yourself you can find suppliers local to you.

Select the supplier or trade you require, enter your location to begin your search.


Are you a trade or supplier? You can create your listing free at DIYnot Local

 
Sponsored Links
Back
Top