

Afternoon Everyone
I have a Potterton titanium combine boiler with a very old thermostat and I tried to upgrade the thermostat to a Nest generation 3 and I got a little confused with the wiring so I put it all back as it was and decided to ask for advice.
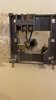
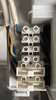
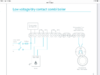
original connection setup has a direct feed from a fuse spur and a wired thermostat in the room, so I looked at the boiler connections and that has 5 wires 3 for the live, neutral and an earth the other two wires go to the thermostat and just make a connection to turn the heating on, I have the boiler on constant not on the built in manual timer so that all is controlled via the thermostat.
That’s the easy bit, now to the tricky bit for me anyway
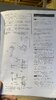
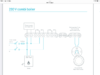
The Nest has a power feed live and neutral from a fuse spur I’m happy with that but if I feed that how do I get power to the boiler? Do I put two lots of wires into the hive one is the feed and the other to the boiler or is there another way?
And then where do I fit the old thermostat live wires to the Nest?
I have attached photos of all info I have but it is baffling me how I get power sorted any help with this would be very much appreciated.
I have a Potterton titanium combine boiler with a very old thermostat and I tried to upgrade the thermostat to a Nest generation 3 and I got a little confused with the wiring so I put it all back as it was and decided to ask for advice.
original connection setup has a direct feed from a fuse spur and a wired thermostat in the room, so I looked at the boiler connections and that has 5 wires 3 for the live, neutral and an earth the other two wires go to the thermostat and just make a connection to turn the heating on, I have the boiler on constant not on the built in manual timer so that all is controlled via the thermostat.
That’s the easy bit, now to the tricky bit for me anyway
The Nest has a power feed live and neutral from a fuse spur I’m happy with that but if I feed that how do I get power to the boiler? Do I put two lots of wires into the hive one is the feed and the other to the boiler or is there another way?
And then where do I fit the old thermostat live wires to the Nest?
I have attached photos of all info I have but it is baffling me how I get power sorted any help with this would be very much appreciated.
Attachments
-
 75657B89-0005-4C60-AD3D-78720E23F8E1.jpeg213.6 KB · Views: 592
 -
 3F0E1A5F-1703-4476-AF8B-B15BE7410E8E.jpeg166.6 KB · Views: 894
 -
 00CBA01E-D002-473A-83FD-995B6DB63A3B.jpeg295 KB · Views: 526
 -
 9BC2174E-3670-440A-8D3C-E5D735C57136.png216.8 KB · Views: 498
 -
 53C16A45-682F-4631-B712-7BAF865959CE.png234.2 KB · Views: 493
 -
 65FFD878-7C6D-4444-89FB-3F6B6A2BC4DF.png262 KB · Views: 528
Last edited: