Rad valve leaking, (very old Mistral)

Joined
27 Mar 2013
Messages
91
Reaction score
1
Location
Tyne and Wear
Country
United Kingdom
Friend has a leaking radiator valve, the radiators and valves are ancient.

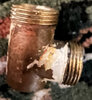
Couldn’t find a drain, so had to manually drain from this valve. Took it off, went and got a new radiator valve, but couldn’t screw it on.

It looks like the threads are different, is this so with a, what looks like, is a Mistral valve which is written on the adjuster?

I put it back on but still leaking. I’ve went on toolstation and found they have “Pegler Mistral 2” is this the same type? Are the threads different from standard rad valves today, as the one I originally got looks thicker threads compared to the one removed?

The connection into the actual radiator is caked and I don’t want to risk trying to remove that, they would have to pay a plumber to do that, and/or replace the whole radiator.

btw I’m not a plumber, just do basic DIY, just helping friend out!

Thanks
 
Sponsored Links
Old 1/2" valve nuts will have different threads from the newer 15mm nuts for sure. The nut and olive would need to be removed (pulled or cut) and the rad tail possibly changed too, depending on whether the new valve uses a 15mm compression tail or a 3/4" union.
 
Old 1/2" valve nuts will have different threads from the newer 15mm nuts for sure. The nut and olive would need to be removed (pulled or cut) and the rad tail possibly changed too, depending on whether the new valve uses a 15mm compression tail or a 3/4" union.
So buying that valve from toolstation it won’t fit still with the original nut? Will the pipe, nut and olive fit from the new standard rad valve?

I could try and cut the nut off both the pipe and radiator I suppose just didn’t want to ideally, and then could use the new standard rad valve.

I won’t try to change the rad tail though as it’s caked and would probably damage the radiator. I’d tell them to get radiator changed as I wouldn’t attempt that.
 
1. The part that screws into the radiator is called a tail.
2. There are two (main) types of tail:
2a. Compression tails. The threaded part screws into the radiator sealed with PTFE tape or similar. The other end is a plain tube, usually chromed brass, 15 mm in diameter. The valve connecting nut is slid onto the tube, then an olive, then the nut is tightened onto the valve, compressing the olive and making a seal. The thread on the valve is usually a male 1/2" BSP thread, which has an outside diameter of a fraction under 20 mm.
2b. Union tails. The smaller threaded end screws into the radiator, as a compression tail. The other (valve) end is a convex conical fitting and between the two is a captive nut with its non-threaded end facing the radiator. The valve has an equivalent concave conical surface, and behind that is threaded 3/4 BSP. The captive nut on the tail fits the thread on the valve and pulls the two parts together. The seal is made by the metal to metal contact of the curved cones, although a little sealant is often used. The outside diameter of a 3/4" BSP thread is a fraction under 26.5 mm.
3. Sounds as if your old valve was a union fitting but the new one you got is a compression fitting. You have two choices:
3a. Remove the existing tail and fit the new valve with its new tail.
3b. Return the new valve and get a replacement with a union fitting.
4. The Pegler valve you referred to is a compression fitting valve. You can get TRVs with union fittings, but they are rare, and quite expensive.
 
Sponsored Links
1. The part that screws into the radiator is called a tail.
2. There are two (main) types of tail:
2a. Compression tails. The threaded part screws into the radiator sealed with PTFE tape or similar. The other end is a plain tube, usually chromed brass, 15 mm in diameter. The valve connecting nut is slid onto the tube, then an olive, then the nut is tightened onto the valve, compressing the olive and making a seal. The thread on the valve is usually a male 1/2" BSP thread, which has an outside diameter of a fraction under 20 mm.
2b. Union tails. The smaller threaded end screws into the radiator, as a compression tail. The other (valve) end is a convex conical fitting and between the two is a captive nut with its non-threaded end facing the radiator. The valve has an equivalent concave conical surface, and behind that is threaded 3/4 BSP. The captive nut on the tail fits the thread on the valve and pulls the two parts together. The seal is made by the metal to metal contact of the curved cones, although a little sealant is often used. The outside diameter of a 3/4" BSP thread is a fraction under 26.5 mm.
3. Sounds as if your old valve was a union fitting but the new one you got is a compression fitting. You have two choices:
3a. Remove the existing tail and fit the new valve with its new tail.
3b. Return the new valve and get a replacement with a union fitting.
4. The Pegler valve you referred to is a compression fitting valve. You can get TRVs with union fittings, but they are rare, and quite expensive.
Thanks for explanation. As I say I’m not a plumber but happy to help people where I can.

I understand what you are saying, if replacing the rad valve fixes it, I’d be happy, this is what I’ve looked at…

https://www.toolstation.com/pegler-mistral-2-trv/p33889

So there is no way the existing nut on the rad tail will fit the above?

The “normal” one I got today wouldn’t screw in as the thread must be different so obviously didn’t force it.

I’m not going to chance removing the rad tail as it’s old and looks caked in, so I’d be worse off, they’d have to get a plumber to do this.

Maybe I could remove the old nut and olive off the rad tail and use a standard rad valve fitting though?

Thanks
 
Do the existing nuts have " prestex" stamped on the underside ?
Pics of the valve and tail would be useful.
 
Do the existing nuts have " prestex" stamped on the underside ?
Pics of the valve and tail would be useful.
Not sure, I’m back there tomorrow to have another go….

Here’s a pic of when the old rad valve was removed, with the top bit (where it’s actually leaking from, the screw in bit), with the threads on that don’t seem to fit the standard rad valve I got today.
 

Attachments

  • 9B2A38AF-96E4-4058-91C4-2139F311C4E7.jpeg
    9B2A38AF-96E4-4058-91C4-2139F311C4E7.jpeg
    567.5 KB · Views: 49
I think some of the Mistral valves are 15mm, so unsure why you can’t get it to fit, so perhaps it is 1/2”? Maybe just remove the nuts and olives and fit new altogether?
 
Just remove the nuts and olives and fit new valves.
That’s what might have to do. How easy do they come off? I’ve read can get an “olive remove tool”, but haven’t got one and won’t get one by tomorrow.

I think some of the Mistral valves are 15mm, so unsure why you can’t get it to fit, so perhaps it is 1/2”? Maybe just remove the nuts and olives and fit new altogether?
It was the threads that it wouldn’t screw into. I presumed they are different as it wouldn’t tighten, yet the old valve did.
 
I'm more concerned about the carpet, it this radiator in a pub?

Andy
? Nope friends house, wrapped a towel around as the leak is small but enough to warrant a fix, as pressure had dropped.

Carpet will dry, it’s best I can do, if can’t fix tomorrow then yes will call a plumber.
 
That’s what might have to do. How easy do they come off? I’ve read can get an “olive remove tool”, but haven’t got one and won’t get one by tomorrow.
You can carefully cut the olive using a junior hacksaw, usually diagonally and split further using a thin flat bladed screwdriver.
 

DIYnot Local

Staff member

If you need to find a tradesperson to get your job done, please try our local search below, or if you are doing it yourself you can find suppliers local to you.

Select the supplier or trade you require, enter your location to begin your search.


Are you a trade or supplier? You can create your listing free at DIYnot Local

 
Sponsored Links
Back
Top