Shower tray trap fitting

Joined
15 Jan 2020
Messages
41
Reaction score
2
Country
United Kingdom
I have a stone resin shower tray, the underside of which is rough, uneven and knobbly (as I imagine most are). Obviously screwing up the lower portion of the trap is not going to make a watertight seal so I'm guessing that I will have to apply some kind of waterproof sealant and then sand it down. What's the best thing to use?

Alan
 
Sponsored Links
Usually the section where the trap is going to sit would have been smoothed down so the waste/trap seal would sit flat and seal easily. Just need to use a good quality silicone to take up the gaps. depending on how ridged/rough it is will determine how much silicone you need to use. The alternative is to sand it flat yourself.
 
Usually the section where the trap is going to sit would have been smoothed down so the waste/trap seal would sit flat and seal easily. Just need to use a good quality silicone to take up the gaps. depending on how ridged/rough it is will determine how much silicone you need to use. The alternative is to sand it flat yourself.

Unfortunately in this case it hasn't been smoothed, and much of it is so knobbly that if I sand it down I would have to take quite a lot of material off. I'll use silicone as you suggest, thanks.

Alan
 
My preferred choice is lsx, however if you really like silicone, try soudal.
The quality of the trap is also important, especially if it's not going to be accessible.
I like mcalpine because they can be cleaned from above.
They cost around £30 but worth it.
Never had a leak on a shower tray using that combination.
 
Sponsored Links
The quality of the trap is also important, especially if it's not going to be accessible.
I like mcalpine because they can be cleaned from above.
They cost around £30 but worth it.
Never had a leak on a shower tray using that combination.

That's good to hear! The trap was supplied with the base and it is one of the McAlpine types. I'm putting it on a plinth with a removable side panel and the trap will be very close to that side so maintenance should be very easy.

Alan
 
Good to hear you're making access. I've had to repair too many showers where there hasn't been access built in and most need to be lifted.

All I would recommend is make sure the base is as strong as you can make it. If it is going onto a wooden subfloor then lift the flooring and dwang the joists where the plinth will sit or at least make sure the main plinth supports sit at right angles across the joists, if there's no joists at the edges where the shower will sit, then that's where the dwangs will be important. Don't use anything less than 40mm thick CLS and an 18mm/OSB3 WBP top and then tank the space.

A good quality silicone - my choice is DowCorning - will be all you'll need IMO and always use the best quality fittings, cant get much better than the McAlpine that you were supplied.
 
Good to hear you're making access. I've had to repair too many showers where there hasn't been access built in and most need to be lifted.

I'm trying to make it as easy as possible for anyone who follows me!

All I would recommend is make sure the base is as strong as you can make it. If it is going onto a wooden subfloor then lift the flooring and dwang the joists where the plinth will sit or at least make sure the main plinth supports sit at right angles across the joists, if there's no joists at the edges where the shower will sit, then that's where the dwangs will be important. Don't use anything less than 40mm thick CLS and an 18mm/OSB3 WBP top and then tank the space.

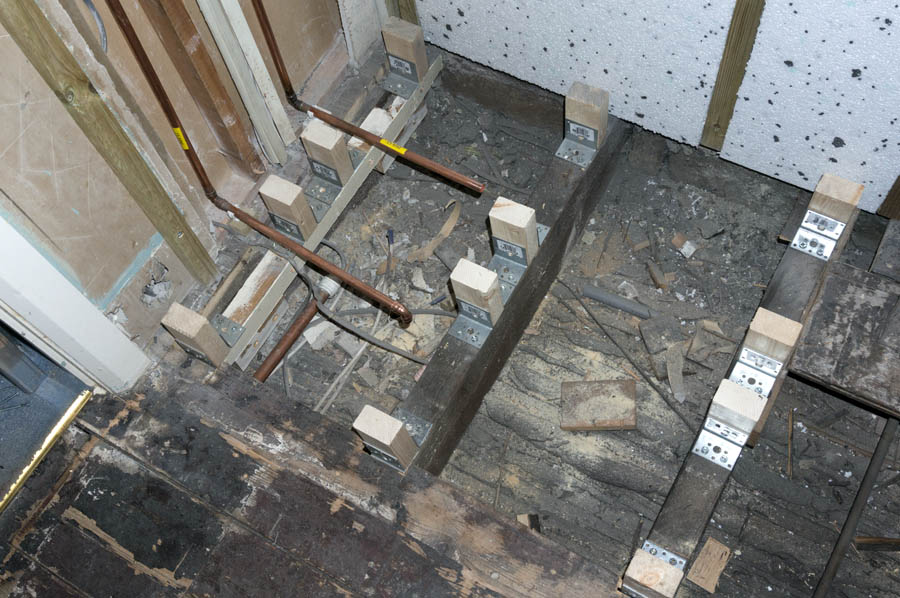
This is what I've done so far. Do you think I need dwangs between these support pillars? The brackets are very rigid. The base will be 18mm P5 grade chipboard. I could only find it in 600mm width and the shower is 700mm so I'm doing it in two pieces T&G'd in the centre, hence the double row of pillars down the middle. Aquadry panels on the sides.

hutch1809.jpg


Alan
 
Is this an upstairs bathroom? If so then single lengths of 40mm wide >90mm CLS at right angles sitting on the joists, then complete the rectangle on the left and right sides running on top of the joists with the centre piece would be inherently more stable. I see what you are trying to do but by doing that you are creating point loading on the joist rather than spreading the weight across the joists.

I wouldn't use a P5 chipboard top tbh unless it was going to be tanked. Even then though I'd still use WBP Ply (or OSB3 board if on a budget).
 
I wouldn't use a P5 chipboard top tbh unless it was going to be tanked. Even then though I'd still use WBP Ply (or OSB3 board if on a budget).

This was what the MIs said to use, with a mortar bed on top. You suggested earlier in the thread that I should tank the area anyway so I was going to look at that.

Alan
 
Just my professional opinion ... I would never use P5. When I'm installing a shower in a bathroom I will alway recommend replacing any P5 flooring anywhere in the room especially where it may get wet, it really is a recipe for disaster.

All the major bathroom reworks I have done over the last few years have involved replacing soaked and rotten P5 flooring somewhere. It just isn't good stuff to use where water may get to it.
 

DIYnot Local

Staff member

If you need to find a tradesperson to get your job done, please try our local search below, or if you are doing it yourself you can find suppliers local to you.

Select the supplier or trade you require, enter your location to begin your search.


Are you a trade or supplier? You can create your listing free at DIYnot Local

 
Sponsored Links
Back
Top