Wood Door Repair Strip to Middle Rail

Joined
21 Dec 2011
Messages
166
Reaction score
7
Location
Lancashire
Country
United Kingdom
Hi,

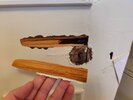
The other half's dad came to stay, didn't turn the bathroom handle - thought he was locked in and pulled the entire doorknob off.

Though to be fair it was only held on with 1 screw.

It's taken a strip of wood off the middle rail, right hand side is 110mm and left hand side 250mm from edge of door.

All of my clamps have too small a throat to reach, how do I repair this please? Bearing in mind I'm not a professional carpenter!

Cheers,
chaoticj
 

Attachments

  • IMG20220614185059.jpg
    IMG20220614185059.jpg
    184.8 KB · Views: 47
Sponsored Links
1. Remove the door from the frame, cut a caul the same width as the door out of something like 3 x 2in CLS, cut two pressure pads about the same size as the repair out of some scrap sheet material or 2 x 1 in softwood then glue the repair piece in. One pressure pad goes over the repair, the other goes at the other edge of the door on the same side in line with the first piece (hold in place with gaffer tape temporarily). The caul is then placed on top of the pads and clamped at both ends. With 3 x 2in CLS and 18mm plywood on a 35mm thick door this will require two 150mm/6in clamps

2. (Note: Requires filled repair afterwards) Cut two pieces of scrap plywood or chipboard, MDF, etc - one the size of the broken out piece, the other the same length, but 50 to 75mm wider. Drill and countersink the larger piece to take 4 to 6 screws in the overhang, about 20 to 30mm in from the edge. Glue the piece back in, apply the smaller pad and use masking tape to hold it in place. Apply the larger piece with 6 screws (this acts as a clamp) and leave to set. Once the glue has set remove, clean-up, fill holes (ideally 2-pack filler) and machine sand

3. Glue the piece back in and pin it in place by driving panel pins in through the piece (the heads of the panel pins should be left 6 to 10mm proud). Once the glue has set remove the pins using a pair of pincers. Then fill the holes, etc as above

4. Glue the piece back in and pin it in place using a second fix nail gun. Once the glue has set punch the pin heads under with a hammer and nail set. Then fill the holes, etc as above

Take your pick, but do use a waterproof glue (such as Everbuild D4 or even Gorilla glue). The techniques above allow you to use a polyurethane (PU) glue which expands. Ideally you need a sharp hand (block) plane to flush the surface with a sander to finish it off
 
Last edited by a moderator:

DIYnot Local

Staff member

If you need to find a tradesperson to get your job done, please try our local search below, or if you are doing it yourself you can find suppliers local to you.

Select the supplier or trade you require, enter your location to begin your search.


Are you a trade or supplier? You can create your listing free at DIYnot Local

 
Sponsored Links
Back
Top