Texecom Premier 24

doing my eyes in cant see the colour of the screws that well.


Its not right that much I can see. 4k7 would be across the two silver screws indicating either end of the reed, the 2k2 froma silver to a spare brass, connect the wires from the panel to silver at one end and the brass at the other that the 2k2 resistor is connected to.


panel terminal--------O---4k7----O------2k2----O----------panel terminal
 
Sponsored Links
Cheers for all that help secureiam - very much appreciated.

Just to update thread, the French door contact was wired incorrectly - now rectified.
With the help of secureiam, the system is pretty much programmed and good to go.
I'll need a bit of advice re the Odyssey 3 bellbox - possibly over the weekend. I initially thought this was good to go (and I wouldn't need to go back to the box outside).

There was another issue I was speaking to secureiam about. The back door contact was alarming when open (system unarmed) and showing 65k.
Back and forth to the wiring...scratching of head - everything looked fine.
Turns out the resistor (4k7) had split into two inside the contact!

I'm going to replace that now.

Currently in engineers mode...I've forgotten how to place it back in 'normal' operation (all inside house).

Also - when going to bed at night, this has been set so only the downstairs alarms (and the only guard upstairs won't kick in) but again, I'm not entirely sure how to set this as I retreat to bed...?!

Cheers!
 
it should automatically log you out.

t it was seeing the 2k2 closed and going into tamper >65k, so there was a problem with the 4k7/ alarm, needed a look, split in two at least you have found the problem.
 
Hi Northbeach

I had a post about a couple of pages back about wiring my Odyssey 3E and how to commission, not sure if that helps but here's the link to that specific post:
//www.diynot.com/forums/alarms-cctv-telephones/texecom-premier-24.358037/page-8#3255356


Regarding the Part alarm for downstairs only, I found the following was the best way to program and use:
- firstly, how are you splitting your house up, is it just upstairs and downstairs?
- If it is just upstairs and downstairs, I found that there is no need to split between Area A/B and the Area Arm suites, and use Part Arm function instead. To do that:
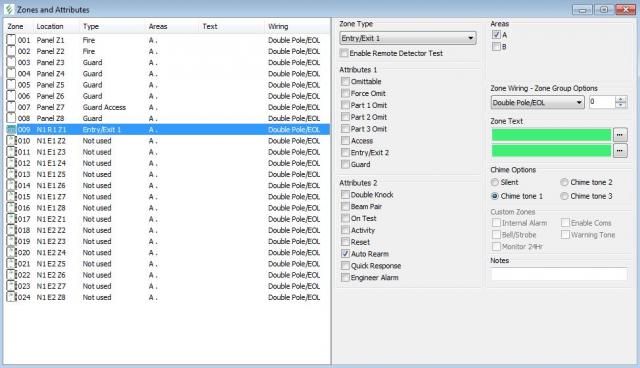
- Set all Zones to Part A
- For the zones which are upstairs, set the Attributes 1 setting for Part 1 Omit (if using wintex, tick the Part 1 omit check box)
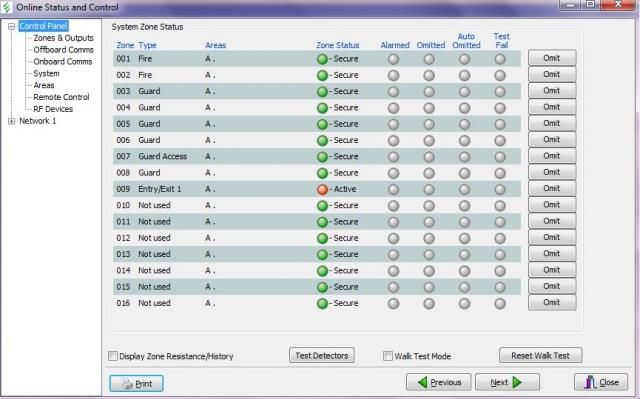
- I have a PIR downstairs which can see the keypad, so if I part arm the system and need to come downstairs to turn it off, I need it to trigger entry/exit and not set the alarm off immediately to give me time to disarm. To do that, the PIR is set as Zone Type "Guard Access", with the attributes "Access" and "Entry/Exit2" selected. This ensures that the PIR will trigger alarm if someone passes it in full arm mode, will not trigger alarm if the front door is opened, and will be used as entry/exit if you walk past it in Part Arm mode.

- In Areas Options (Section Areas, Tab Options in Wintex), set Option 30 to enable Part Arm for Area A, and leave Area B off
- In Area Arm Suites, do not put any Areas in any of the suites (I also put the Part Text to "not used ignore", so if i ever see that on the keypad I know I am in the wrong section.

- Keypad is set to also be a part of Area A

EDIT: - In Global, System Texts, I have the Part Arm 1 text set to "Downstairs", so that when I go to set the Part Arm, the first option I am presented is Downstairs only, which will arm all Zones in Area A apart from the ones which had "Part 1 Omit" set in the Zones section above.

With that all set, to part arm I use the following process:
- Enter code/use the proxy tag
- Panel welcomes me back (I love that!), and asks me if i want to fully arm system
- You can either press down to select part arm and press yes, or press the Part button to immediately go into the Part Arm selection
- System asks which part arm i want to use, as the Downstairs is the first part arm (Part Arm 1), i want that one, you can either press yes or present the proxy tag again

Part Arm procedure begins!
You can also set the Part Arm to be Immediate and Silent in Area options (Options 01 and 02), however I dont use them at the moment (I don't have any young kids who could be woken up by it, and I prefer the beeps to know the alarm sets)

hope this helps
desig
 
Sponsored Links
Many thanks Desig - and cheers for that link.
To be honest, I'd thought merely by wiring up the Odyssey (around a year a go!) that would be the end of it until the alarm went live (at least taking the bell and power wires out whilst it was all being tested).
I had to borrow a ladder off a friend as my own ladder simply doesn't reach as high (anyone know of any ladder sales on here, please let me know...I digress!).
So, it's going to take a bit of organising to sort that (but that's the final part so not too concerned at the moment).

Secureiam kindly ran through this with me last night...a fair bit to take in/crash course but happy enough later on in the evening to work out what he'd advised.

The latter part of your post above is really helpful too - cements what I was doing last night.
Couple of issues (possibly something I've inadvertently carried out) which I need a bit of help on.
One was an auxiliary tamper flashing (not the panel lid tamper - that's sorted...turns out I'd placed the Pyronix Alert Speaker front on the wrong way round (easily done when taking on and off) and thus the tamper contact wasn't being depressed. Sorted now.
The other issue I'll address below:

I've attached two screen shots from Wintex and I'll just explain the set up briefly.

Zone 1 : Smoke 1

Zone 2 : Smoke 2

Zone 3 : Upstairs Landing PIR

Zone 4 : Back Door Contact *OMIT

Zone 5 : French Door Contact *OMIT

Zone 6 : Dining Room PIR *OMIT

Zone 7 : Downstairs Hall PIR (Set as Entry/Exit 2) *OMIT

Zone 8 : Living Room PIR *OMIT

Zone 9 (keypad) : Front Door Contact (set as Entry/Exit)

* As you can see, a few of these zones are set as OMIT (ticked in WINTEX) - not quite sure why as from advice above I should only OMIT the one upstairs?
Also, Zone 7 Downstairs Hall PIR (above keypad) is set as Guard Access.
Struggling with the concept a little but is it a case of 'activating the alarm but giving you enough to time to disarm it as you walk downstairs in the morning? Same as the front door entry (I'm probably over thinking it!!).

It might be clearer to see in the screen shots.

The other issue is that Zone 9 (Front door contact) is set as Active (door closed/open doesn't make any difference).
If I part Arm 'downstairs' then Zone 9 beeps and indicates 'ACTIVE'.

Pics:
Online Status:

onlinestatus.jpg


Zones and attributes:

zonesandattributes.jpg


Quite happily sending and receiving to the panel from WINTEX (have sent date/time updates and renamed users etc).
Would also like to add chime functions to doors when we're at home (just the door contacts ones...obviously!).

Ok - many thanks...think I'm nearly there!
 
Hi Northbeach


* As you can see, a few of these zones are set as OMIT (ticked in WINTEX) - not quite sure why as from advice above I should only OMIT the one upstairs?

The "Part X Omit" attribute is used to select if a Zone should NOT be armed during a Part Arm. The Premier Elite 24 can handle 3 separate Part Arm set ups (though if you are like me you will only use the Part 1 and ignore Part 2 and 3)
So, if you wanted Part Arm 1 to only arm downstairs, then the Part 1 Omit should be ticked for any zone that is upstairs, and the downstairs zones should not have any Part X Omit attributes ticked.

Also, be careful not to confuse the "Part X Omit" attributes with the "Omittable" attribute.

The Omittable Attribute (first Zone attribute) is used to control whether a Zone can be manually Omitted when arming the system. If you do not want any Zones to be omitted when you wish to arm the system, then you can have this attribute unset.


Also, Zone 7 Downstairs Hall PIR (above keypad) is set as Guard Access.
Struggling with the concept a little but is it a case of 'activating the alarm but giving you enough to time to disarm it as you walk downstairs in the morning? Same as the front door entry (I'm probably over thinking it!!).

If the Downstairs Hall PIR can see either of the front door, or the keypad then you want this Zone to be in "Guard Access" Zone Type. This ensure that when you open the front door and enter the house, the Front Door will make the panel start the entry/exit timer, but the Hall PIR detecting you will not trigger an alarm condition. If the PIR senses someone when the system is FULLY armed and not in entry/exit mode, then it works the same as Guard PIR and will trigger an alarm.
When the System is PART armed, the Guard Access PIR should start the entry mode timer, so that you have enough time to disarm the system.
However, I found that my Guard Access PIR did not do this specifically unless the following Zone attributes were also set

The "Access" and "entry/Exit 2" attributes do the following:
- Access - Similar to Guard Access Zone type, if the sensor detects a person during exit, it will not cause a fault for the PIR as still active. Likewise, in entry mode if the sensor detects a person and this attribute is set it does not cause an alarm condition. This is best used only on access routes between an entry/exit point, and the keypad.

-Entry/Exit 2 - when the system is PART Armed, a sensor with this attribute set will start the entry timer instead of going straight into alarm. So if I PART Arm the downstairs and walk down in the morning, this starts the timer giving me 30 seconds (or whatever configured) to turn off the alarm


The other issue is that Zone 9 (Front door contact) is set as Active (door closed/open doesn't make any difference).
If I part Arm 'downstairs' then Zone 9 beeps and indicates 'ACTIVE'.

Firstly, I have seen/been told that the main entry/exit point should be Zone 1 - however I dont know if this is "best practise" or if any control panels are coded to expect this. the more experienced users will know the answer to this.

Forgetting that for now, does the zone also remain active when you are in engineer mode and the system is disarmed?


My door contacts are configured in the simple way as "Normally Closed", with the tamper wires under a brass contact and no resistor,so i'm not sure exactly what needs to be checked for a Door Contact in Double Pole/EOL with resistors inside. However, I would check the following:

- Are the door contact parts too far apart? If the contact is unscrewed and held up right against the part wired in, does that make a difference?
- using the keypad in engineer mode, what does it report when you check the zone status for zone 9? what is the resistance level shown as? A resistance of >65k means something is wrong either with wiring or broken resistors.


That's all I can offer for now
 
Hi there - all understood.
Yes - aware of omittable and omit differences (had a play around with them during a couple of tests).

Will need to check zone status in engineer code (code twice, but then which option for zone check - key down till I see option?).

Unfortunately if there is an issue with entry exit 1 being on Zone 1 then it's too late -this is wired via the spare terminal in the keypad rather than the zones on the panel :eek:
I'm hoping that's not an issue!

I've just noticed actually in Wintex that the door is showing a resistance of 65k, so I guess there is another wiring issue.
I'll take a look at that first and report back.

BTW - I checked the smoke alarms and they alarming on smoke (just need to reset them....if I can recall how).

Many thanks.
 
In Keypad options you can say what Keypad Zone 1 is mapped to in the control panel. you must currently have it set to zone 9 for the front door
however, not sure if changing it to zone 1 means you must disconnect what is on zone 1. do you have an expander?


I also didnt realise you can check resistance via Wintex. Is that the "Display Zone resistance/history" check box you had in one of your screenshots showing zone status?
 
keypad 1 is indeed set up to zone 9.

"I also didn't realise you can check resistance via Wintex. Is that the "Display Zone resistance/history" check box you had in one of your screenshots showing zone status?"

Yes that's the one.
I've just taken the contact off and all seems ok - but I've re done the wiring and resistors look fine.
Would having the colours the wrong way round in the Keypad zone make any difference?
otherwise I cannot see why there is a resistance of 65k...highly frustrating!

Many thanks.
 
Er, of course...changing the tamper wires does make a difference! :oops:

If the wiring and resistors are fine (I could try new ones, probably tomorrow now) what else could this be? Constantly shown as active and with a 65k resistance.

Cheers.
 
It is most likely resistors/wiring causing this.
When one of my PIRs was reporting tamper and resistance >65k, it was because I had forgotten to set the jumpers for alarm and tamper resistance (were meant to be 2k2 and 4k7 respectvively)

Between the last picture you posted and the
info from secureiam, I didn't see an updated pic of how you have wired it, so just want to make sure you have it as follows:

One wire to the first silver screw (lets say the blue wire)
A 4k7 resistor from that same first silver screw to the other silver screw
A 2k2 resistor starting from the second silver screw to one of the brass screws
The second (yellow) wire to the brass screw with the 2k2 connection.

Blue wire goes to the Left A connection for the keypad zone
Yellow wire goes to the right T connection for the keypad zone

Or finally, the alarm cable could be damaged. Have you tested the cores themselves to see if you get voltage/resistance between them?
 
Hi desig.

It's now showing 'tamper' zone 9 (door contact) on both the keypad and wintex diagnostics. It's also showing a resistance of 100k!!

Wiring resistors is ok (same as other door contacts and as you've described) but I'm wondering if I've got the wires in the contact the wrong way round (pretty sure I used the blue to 2k2 on the French door yesterday whereas on this contact I've used blue to 4k7. Sound like the culprit?
Won't be able to check until this evening, but I'll give that a go first. Failing that I'll try new resistors and then maybe try spare cores not being used (switching them in the keypad to).

I'll report back later.

Many thanks!!
 
Your using eol and you have the two wires going to the outer 2 terminals of zone 1 (zone 9).

100k never seen that before usually <65k

I would check the wiring first.

wires flow in a circuit and the resistance across the circuit is measured.

flow takes the easiest route, so 4k7 is easier than the break of greater than 65k, because that resistor was broken in half it could only see 65K, when shut it showed 2k2 because the alarm was closed (non resistance/ very minimal resistance) and the 2k2 at th eol which it had to flow through.

Yes - very odd.
Went back down to 65k last night, but showing as tamper in zone 9 on the keypad menu. I haven't had chance to check yet today, but on Wintex it was initially showing Active on Zone 9 (resistance at 65k).
Does indeed look like a wiring issue rather than anything in the programming.
However, I checked the other door contact (back door) and the wiring is identical and as described here. I will try a different coloured pair of wires to see if that rectifies it...if there's a break in the cable, then that's no so good as the cable is buried and plastered/decorated over :eek:

Possible there's a fault in the contact itself?

Many thanks - will report back.
 
Switched the 'A' in the RPK Zone 1 from yellow to black and 'T' to Green.
Switched them over in the Door Contact 'Black' on the 2k2 and Green on the 4K7.
'Tamper' on Zone 9 alert on Keypad/Wintex and showing 100k again!!!???

So that's the blue and yellow wires (possibly damaged) switched over to Black and Green but I'm still getting a tamper and 100k resistance alert :(

The contact is almost mm spot on next to the contact when the door is closed.

Any ideas folks? Try in Zone 2 of the RKP (and alter in Wintex)?

Cheers.

EDIT - Keypad states 65k on screen and this:

Zone 9 N1, R1, 1
 

DIYnot Local

Staff member

If you need to find a tradesperson to get your job done, please try our local search below, or if you are doing it yourself you can find suppliers local to you.

Select the supplier or trade you require, enter your location to begin your search.


Are you a trade or supplier? You can create your listing free at DIYnot Local

 
Sponsored Links
Back
Top