EDIT - please don't be put off by the
 s - the links work, it's just the thumbnails that ImageShack have managed to lose....
Comment/questions/suggestions...
Installing some outside lights - the cable will exit the house wall and go into an enclosure containing an RCD (house circuit is non-RCD) a couple of sockets, and B16/B6 MCBs for the sockets and the lights:

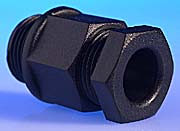
Fitting glands to trouser box:
First of two boxes being installed:
Closeup of a cable before the gland was assembled. When pushed together as the gland was tightened the armour did cover the cone:
Done. Before re-making when I found I'd not got long enough cores to get into the choc-block OK.. 
Grey sleeved blue used for neutral, black sleeved G/Y for cpc.
Closeup of 2nd box:
Choc-block was a bit of a squash in #1, so I used crimps in #2. As the cores are stranded I found that twisting 2 or 3 and then crimping gave excellent results - did a few test joints and tried very hard to pull them apart - wouldn't budge. When I open up #1 I'll see if the cables look stressed - I might replace the choc-block with crimps.
Photo of the internals for the enclosure:
Top right is the RCD/MCBs in a unit with a 16A socket.
Top left is a JB with a 4-core cable to run to the photo-switch - L/N/E/Switched Live.
The incoming supply will enter the mini-CU through the gland at the bottom, the outgoing cable for the lights will exit the JB through the gland in the bottom.
The G/Y cable from the Masterseal enclosure runs from the earth block in the CU to the earth stud of the main enclosure.
13A socket:
Mini CU w. 16A socket:
The cable supplying the MCBs is continuous - I stripped a section and bent it double to go into the yellow crimp. All the crimps are spades, they fit really well under the busbar screws of the RCD/MCBs.
Closeup of the JB:
CU & JB (a bit blurred, I'm afraid):
Photoswitch on the outside of the enclosure - the closeup got a bit too much flash, unfortunately:
Armour continuity connections:

All done, ready to fix to the wall and receive incoming/outgoing SWA cables:
Nothing is yet unchangeable, so if anybody spots anything horrific, let me know.
Once I've done the dead tests I'll be filling those trouser boxes with waterproofing compound.

Comment/questions/suggestions...
Installing some outside lights - the cable will exit the house wall and go into an enclosure containing an RCD (house circuit is non-RCD) a couple of sockets, and B16/B6 MCBs for the sockets and the lights:

Fitting glands to trouser box:

First of two boxes being installed:

Closeup of a cable before the gland was assembled. When pushed together as the gland was tightened the armour did cover the cone:

Done. Before re-making when I found I'd not got long enough cores to get into the choc-block OK..

Grey sleeved blue used for neutral, black sleeved G/Y for cpc.
Closeup of 2nd box:

Choc-block was a bit of a squash in #1, so I used crimps in #2. As the cores are stranded I found that twisting 2 or 3 and then crimping gave excellent results - did a few test joints and tried very hard to pull them apart - wouldn't budge. When I open up #1 I'll see if the cables look stressed - I might replace the choc-block with crimps.
Photo of the internals for the enclosure:

Top right is the RCD/MCBs in a unit with a 16A socket.
Top left is a JB with a 4-core cable to run to the photo-switch - L/N/E/Switched Live.
The incoming supply will enter the mini-CU through the gland at the bottom, the outgoing cable for the lights will exit the JB through the gland in the bottom.
The G/Y cable from the Masterseal enclosure runs from the earth block in the CU to the earth stud of the main enclosure.
13A socket:

Mini CU w. 16A socket:

The cable supplying the MCBs is continuous - I stripped a section and bent it double to go into the yellow crimp. All the crimps are spades, they fit really well under the busbar screws of the RCD/MCBs.
Closeup of the JB:

CU & JB (a bit blurred, I'm afraid):

Photoswitch on the outside of the enclosure - the closeup got a bit too much flash, unfortunately:

Armour continuity connections:


All done, ready to fix to the wall and receive incoming/outgoing SWA cables:

Nothing is yet unchangeable, so if anybody spots anything horrific, let me know.
Once I've done the dead tests I'll be filling those trouser boxes with waterproofing compound.