
A homeowner has lifted a failing patio at the back of the house and found it had been laid over timber decking with a bit of concrete near the wall – no wonder it was moving. Now the ground is opened up, they can see three ventilation channels under the door threshold that were previously buried under the old build-up, with no proper air bricks fitted. They want a new patio flush with the kitchen floor for a level threshold, but the rest of the garden sits higher than the DPC. The question is how to put in a proper patio at that level without choking off the sub-floor ventilation.
This is a common one in UK houses. Before you start spending money, do a couple of simple checks so you're fixing the cause, not the symptom. I'll run through what's likely happening, what you can safely check yourself, and what a proper fix looks like – plus the usual bodges that don't last.
What's actually going on under there
Suspended timber floors need air moving through the void underneath. Without it, moisture builds up in the joists and floorboards, and over time you get rot, musty smells, and springy floors. Air bricks are how that air gets in and out – they need a clear path to open air, and paving or soil needs to sit below them so water can't wash straight in.
In this case the previous lot buried the ventilation openings under decking and tiles. There's been no proper airflow for who knows how long. The reason there's no damp showing yet is probably a mix of luck, the void being reasonably dry, and the timber not having reached the point where it lets go. Just because you can't see a problem doesn't mean the floor structure isn't slowly taking on moisture. Water gets in, then it shows up somewhere else, often years later when a joist end crumbles.
The other issue is levels. You want the patio flush with the kitchen floor for a nice threshold, but the DPC and the air bricks sit low on the wall. Paving hard up against the wall at floor level will bridge the DPC and block the vents. Both are bad news.
Simple checks first
Before you decide on a build-up, get a proper look at what you're dealing with:
- Measure from the internal finished floor down to the top of the DPC (usually a black plastic strip in the mortar bed, two courses up from the ground typically). You need paving to finish at least 150mm below the DPC, ideally more.
- Find where the vent openings actually are. Are they proper air brick openings through to the void, or just gaps in the brickwork? Shine a torch in – can you see the sub-floor void, joists, or just rubble?
- Check the state of the joist ends nearest the wall. Push a screwdriver gently into any exposed timber. If it sinks in, you've got rot starting and that needs sorting before you close anything up.
- Look at the ground levels around the rest of the garden. How much higher is it? Is there a fall away from the house, or does everything drain towards it?
- Check inside – lift a floorboard near the external wall if you can. Have a sniff and a feel. Damp, musty, or cold and dry? That tells you a lot about whether ventilation has been failing quietly.
If the joist ends are soft, stop and deal with that first. No point putting a lovely new patio down over a rotting floor.
The proper fix – good, better, best
You've basically got three sensible routes. All of them keep the air bricks doing their job.
Good – step down to the patio
The simplest and cheapest option is to accept that the patio needs to sit low enough to keep the air bricks clear, and put a step down from the kitchen door. Not what you asked for, I know, but it's the most foolproof. The garden being higher isn't really the issue – you're only stepping down from the door threshold, then the patio can rise or the garden can be retained separately.
- Patio finished level a good 150mm below DPC and below the air brick openings
- Fall of about 1 in 60 away from the house
- Proper air bricks fitted into the openings with telescopic sleeves through any render or facing
Longevity: excellent. No clever engineering to go wrong.
Better – drainage channel and duct extensions
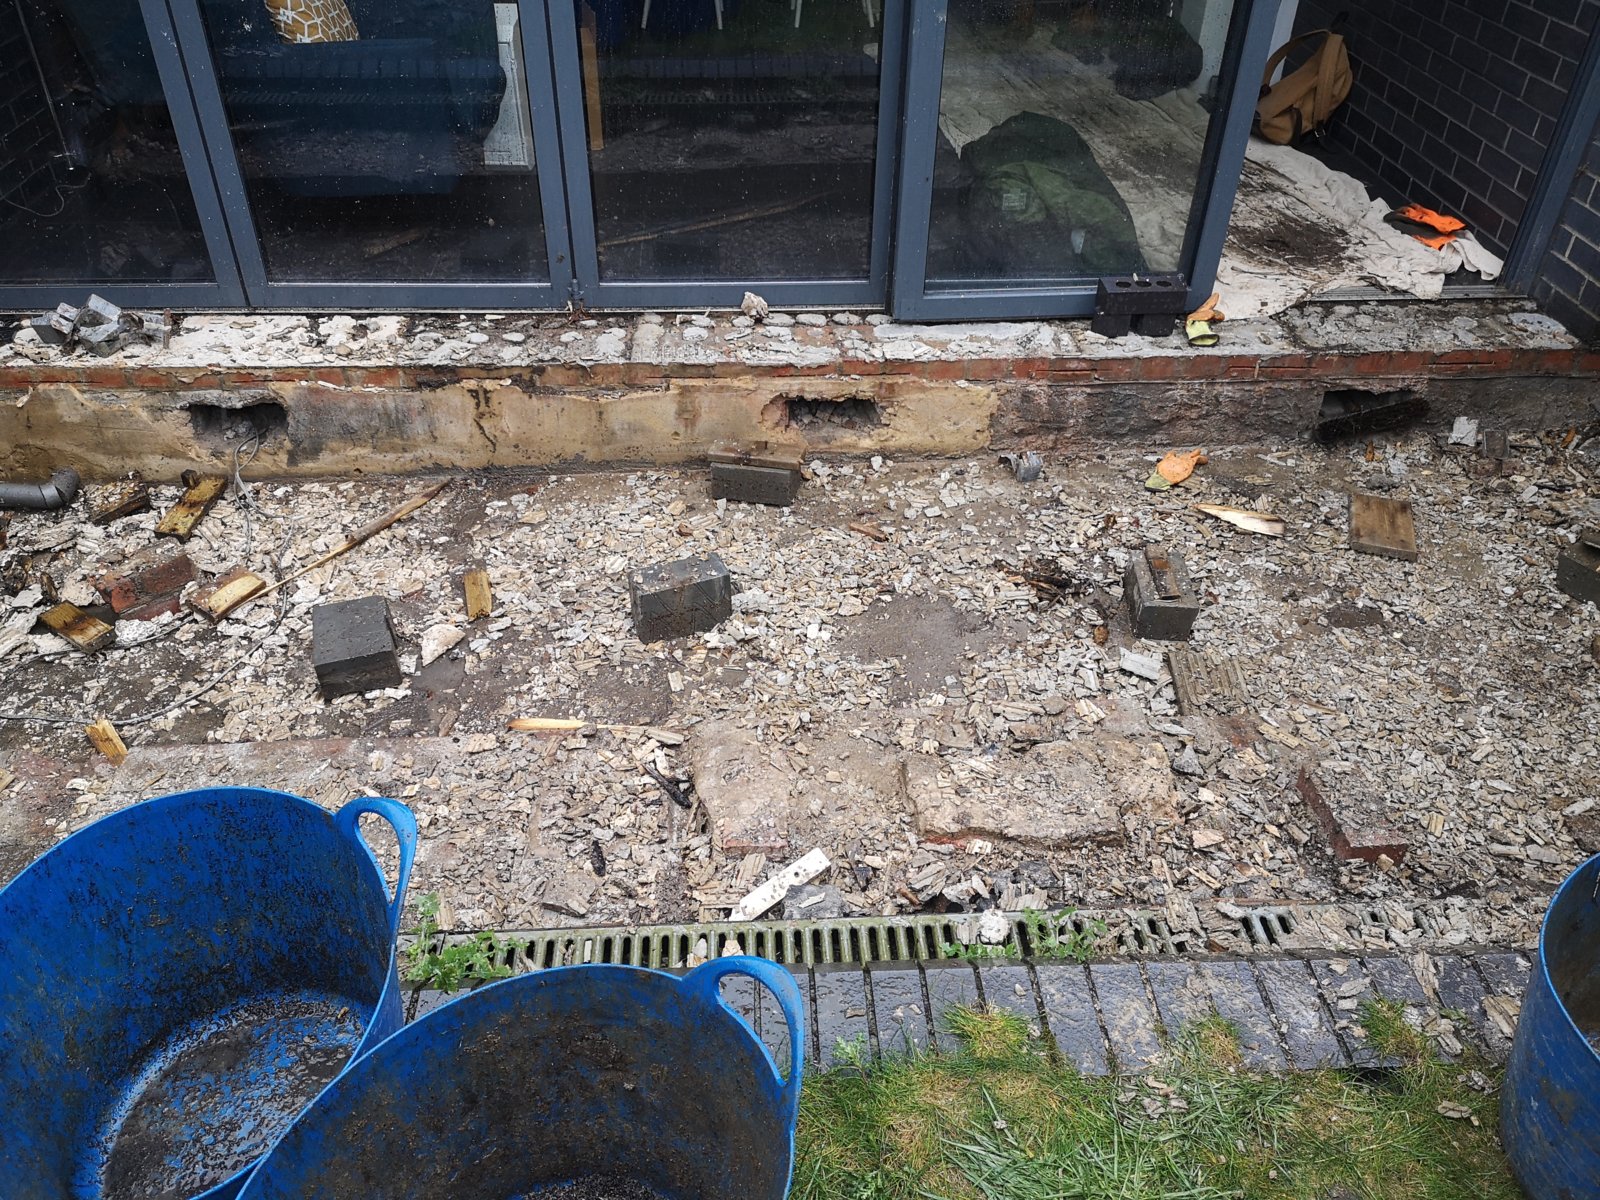
If you really want the patio close to threshold level, you can extend the ventilation out and up using ducting, similar to the way builders duct air bricks through a new extension slab. You run a rigid duct (soil pipe or purpose-made periscope vent) from each existing opening, out under the paving, and terminate it somewhere it can breathe – either up through the patio in a discreet spot, into a retaining wall face, or into the side of a deep drainage channel that sits along the house.
The drainage channel (aco-type) does two jobs: it stops surface water from running towards the door and threshold, and it gives you somewhere to terminate the vents above patio level. You need to be careful the channel doesn't overflow into the vent openings, so oversize it and make sure it drains properly to a soakaway or gully.
- Cross-sectional area of the duct must match or exceed the air brick opening. Don't neck it down.
- Runs should be as short and straight as possible, with a slight fall away from the house so any condensation drains out, not in.
- Use rodding access if the run is long, so you can clear it.
- Terminate high enough that splashing and debris won't block it.
Longevity: good if detailed properly. The risk is blockages over the years, so accessible terminations matter.
Best – concrete sub-base with paving on pedestals
The neatest solution if you want that flush threshold is a concrete slab or firm sub-base laid low, below DPC and air brick level, with the finished paving sitting on adjustable pedestals above it. That leaves a ventilated void under the patio itself, and the air bricks vent freely into that void, which then breathes out around the edges of the paved area.
This is essentially how balconies and roof terraces are done. It gives you a level threshold, keeps the DPC and vents clear, and the paving lifts out for access. It costs more, and the pedestals need decent quality porcelain slabs to work well, but done right it's the tidiest answer to your exact problem.
- Slab or sub-base falls away from the house
- Perimeter left open (or grilled) so air can escape from under the paving
- Air bricks vent into the void, not into a sealed box
Bodges to steer clear of
- Paving straight up to the wall at floor level with no vents. Bridges the DPC, blocks the void, guaranteed damp and rot in time.
- Flexi hose or corrugated pipe as a vent duct. Collapses, sags, holds water, blocks up.
- Grille set flush in the paving directly over a duct with no fall. Fills with grit and water within a season.
- Slapping a bit of mesh over the openings and paving over the top. Same as no vent at all once it silts up.
When to bring someone in
If you find soft joist ends or evidence the sub-floor has been damp for a long time, get a builder or damp specialist to look before you close it up. If you're altering the door threshold itself to get flush access, that can involve lintel and DPC detailing that's worth getting right first time. Structural work around openings isn't something to eyeball.
Reality check
Whichever route you pick, the prep is what makes it last. Get the levels right on paper before you order a single slab. Expect the job to take longer than a straight patio because of the ducting or pedestal detailing. Keep the air brick openings covered with something breathable during the work so you don't fill the void with mortar droppings and grit. That's a nightmare to clear later.
If it were my house, I'd go with the pedestal option for a flush threshold, or accept a single step down and do a proper traditional patio. The ducting route works, but it's the one most likely to cause head-scratching in ten years' time when something blocks up and no one remembers where the vents run.